They are classified bythe way their resistance responds to temperature changes. Now, in the same Tool menu, set the port that you have already observed in the Devices and Printers. Well, given its an Arduino-driven thermometer we should be able to take the reading. dht11 rtc i2c thermometer ds1307 16x2 genstr Thermistors are variable resistors that change their resistance with temperature.
Well I found it today and was trying to figure out how the heck I had it wired up, did a search and took me back to this article. It made things quite easy and I have it up and running again. LCD.print(T); // move cursor to
The output voltage can be easily used to tell the temperature in Celcius. Make sure that you install 1.6.7 or higher, otherwise this Instructable will not work! I may actually build a circuit to see if this works. We seem to be having a lot of weather recently I dont know if youve noticed so this feels quite timely. Electronics Weekly is owned byMetropolis International Group Limited, a member of the Metropolis Group; you can view our privacy and cookies policy here. Created by Mirko Pavleski, the room comfort thermometer uses LEDs to indicate its reading. hi quality content. float logR2, R2, T; Note that you cannot connect your aditional thermistors to the same voltage supply unless you change the mathematical equation as you will change the resistance of the circuit each time you add a thermistor. By Alun Williams Hi, those resistors set the lcds backlight brightness and contrast.
6th May 2021, How cool is this? #include 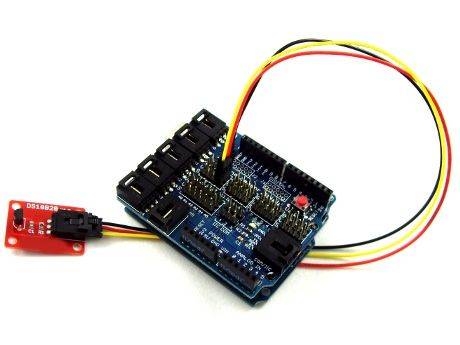
I have noticed you dont monetize your website, dont waste your traffic, I have just made it and is working very well and very fast. Also, you could use this thermistor to take body temperature from the armpit, which is pretty close to the actual body temperature. So, let us get started to gather further information to start the project.
But that said, I have seen some thermistors that have the leads insulated with plastic so those could be used in aqueous environments. For security, use of Google's reCAPTCHA service is required which is subject to the Google Privacy Policy and Terms of Use. When this analog data is converted into digital form, it is directly interpreted as the temperature in degree Celcius. I need help. Just tried the temp sensor with LCD. T> 5 || T<60; NTC thermistors aremade from a semiconducting material (such as a metal oxide or ceramic) thats been heated and compressed to form a temperature sensitive conducting material. In this article, Ill explain how thermistors work, then Ill show you how to set up a basic thermistor circuit with an Arduino that will output temperature readings to the serial monitor or to an LCD. if hello, how much did this project cost you?
Measure thermistors resistance with a multimeter and choose a resistor to match. set the variable T as an int instead of a float. Finally, a good quality video, and no BS waste of time, on Arduino setup and programming. may I know which resistors you used ?? This Arduino-powered thermometer uses LEDs to indicate room temperature: https://t.co/4zYYxbmuio pic.twitter.com/kWnwNjFZPC. Any ideas for the new circuit? change the thermometer value with the shield buttons .
 int ThermistorPin = 0; Instead, it should be R2 = (Vo/(Vi-Vo))*R1 = R2, what is c1,c2 and c3 and how do u calculate them, the code works perfectly for arduino, but it does not gives me the goods values woth a ESP8266 :'(. Ive seen your Videos on Youtube and came to your website.
In the first code in the fifth line, here: Temp = log(10000.0*((1024.0/RawADC-1))); I dont understand why we have to use RawADC-1? Error compiling: undifined reference to log can anyone assist me? If we make R1 the unknown, then we end up with R1 = R2 * Vout / (Vin Vout).
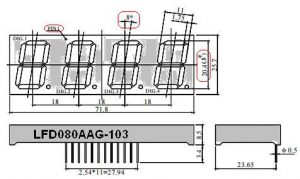
The parts used in this project can be found at SunFounder, the number one source for Raspberry Pi and Arduino starter kits and many more robotics and DIY electronics modules and accessories. Required fields are marked *. 3-in-1-Temperature-Sensor-Shield-For-Arduino-Nano.pdf, JLCPCB - Only $2 for PCB Prototype (Any Color), Programmable Resolution 1-Wire Digital Thermometer, Temperature Range -20 to 120 Degrees Centigrade, Output Resolution 0.14 Degrees Centigrade, SPI Interface Connected to Arduino Nano A5-SCL and A4-SDA Pins, Measures Temperatures from -55C to +125C (-67F to +257F), Programmable Resolution from 9 Bits to 12 Bits, Output Data pin Connected to Digital Pin D12 of the Arduino Nano. I believe the X (multiplication) should be a / (division). :o) Im using the same concept for other controller. https://www.thinksrs.com/downloads/programs/therm%20calc/ntccalibrator/ntccalculator.html.
As a standard, the 10-bit PWM is configured to continuously transmit the measured temperature in range of -20 to 120C, with an output resolution of 0.14C. This program will display Celsius and Fahrenheit at the same time: To output the temperature readings to a16X2 LCD, follow our tutorial, How to Set Up an LCD Display on an Arduino, then upload this code to the board: Heres a video of the temperature sensor so you can watch me set it up and see how it works: Well, thats about it.
Put this LM35 sensor on your arm and cover it with a cloth and enjoy measuring your body temperature.
R2 = R1 * (1023.0 / (float)Vo 1.0); tempC=ThermistorC(valC); Serial.print(Temperature = ); Hi! -Marcy.
Its fritzing schematic is below, and you can also find the Python code on the Arduino website. Maximum is 2,048 bytes. Can any one tell me how to rectify this problem. Ah nevermind!
Will that make a difference in this command? Great tutorial. I used a 220 ohm resistor. What is the solution for this. The conducting material contains charge carriers that allow current to flow through it. The thermistor I used in this article is a NTC thermistor, so if you have a PTC thermistor, it could cause the temperature changes to become opposite from what you would expect.
T = (1.0 / (c1 + c2*logR2 + c3*logR2*logR2*logR2)); How will the schematic and code change? Than you for all tutorials. The resistance of this thermistor at room temp is about 45 ohm according to datasheet and my multimeter. Hello, I have a question is there was any way to display the voltage of the thermistor at any given time along with its temperature. Arduino Nano shield consists of 3 different types of temperature sensors.
Recommended max impedance for the atmega 328 analog inputs is 10K. I have been using the same resistors and thermistor, what do you call the digital monitor that is small in the video.
valF=analogRead(1); Click on the tool menu and set the board to Arduino Nano. valC=analogRead(3);
regards
delay(500); // wait for display to boot up Sign up for the Electronics Weekly newsletters: Mannerisms, Gadget Master and the Daily and Weekly roundups.
Download the latest version of Arduino IDE from.
You should download Visuino and use it to generate the code for you. im working on a project and i need to heat a metal up to 150 degrees to test it on my machine cooler project. NTC stands for Negative Temperature Coefficient.
rtc higrometer adjust thermometer alarm florica niq nicu afisaj cathode segment Vo = analogRead(ThermistorPin);
DIY, Wireless, Modular, Arduino, 3D Printed! I rectified that error. LCD.print( C); delay(500); I found this article a long time ago, and since I had a lot of thermistors (pack of 25 for some strange reason!) Which thermistor should we use and how to connect it with arduino?
I followed the instructions and put the same resistance as the thermistors resistance worth but the Temperature goes down instead to increase when I warm it up.
In Negative Temperature Coefficient (NTC) thermistors, resistance decreases with an increase in temperature. delay(1000);
Instead of using the voltage divider, just connect the signal wire to the center pin, and the positive and negative wires to the outside pins. These thermistors are manufactured by Thinking Electronics from Taiwan . tempF=ThermistorF(valF); Hi, thanks for this help, because I can now read the temperature of a 3d printers hotbed with my arduino !
The Visuino code is included in the project.The generated Arduino code uses the Visuino Open Source libraries, ind since they change all the time, if I post the generated code it will become incompatible very soon. - only before line Number 8 put double slash (//) like that exmple didnt understand line 5 and 6.can anyone explain whats going on there?
Required fields are marked *. Remote weather stations, home automationsystems, and equipment control and protection circuits are some applications where thermistors would be ideal. I produced a 3-point calibration curve and have a linear trendline displaying the equation. Can anyone give me a good answer? Download the code attached below and copy it on your IDE.
Insert the Arduino Nano board into the breadboard. Check your inbox now to confirm your subscription. Problem uploading to board. Thank you very much for your help. valF=analogRead(3); Great! By using this website you are consenting to the use of cookies. Wouldnt it make more sense to define Vo as a float, or does it not matter? Arduino Nano thermometer takes room temperature, |News|Products|Blogs|Jobs - Owned by Emap, Southern House, CR0 1XG (020 39532600), Arduino Nano boards get With Headers prototyping option, Arduino Uno + potentiometer + OLED == virtual circular dial, Arduino updates the Braccio ++ robotic arm kit, Arduino turns to Linux for the heavy lifting Portenta X8. Read the Electronics Weekly @ 60 supplement . Tune into this Xilinx interview: Responding to platform-based embedded design. Please tell me: why this code can not compile with Energia?
In Positive Temperature Coefficient (PTC) thermistors, resistance increases with an increase in temperature. }. Just leave a comment below if you have any questions about this project. thanks, NTC-MF52AT 10K 3950 equation matching range: Find the comment by Ronald and use the link to find your c-factors. if you use 100k resistor R1 must be = 100000?
12k of the thermistors resistance. document.getElementById( "ak_js_1" ).setAttribute( "value", ( new Date() ).getTime() ); Enter your name and email and I'll send it to your inbox: Consent to store personal information: Hello, Please tell me what is happening. This is known as a voltage divider. temperatursensor lm35 Where can I download it? Connect the Vcc and ground pin to the 5V and ground of the Arduino Nano board and connect the OUT pin to A5 of Arduino. where I was getting 456 F I am now getting 74 F Perhaps these glass rod sensors are very voltage sensitive. Baud Rate is also set in this function. Hi.
Hi, i followed all the steps in the video, but im not getting any LCD output.
avrdude: ser_open(): cant open device \\.\COM1: The system cannot find the file specified.
As we have already made a list of components, let us move a step ahead and go through a brief study of the working of each component.
Maximum is 32,256 bytes. sensor arduino temperature brick 30cm 15cm cable common emartee module thanksbuyer connecting shield cables need digital Sketch uses 4,176 bytes (12%) of program storage space. The problem with using this thermistor orally is that the exposed leads of the thermistor would be partially shorted by the saliva in the mouth.
We can manufacture this for you, how many pieces do you need?
Can I modify this code with my calibration equation?
Im also facing similar problem.
Also, feel free to share this if you know anyone that would find it helpful! Actual readings for our thermistor are 218 to 237, which are then converted to resistance R2. THANKS!!!! Probably I will have to study this equation. I am Hamza. I built the circuit as well and get the same result (-459.67 deg F). The second step, before starting to make the circuit, is to go through a brief study of all these components. Or if you prefer its (1023.0-RawADC)/RawADC which can directly be deducted from wiring the NTC to the 5V and R1 to the GND. I want to build a thermistor temp sensor using arduino (as in above circuit) but then need to convert measured temperature in degrees centigrade to air flow in meters per second, and be able to display on screen, and record this via computer. See http://www.arduino.cc/en/Guide/Troubleshooting#upload for suggestions. hi, if you are still interested use 100K thermistor and use the following co-efficience c1 =0.7203283552e-3 c2= 2.171656865e-4 and c3 = 0.8706070062e-7.
Or maybe there is something else?
What is the code if i add in 3 resistors instead of 1. Attached is my code. But i would like to ask if its possible to the i need a heat temperature sensor but it is very expensive. T = T 273.15;
Well I got her 6 red roses, 5 for the 50 and a pink one for the 51st. How To Make A Buzz Wire Game Using Arduino? Can we use RTD Or Thermocouple in place of NTC?
I couldnt find any information on your specific thermistor, but it sounds like the problem could be related to if your thermistor is PTC (positive temperature coefficient) or NTC (negative temperature coefficient).
im trying to connect from 2 weeks but im not able to.please help me. can I know what is the actually thermistor sensor.it is sensor for human body temperature or environment.
Got it. Read our special supplement celebrating 60 years of Electronics Weekly and looking ahead to the future of the industry. So with just a glance at the thermometer we can conclude whether the temperature is in the comfort zone., By pressing the button, the mode of operation switches to linear. http://www.rixratas.ee/jaga/jaga.php?fn=NTC_MF52AT_10K.jpg, Hello, Yesterday I did it correctly and temperature went up upon touch nevertheless, today The measurement goes down when touched, any idea of what could have happened? Can anyone plz help? However, R1 is not the unknown. Thanks a million for jogging my 70 year old mind back to ground level, it has been rather sluggish after sitting with my wonderful wife of 51 years as cancer took her from me, just 4 days after our 51st wedding anniversary.
Actually the rearranged formula works fine assuming R2 is the thermistor. If your resistance rises as temperature increases youve got a ptc and it wont work with this setup. This analog input is converted to digital form by using a formula. for standart 100K 3d printer thermistors you can use the following settings: float c1=0.003517835373043556, c2=-0.0002577063055439601, c3=0.000001766946404565146; //c values berekend op https://sanjit.wtf/Calibrator/webCalibrator.html. Contest. The value read is double than the real value in the room.
Algebraicly you cant rearrange the 1st formula to get the 2nd.
Now as we have made a digital thermometer using Arduino.
lcd.print("Danger Zone"); Alvin is correct. So if i want to make any changes i will not need the use of a pc or laptop. Tune into this podcast to hear from Chetan Khona (Director Industrial, Vision, Healthcare & Sciences at Xilinx) about how Xilinx and the semiconductor industry is responding to customer demands. I was thinking along the lines of adding an if else statement with the following. The rearranged formula for R2 seems to be incorrect.
Hi,
Also, I used the coefficients in your sketch. Pol.
However, theArduino cant measure resistance directly, it can only measure voltage. We've scanned the very first edition so you can enjoy it. The DS18B20 communicates over a 1-Wire bus that by definition requires only one data line (and ground) for communication with a central microprocessor. LCD.write(254); Make sure you use a resistor that matches the resistance of the thermistor. Not sure what that had to do with anything, but it worked for me. Global variables use 222 bytes (10%) of dynamic memory, leaving 1,826 bytes for local variables. Have u find the solution to above issue.
I need to add a Bluetooth transmitter to my temp sensor program to inform me when the temp increases to 60 degrees . Thermistorsare simple, inexpensive, and accurate components that make it easy to get temperature datafor yourprojects. In the same Tool menu, set the processor as. Did you make this project? document.getElementById( "ak_js_1" ).setAttribute( "value", ( new Date() ).getTime() ); Homemade electronic gadgets, the latest dev boards, and the more interesting consumer devices. So my problem is that you have not declare the resistors quality and its number in the start of video !! /tmp/cc8vrcYJ.o: In function `ThermistorF:
Thanks!
you use 100k ntc and 100k resistor. If you don't have the OneWirelibraries already installed, follow these steps: You can see the connected and running Thermometer on Picture 1. This report would have more information with I have managed to modify the code to output the temp display in C on the LCD screen I am using, however, it is not accurate. Now my problem is as im increasing the temperature the value which is showing on the LCD is decreasing im not getting why this is happening. is not wrong because you are used 100k resistor? The next time you press the button, the device switches to TEST mode, and now all the diodes are switched on successively one by one to the maximum and then returned. We want to have a continuous record of body temperature instead of room temperature.
(im using a HT-NTC100K that can handle up to 350 C). They can be a range of values, but potentiometers are probably best to use there. I am building a temp sensor for our local paranormal group (no I am not into ghosts, but my niece is, so this is for her.)
SoftwareSerial LCD(10, 11); // Arduino SS_RX = pin 10 (unused), Arduino SS_TX = pin 11, void setup() to make extra money, search for: Mertisos tips best adsense alternative, Can an one help me plzzz? tempC=ThermistorC(valC); Serial.print(Temperature = ); Show verbose output during compilation Theyre analog sensors, so the code is relativelysimplecompared to digital temperature sensors thatrequire special libraries and lots of code. The manufacturer of the thermistor might tell you its resistance, but if not,you can use a multimeter to find out. I have to submit this project in the next two days so please if anyone is reading this, help a brother out.
Thermistors are low cost accurate components that can be used as temperature sensing device for various applications.
hi, I am using a 100k glass bead thermistor (meant for 3d printing), and wired it up like you showed and uploaded the code. Works great, but wondering how to get it to use only whole numbers. Arduino Nano is a microcontroller board. To build it, the list of components include an Arduino Nano R3, an Adafruit Waterproof DS18B20 Digital temperature sensor, a push button switch (for changing operational modes) and, for the lights, a Digilent WS2812 Addressable LED Strip. She loved it. LCD.write(254);
it works for me. To display the Ferhanite temperature on the serial monitor also, we have used a formula to convert this temperature to Ferhanite and than displayed it on screen.
And its really low to, on my thermastat it says 75 F. How to fix this. hi , can this sensor mesure temperature for health ??? Apparently, those can be determined by experimentation, but that sounds like a major project in itself. Please read and accept our website Terms and Privacy Policy to post a comment. delay(1000); In your video you have used 100k ohm resistor with thermister but in the other part of the video you have used two other resistors with 162 lcd !! Hay man tanks for the code it works but a slight problem when it is like cold or when i gave some cold air the temperature doesnt comes below 29,28 it shows some Chinese,japanes languages on the display on the other when i heat the thermistor the temperature rises & displays 70,80,90 thats not a issue Its range is from -55 degrees to 150 degrees Centigrade. cheers.
I mainly work with printed circuit boards on proteus to bring life to my inventions. R1=10000 in your example. click the upload button to burn the code on your Arduino Nano board. Click on the tools button on the Arduino component (.
LCD.write(139); Connect the thermistor and resistor to your Arduino like this: The value of the resistor should be roughly equal to the resistance of your thermistor. The three possible modes of operation are: dot, line, and test. when i visit the serial monitor the temperature given there is negative and makes no sense whatsoever . // Temp = (Temp * 9.0)/ 5.0 + 32.0; Jesus man thanks a lot you are savivor :D :D. Perhaps a bit late, but I experienced the same problem. In the following Instructables I will demonstrate how to work with multiple thermometers connected to the same pin, as well as how to get the Thermometer OneWire address, so stay tuned ;-). It will run for 10 minutes every time when you run so you can edit and generate projects as long as you want.This way the code will be guaranteed to work. So how do i display lower readings?? Hello,
High temperatures cause the semiconducting material to release more charge carriers. Thanks to all the folks who participated in this circuit review and discussion, it was very helpful.
it works brilliantly but could you suggest me how to put 2 thermistors that give 2 readings simultaneously in Celsius? Arduino interface examples can be find here, https://playground.arduino.cc/ComponentLib/Thermistor, https://playground.arduino.cc/ComponentLib/Thermistor2, 24 Hours fast turnaround, Excellent quality & Unbeatable prices, $18 Welcome Bonus for new registrations Now https://jlcpcb.com, Does ready project with all components available for sale. I followed the above steps exactly, however the numbers I get are negative 459 Fahrenheit and does not change at all. int Vo;
Hello to everyone, a little help please? You have learned how to connect Maxim OneWire DS1820/DS18S20 Thermometer to Arduino, and read temperature from it. From the equation: Vout=Vin(R2/(R1+R2)), the R2 resistor is the one that connects to ground and R1 connects to 5V (or 3.3V). Reply In this function, the input to the Arduino board is processed and output is sent to the other pins or displayed on the serial monitor. so plz mention the type of these two resistors quickly because it is my project THANKYOU !! Will this make the thermistor more stable? LCD.write(254); up to ~280 C, above 280 C i get an unstable reading, alternating between 3 fixed values.. 370.30 | 307.53 | -273.15 (same thing happens if i replace my thermi. It requires a C Codeto operate. Thank you! The project is featured on the Arduino Project Hub, where Mirko writes: By changing the temperature, the color of the diode gradually changes from dark blue at lower temperatures, so next light blue, through green shades at comfortable temperatures, to red levels at higher temperatures. the included link is to the online calculator. To add more thermistors keep adding the following code and change the analogue read pin. You only need to know the magnitudeof your thermistor. could you suggest me how to put 3 thermistors that give 3 readings simultaneously in Celsius?.. You can also calculate your own three resistors values and put the on the following link it will calculate the co-efficiece for you http://www.thinksrs.com/downloads Thanks a million for the video and sketch. NTC thermistors are resistors with a negative temperature coefficient, which means that the resistance decreases with increasing temperature.  When hold the thermistor is temperature getting reduced. Hi, what if i have a 500 000 kilo ohm thermistor value.What resistor value should i use? Your email address will not be published. Read the first ever Electronics Weekly online: 7th September 1960.
valC=analogRead(2);
When you login first time using a Social Login button, we collect your account public profile information shared by Social Login provider, based on your privacy settings. I reversed the + and leads and this solved it, leaving the center lead the same. In NTC thermistors made from ferric oxide, electrons are the charge carriers. There is a wrong R2 equation. How do you setup a chain of thermistors? Id like to find coefficients for it.
Get Mannerisms, Gadget Master, the Daily and the Weekly, in newsletter form, Ebay collect in person something you should know.
It could be used for human body temperatures, but it depends on how you want to measure the body temperature. I have a question about Steinhart-Hart equasion. I tend to make life easier by making circuits and designs to automate things around me. After connecting the circuit above, upload this code to your Arduino to outputthe temperature readings to the serial monitor in Fahrenheit: To display the temperature in degrees Celsius, justcomment out line 18 by inserting two forward slashes (//) at the beginning of the line.
And by changing the R value you will get the correct readings without changing the calculation part of the program. Have you got an Idea where I have to search for the problem? On Picture 3 you can see the complete Visuino diagram.
I am having an issue with my thermistor outputting Fahrenheit as 198.73 at room temp I cannot seem to figure out what the issue is but it is calculating F to C correctly. I tried to invert the Thermistor and gained the knowledge that this doesnt effect it. It is better to connect a ww0-ohm resistor with the Vcc pin of the LM35 temperature sensor. R2 = R1 * RawADC / (1023.0 RawADC) however, in this case you might want to use 1024 to avoid dividing by zero if your NTC opens up or get disconnected.
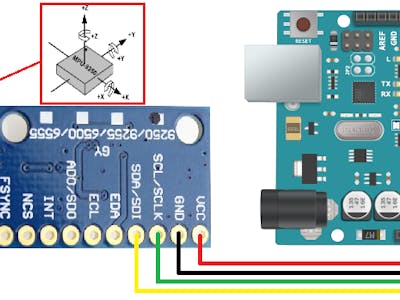
so i assume the code cant handle R2 values below a certain resistance.. any idea if i need to change c1, c2, c3 values ? Applications that can benefit from this feature include HVAC environmental controls, temperature monitoring systems inside buildings, equipment, or machinery, and process monitoring and control systems. mpu9250 arduino visualization data project wiring hackster uno visualize io embed useful sent tool through what is the solution for this problem. We also get your email address to automatically create an account for you in our website. float c3 = 7.19951882000E-008; // Steinhart-Hart C3, Other values can be calculated here:
Thus, it is simple to use one microprocessor to control many DS18B20s distributed over a large area. Hello I do not have the data sheet of my thermistor how to dO MY PROGRAM? Dont worry, because a step by step procedure to set up and use Arduino IDE is given below: The code is very simple.
The NTC is connected to Analog A0 of Arduino Nano pin with 10k divider Resistor. How To Make A Digital Air Pollution Meter Using Arduino? thank you, hi, if you are still interested use 100K thermistor and use the following co-efficience c1 =0.7203283552e-3 c2= 2.171656865e-4 and c3 = 0.8706070062e-7. nano becomes guppy electronics open featured or anything else.. LM35 is a temperature sensor.
I buried her with a gold plated rose in her hand, wearing the same dress she wore on that day in 1969 when we joined our souls for life. The Arduino willmeasurethe voltage at a point between the thermistor and a known resistor. To start programming the Arduino, you will need to have the Arduino IDE installed from here: http://www.arduino.cc/ .  So what I need to do, is store the initial temp in a variable, then check the subsequent temps against that temp, and besides reporting the temp, report on the next line weather temps rise or fall, as well as light a red LED if the temp rises, a blue LED if it falls, and a green LED if it remains the same. Al the variables that will be used later to store different values are also initialized here.
I am using a different thermistor and LCD screen than shown here. And if you like our articles here at Circuit Basics, subscribe and well let you know when we publish new articles. delay(1000);
tempF=ThermistorF(valF); Is this thermistor temperature sensor can measure up to 150 degrees? Serial.println( C);