 2000-2022 Home Depot.
Lowe's and Home Depot offer storm door installation for about $125, and the install cost usually includes measuring the existing entry door to make sure the storm door will fit along with delivery of the storm door, so if you can't fit the door into your vehicle and have to pay for delivery it might be worth another few dollars to have the door installed. ADJUST THE CLOSER Tools needed: LEFT HINGE - Interior Views SLOWER FASTER Figure 29 In this step, you will adjust the door closer. 7.
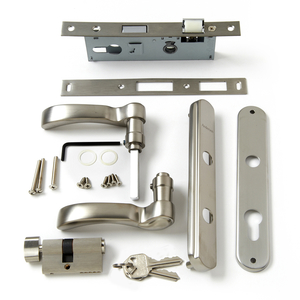
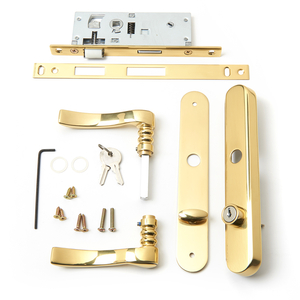
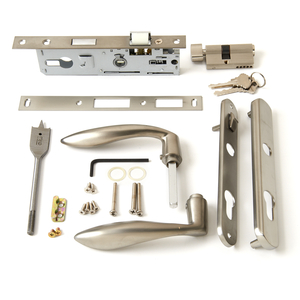
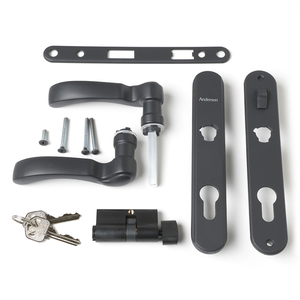
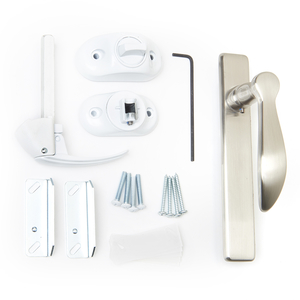
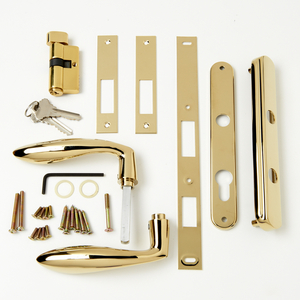
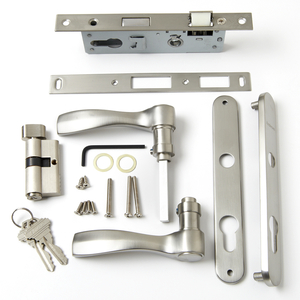
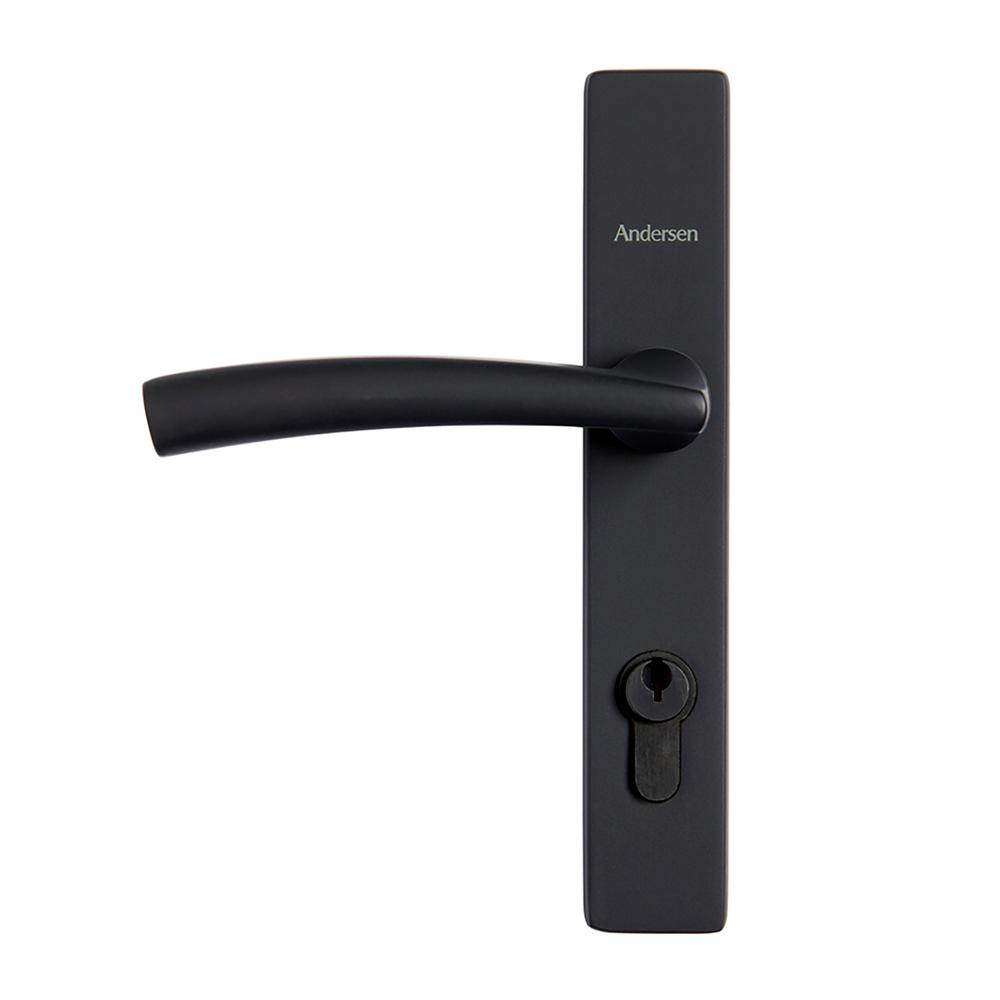
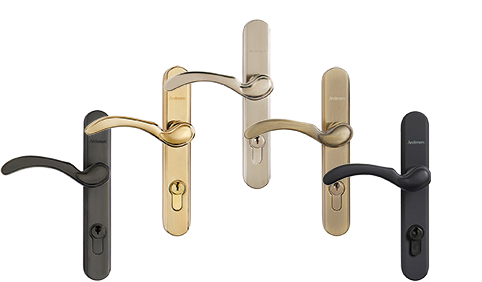
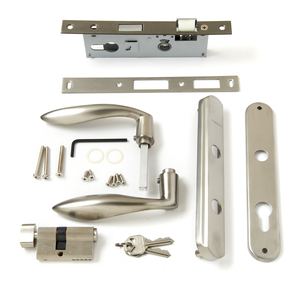
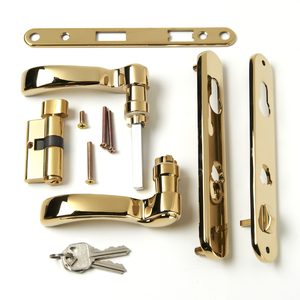
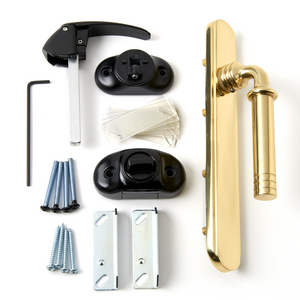
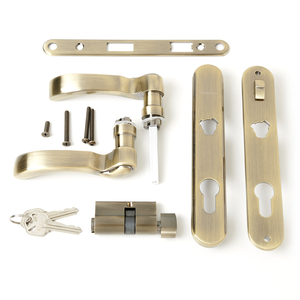
door storm 2000 series emco handle andersen hardware doors handles fullview glass lock warning Entry door hardware and handle may become hot when exposed to sunlight. andersen emco When cutting open the box, stay close to the dotted cutting line that's shown on outside of the box. 4. Close the storm door. storm door series andersen brass contemporary doors sunshinecontractingcorp x 80 in. wVIlxnllM_nlv0[z=zg, Q` f3 EZM:e64,c}C644,od-/G[k kHzNgh}avtf The image below shows locating the centerline for the template: Spend as much time as you need on this step because if you don't get it right and drill the three 5/16" holes into the storm door in the wrong place, there won't be any easy or aesthetically pleasing way to fix the mistake and make the storm door weathertight. If the door has to be left outside and it might rain, the main instructions are under the door and not in a plastic bag so you might want to take them out of the box. Most of the Emco storm doors are designed to be installed within standard entry doors that have brick molding. Extend the line onto the door jamb. INSTALL HANDLE SET In this step, you will install the handle set. 3000 Series White Right-Hand Self-Storing Easy Install Aluminum Storm Door, 2000 Series Full View Interchangeable Aluminum StormDoor, 36 in. hXYnH7 5\23-^$yj5TT^+ %PDF-1.6 % rubbed storm pella andersen 3000 Series White Fullview Easy Install Storm Door. Using the drill and 1/8 drill bit, drill a hole in the mounting surface. handle andersen storm door brass parts andersenstormdoors Center the rain cap in the door opening. 3000 Series White Left-Hand Fullview Easy Install Aluminum Storm Door, 36 in. andersen handle storm nickel finish estate door andersen kit assembly andersenstormdoors parts 7 Figure 26 6. If you have an older entry door you'll need to find out if the storm door will fit within your door's trim, or if you need to do some kind of build out.
storm door 3000 andersen self storing retractable handle screen doors series modern handles brushed nickel emco In this article we'll offer a few tips for installing an Emco 100-Plus storm door. 3. 7 3. warning Windows and doors can be heavy. 1. 11 11 RIGHT HINGE - Exterior View (Figure 9) . x 80 in. hb```f``Z`! ,l@qhUvBl+|CjB> "h"2BR I?d+Y&)yq>1=UBR 'ls][;v, 5. RIGHT HINGE - Exterior Views . series storm andersen door doors modern x 80 in. hbbd```b``"@$"YH0L `nkDrM ?d4bHo)"&4M3Lb@?_&F`730L endstream endobj startxref 0 %%EOF 406 0 obj <>stream 3 2 1/4 5 5/8 . Just snug the door sweep screws - don't tighten them, especially the last screw on the hinge side.
! gE*Z6c8XJ .1FaI5J0*$X,!s 'e;(i&0Dep 7. opening at the bottom on the hinge side and mark a line on the sweep or door frame. Overview of the 30 Minute Easy Installation System available on Andersen LuminAire Retractable Screen Doors. 2. Measure 5/8 below the window 2. The other tools Emco recommends are: a drill, screwdrivers (flat, Phillips), pencil, tape measure, pliers, scissors, center punch, hammer, gloves, and safety glasses. If your abilities do not match the requirements of this installation, contact an experienced contractor. Local store prices may vary from those displayed. 329 0 obj <> endobj 360 0 obj <>/Filter/FlateDecode/ID[<771989A743DE94CF078E8CB3331CA4A6><8126D0E11BD44AAF9DDBC3564E6EC2F2>]/Index[329 78]/Info 328 0 R/Length 144/Prev 521230/Root 330 0 R/Size 407/Type/XRef/W[1 3 1]>>stream pajero bendix rattaat sulatettu systemaattinen napsahtaa Those orange spacers look like packing material to keep the door from sliding around in the shipping box, but they're an important component of the install. 3. See handle set instructions contained within handle set box for details. kYQ'!:^[||"#\`ql8ILIdG{O=a$;_YlMGZ==7uq` /F;6XE#q)NlkIa.Nw*{x[=fXw~p2:Bc|f|h5dV)RwYThxF\jh|^1CP?5X{Rxw>4"B6xs>VgK{X)}0Dj}[[3\9f7=/i?QZt9(>BQAQ%>lR{=[$(g:xCS~(f(jh. @ d1 ma)D-(-h}r<9y;q.qDhsr:E/i;Tu~H storm door storing self series emco handle andersen handles hardware doors lock brass stormdoors Installs in about 30 minutes requiring only basic tools and no cutting. Andersen has been in the door and window business for a long time and they've made their DIY storm door installation process easy enough for those with basic skills, tools, and a willingness to study the instructions. 3. 3. 5. andersen handle storm door hardware
The 100-Plus offers the 2-Hour Easy Install option while the 100 does not. Ditto for the small box that contains the hardware instructions. INSTALL REMAINING FRAME COMPONENTS 8 - #8x1 Tools needed: 11 1/8 LEFT HINGE - Exterior Views In this step, you will finish fastening the rain cap to the top mounting surface. Home | DIY | ALL RIGHTS RESERVED. There are two models of the 100-Series storm doors, and the difference between the 100 and the 100-Plus storm doors is the installation process. Using a pencil, mark the hinge 3. PREPARE STORM DOOR FOR HANGING 1 - #8x1 Tools needed: 8 - #8x1/2 1/8 LEFT HINGE - Exterior View (Figure 9) In this step, you will hang the rain cap against the top mounting surface (Figure 9). 2. 2. x 84 in. Installs in three simple steps requiring only basic tools and no cutting. Screen track and housing assembly for Andersen LuminAire Retractable Screen Door. and install the door itself, and another 30+ minutes to install the door handle, door closure, and make final adjustments. PLEASE call the storm door Solution Center at 1-800-933-3626 with any questions regarding installation, mis-cut part replacement, lost part replacement, or anything else related to your storm door purchase. storm handle parts nickel door andersen traditional series andersenstormdoors doors screen hardware finish aluminum Schlage is a registered trademark of Schlage Lock Company. The door sweep that comes with the 100 Series storm door is usually one piece so it doesn't require sliding the sweep into a channel and crimping the channel as shown in the Emco video (no need for pliers), and the sweep fits the length perfectly so won't need to be cut to size (no need for scissors). Figure 9 side hole on the mounting surface.
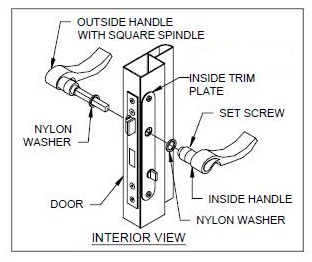
Remove the insect screen by lifting it up and then away from the shipping clip (Figure 5). RIGHT HINGE - Interior Views . interior side up 4. 4. The instructions say to use a hammer and center punch to mark the holes for drilling the sweep, but I just mark the locations with a pencil then drill the holes, so no center punch is needed. 13 5. 5. storm door 3000 andersen traditional screen handle series doors handles hardware self storing emco retractable brass matte bronze rubbed oil Set rain cap aside. storm handle door andersen contemporary parts screen handles andersenstormdoors Please call us at: 1-800-HOME-DEPOT (1-800-466-3337), Please enter in your email address in the following format: you@domain.com. Remove and properly discard the shipping clip. door storm andersen handle assembly traditional nickel finish 2004 parts present kit handles doors cylinder lock kwikset universal bc 4p+ Use of this site is subject to certain Terms Of Use. The instructions tell you to check clearances so the storm door handle clears your entry door handle and deadbolt, and this step is very important. The total installation time will probably be closer to three hours. The instructions are very detailed and Emco has divided the pieces and parts into small color-coded bags which correspond to each particular color-coded section of the instructions. HANG HINGED STORM DOOR Tools needed: 14 - #8x1 11 1/8 LEFT HINGE - Exterior Views In this step, you will hang the storm door in the opening. Open the door and then let it close to note the speed at which the door closes. interior side up . handle storm brass door andersen parts traditional kit handles hardware finish doors screen andersenstormdoors Locate the adjustment screw at the end of the closer that attaches to the door frame (Figure 29). 1 6. Products shown as available are normally stocked but inventory levels cannot be guaranteed, For screen reader problems with this website, please call 1-800-430-3376 or text 38698 (standard carrier rates apply to texts), 3000 Series Full View Retractable Aluminum Storm Door, 4000 Series Full View Aluminum Storm Door, 3000 Series Full View Interchangeable Aluminum Storm Door, 2000 Series Full View Retractable Aluminum Storm Door, 400 Series 1/2 View Self-Storing Storm Door, 36 in. 2. Your Home Depot might have different policies, or the policies may change over time. Kwikset is a registered trademark of Newfry LLC. Using a Phillips head screwdriver to adjust the closer to the desired speed: For a faster closing speed, turn the adjustment screw to the left (counterclockwise). andersen handle door storm anderson french nickel install doors series handles screen easy glass parts system hardware minute installation source Most of the holes that need to be drilled require a 1/8" bit which is included in the package, but you'll need to supply a 3/32" drill bit for drilling the latch strike, and a 5/16" bit for the door handle. Storm doors also keeps the bugs at bay and adds another small layer of energy efficiency. Installation Guide for Andersen 1-1/4 Fullview Storm Doors Please Do Not Return Product to Store! Assemble the sides and top/bottom screen tracks, Place the assembled unit into the opening. 6. door storm emco parts handle andersen doors anderson surface mount screen brass kit hardware assembly lever andersenstormdoors handleset sc st warning Improper use of hand or power tools could result in injury and/or product damage. 3000 Series White Left-Hand Self-Storing Easy Install Aluminum Storm Door, 36 in. The Emco video installs a 400-Series storm door instead of a 100-Series Plus storm door, but the overall installation process was similar (except for the door handle) and helps to clarify some of the unfamiliar terminology. Your storm door might have different components. handle storm traditional parts door andersen brass screen kit handles aluminum doors andersenstormdoors Overview of the installation for Andersen LuminAire Double Retractable Screen Doors. with any questions regarding installation, mis-cut part replacement, lost part replacement, or anything else related to, If your abilities do not match the requirements of this installation, contact an experienced contractor, PLEASE call the storm door Solution Center at 1-800-933-3626. That time frame doesn't include reading the instructions, getting familiar with the pieces and parts, watching the 20-minute Emco video, and setting up the workspace (sawhorses, drop cloth, dustpan and broom, etc). 4. Don't throw anything away after unpacking the door. There's not a lot of room to play with and you might scratch the door with the knife. Emco includes a paper template and the instructions suggest measuring down 39.5" for the centerline of the template, but 39.5" can sometimes interfere with existing entry door hardware and the storm door won't be able to close. Metric System | Tool Pit | About | Privacy and Affiliate Disclosure. All the screws and hardware needed for the install are included in the door package. SAFETY FIRST - Please read and follow all warnings and cautions in this guide.