| First lay down the piece with the extended strips, then fit the second piece on top. Need Help? Plastic laminate is generally applied with contact cement.
Click here for more information. This item is not currently available for immediate purchase, but can be ordered by visiting the selected store. laminate homedepot sold countertop wilsonart boardwalk oak standard fine sample countertops texture Add extra inches to both to allow you plenty of laminate material. The sanding helps to remove any existing glossy coating and roughs up the surface for better bonding with the countertop adhesive.
Once the edge strips are securely bonded, just remove the clamps and trim in the edges with a router and flush trim bit. Touch up uneven edges with a file or sander, keeping it flat on top of the particleboard and pushing away from the laminate. After doing this to three countertops, the kitchen looked much better. You build the substrate, cut out the laminate, and paste the two together with contact cement. embossed houzz countertops Please call us at: 1-800-HOME-DEPOT (1-800-466-3337), Please enter in your email address in the following format: you@domain.com. new 768 Warden Avenue, A spin mop is an effective cleaning tool with a round and absorbent head thats wrung out using a spinning mechanism. With bits that use a guide wheel, carefully set the guide so the bit cuts only the edge of the laminate but not the adjoining countertop surface. amzn_assoc_ad_mode = "manual";
amzn_assoc_ad_type = "smart"; Home & Garden RONA Scarborough Golden Mile Keep the bit free of adhesive by occasionally unplugging the router and soaking the bit in water. Wear protective eyewear when using power tools. Yes, it's a messy job.
I used a random orbital power sander over all existing countertop surfaces before cleaning. After the old countertop has been prepped (sanded, cleaned, dried), brush contact cement onto the countertop surface.
Use the roller to apply pressure to the sheet so the glue will have a strong bond and no air pockets. Orders over $200 receive automatic free shipping. Trim excess from the edge strips with a router and flush trim bit. Coat the back of edge strips with contact cement. Align it with the back side of the countertop surface, making sure the bottom edges are flush. 768 Warden Avenue Lay wood scraps or dowels across the substrate every 12 inches or so. Apply a smooth, even layer covering the entire surface. Space the rods 12 inches apart. All rights reserved.
For instance, do you need a cabinet liner that provides lasting durability?
How to Repair Separating Laminate Cupboards, Extreme How-To: Re-Laminating Countertops, Ace Hardware: Installing Plastic Laminate Countertops, The most important gardening tools you didn't know you needed, DIY Laminating Countertops Without Router. This makes it easier to see the line as you cut and it helps prevent the laminate from chipping and splintering. Press the laminate firmly with several passes of a J-roller; be careful not to roll over the edge, which could snap the laminate. As This Old House technical editor Mark Powers shows on the following pages, it's easy to turn a disorganized garage, mudroom, or shed into a multifunctional workroom in one quick weekend.
Something went wrong.
For the most part, edge strips install in much the same way as the surface sheeting.
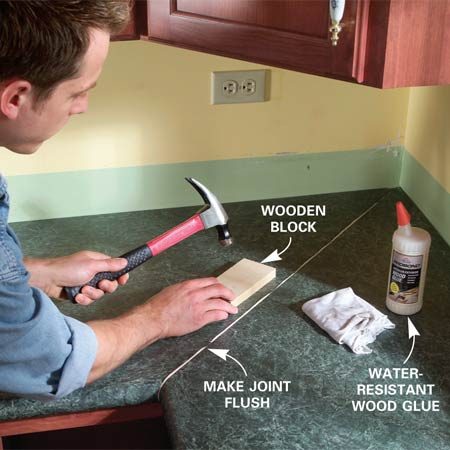
FREE SHIPPING ON SELECT PRODUCTS AND QUANTITIES. Wipe away the caulk that squeezes out at the seam with a wet finger to create a smooth seal between the two pieces of laminate.
Next, place the new sheet laminate face up on top of the wood strips.
 Continue working your way along the entire length of the countertop until the laminate is in place. The item you've selected was not added to your cart. Use wood strips to keep the second piece away from the cemented surface of the counter. laminate diy countertop ing cut particle screwing gluing before So I bought three new 4-by-8-foot sheets of laminate and went to work.
Pour contact cement onto the back and, using a paint roller, spread the adhesive over the entire sheet. All rights reserved. Spread contact cement with a paintbrush over the horizontal surface of the countertop. Remove the paper and use your J-roller to roll from the middle of the second piece toward the seam, bonding the seam tightly. Clamp the sheet to a straight length of lumber at each mark. But with these tips, youll be able to trade those funky, pungent odors for fresh air. In fact, the blade simply peels away a strip of the material in a ribbon thats as wide as the kerf of the blade, and the cuts are perfectly smooth. bvseo-msg: The resource to the URL or file is currently unavailable.. Two years and more than 500 articles later, she's enjoying her freelance writing experience for online resources such as Work.com and other online information sites. During the course of a recent kitchen remodel, I recovered a laminate countertop with newer, more brightly colored laminate sheeting with a granite-type pattern. - eBay Money Back Guarantee - opens in a new window or tab, - for PayPal Credit, opens in a new window or tab, Learn more about earning points with eBay Mastercard, - eBay Return policy - opens in a new tab or window, - eBay Money Back Guarantee - opens in a new tab or window.
Always cut laminate good side facing up. Allow the contact cement to set for the period of time recommended by the manufacturer before proceeding. Plus, the patented Tracing Bit tip has a non-cutting bead at the end of the bit that avoids the object behind the surface (the high-density particleboard counter) and only cuts out the material desired (laminate, in this case). Thanks to technological advancements, the world of inexpensive flooring has expanded, giving homeowners and DIYers lots of options. Laminate this piece, adhering first the short sides, then the wide face, and finally the top.
Working from one end to the other, stick the laminate to the substrate, smoothing it as you go. When using a power circ saw or jigsaw, cut from the back side of the laminate. Allow the contact cement to dry to the touch on both parts. Drive 1 5/8-inch screws through the pilot holes.
You may encounter obstructions such as sinks, faucets, etc. With that kind of setup, we'd really be able to spread out and get something done.
Ideally you can stop the edge strip at a corner and begin the second strip on the other side.
Run a bead of caulk along the tops of the cabinets and on the sides of the counter where the two pieces will meet. There are special blades that allow you to use a utility knife to cut sheet laminate. If you get contact cement on the laminate, you can remove it with fingernail polish remover. Do not rush the router; let the tool do the work. Remove all dust with a shop vacuum. that you have to work around. amzn_assoc_marketplace = "amazon";
You can then go along the edges with a half-round file to slightly bevel the transition between the countertop surface and the edge strips. Roll any excess onto the substrate. Seller assumes all responsibility for this listing. Measure the length and width of the countertop. Take a strip and position it over the side without letting it touch, making sure it's evenly aligned all around. However, what if you dont have corners? I used a solvent to remove the excess contact cement. Wait 15 minutes, then coat the sides again. Then create an even bevel with a file. This special bit treats the underlying particleboard as a template, so you can zoom your Rotozip around the sink cutout and quickly cut the laminate to match. countertop refinishing kit hardware tone weeks
Scarborough, Ontario, M1L 2G9 You'll need to double up at the edges to create a 1-inch face and raise the counter higher. At the seam, position the second piece tightly flush against the first piece, on top of the wax paper.
Once the second piece is securely bonded in place, then lift the edge covering the wax paper. By submitting your email, you agree to our. |
Allow the glue to dry tacky, then install the edge strip, roll it in with the J-roller, and use clamps to hold the strip firmly in place while it dries. Using the router turned on its side, cut off the overhanging edges of laminate, running the bit counterclockwise around the edges. laminate kitchen countertop install countertops line installing miters Here are a few tips on seaming the laminate: amzn_assoc_placement = "adunit0"; Home Newest Articles Replacing & Installing Laminate Countertops Using Formica. Read this guide to learn more about affordable flooring options. Use shorter strips on the other piece to accept the extensions. Get the latest This Old House news, trusted tips, tricks, and DIY Smarts projects from our expertsstraight to your inbox.
though it takes finesse to keep from gluing the pieces together prematurely, and trimming with a router requires patience. Use of this site is subject to certain Terms Of Use. Even when cut to size, the material is still slightly larger than the countertop surface and difficult to maneuver without some assistance. Allow the adhesive to dry until tacky (usually 5 to 10 minutes, but check the contact cement label for recommendations). But plunge pools fill the middle ground, give a splash of fun, and offer relaxation in smaller yards.
Best of all, you can install it just six hours. Theyre constructed using immense heat and pressure to fuse together layers of kraft paper that have been saturated with phenolic resin. Discover the "Well made here" Canada made products. But I was told of this trick by a professional cabinet maker, and thought Id give it a shot. When your laminate countertops are looking worn, you can replace them without major construction using sheet laminate. Starting with the proper substrate creates a good foundation for the countertop.
A popular and economical choice for kitchen countertops is plastic laminate, available in many attractive colors and designs. To make a backsplash, cut a piece of particleboard 5inches wide and as long as the counter.
The colour and design combines the look of real marble with the affordability of laminate. Wading in the water in a backyard meant having a massive swimming pool or settling for a scant hot tub. Pour more contact cement onto the substrate and, using the roller, spread it out until it is fully covered.
Yes
The rods should reach to the back wall and extend several inches beyond the front of the countertop. Tape the second piece to hold it in place. Line the marks up with the edge of the lumber. Coat the back of the laminate sheet with contact cement as well. Particleboard has a uniform, clear surface perfect for accepting the contact cement and leaving a smooth finish. This project did not require me to seam the laminate because each of the three countertops fit within the footprint of the 4-by-8-foot sheets. Love the look of Corian, but dont love the cost? "You have to have both parts lined up correctly," says Tom.
This 30" laminate piece features a pre-glued design for hassle-free installation, and it can be cut to size to suit your project. Using a drill/driver fitted with a 1-inch bit, create pilot holes through the backsplash and into the edge of the countertop every 6 to 8 inches. Roll the entire surface again with the J-roller to ensure the contact cement is bonding. I then added a simple tileboard backsplash with a small PVC trim strip at the bottom (for water resistance), and the countertop job was complete.
Turn the laminate sheet over and place it on top of the dowel rods. With your plan sketched out, transfer those dimensions to the sheet laminate, marking the appropriate cutlines on the material. Position the straight edge against the back wall. If the front of the countertop has laminate trim, sand it down also. Brush contact cement on the back of the strip and on the surface of the old countertop edge (after prepping). Whether you are a tradesperson, contractor, or crafty weekend warrior, you can count on Pro Cabinet Supply for only the best quality cabinet building products.
First bond the larger sheet in place like normal. At this point, place strips of wood or dowels over the countertop roughly 1 foot apart. This kitchen had three separate countertops, at various heights and locations around the kitchen. TOH Tip: When using a router, cut from left to right as you face the edge (and the tool is upright), to keep the bit from pulling. We will notify you on events like Low stock, Restock, Price drop or general reminders so that you dont miss the deal, translation missing: en.general.pagination.previous, translation missing: en.general.pagination.next, Wilsonart Walnut Heights 7965K Laminate Sheet, Wilsonart Skyline Walnut 7964K Laminate Sheet, Wilsonart Pinnacle Walnut 7992 Laminate Sheet, Wilsonart Colombian Walnut 7943K Laminate Sheet, Wilsonart Uptown Walnut 7971K Laminate Sheet, Wilsonart Florence Walnut 7993 Laminate Sheet, Arborite Blonde Modern Cherry W464 Laminate Sheet, Formica Macchiato Walnut 6932 Laminate Sheet, Wilsonart Montana Walnut 7110K Laminate Sheet, Wilsonart Brighton Walnut 7922K Laminate Sheet, Arborite Mocha Modern Cherry W465 Laminate Sheet, Walnut Grove WW050 Laminate Sheet, Woodgrains - Pionite, translation missing: en.general.pagination.current_page.
Immediately roll the surface with a J-roller to work out air pockets. The wood strips will act as a temporary barrier between the sheet and existing countertop. Denise Brown is an education professional who wanted to try something different. View cart for details. Remove the glossy finish from the old laminate countertop by sanding it off with a random orbital sander. 2022 Extreme How-To. In some cases your edge strip may not be long enough to cover the entire countertop edge, and youll have to join two edge strips. Well DIY solid surface countertops can be an extremely affordable and elegant option with material from SolidSurface.com.
Apply contact cement to the front and side edges of the countertop.
Unfortunately, it doesn't come any thicker than 34 inch, which isn't enough for a countertop. The products included in this article are available at various home improvement stores and online retailers like Amazon. 2022 Copyright Pro Cabinet Supply. Products shown as available are normally stocked but inventory levels cannot be guaranteed, For screen reader problems with this website, please call 1-800-430-3376 or text 38698 (standard carrier rates apply to texts), 4 ft. x 8 ft. Laminate Sheet in Brite White with Matte Finish, 4 ft. x 8 ft. Laminate Sheet in Black with Matte Finish, 5 ft. x 12 ft. Laminate Sheet in 180fx Calacatta Marble with SatinTouch Finish, 4 ft. x 8 ft. Laminate Sheet in Markerboard White with Gloss Finish, 5 ft. x 12 ft. Laminate Sheet in RE-COVER Antique Cognac Pine with Virtual Design Matte Finish, 5 ft. x 12 ft. Laminate Sheet in Antique Cognac Pine with Virtual Design Matte Finish, 5 ft. x 12 ft. Laminate Sheet in White Ice Granite with Matte Finish, 4 ft. x 8 ft. Laminate Sheet in Calcutta Marble with Premium Textured Gloss Finish, 5 ft. x 12 ft. Laminate Sheet in 180fx Dolce Vita with Etchings Finish, 5 ft. x 12 ft. Laminate Sheet in 180fx Calacatta Marble with Etchings Finish, 5 ft. x 12 ft. Laminate Sheet in Argento Romano with Matte Finish, 5 ft. x 10 ft. Laminate Sheet in RE-COVER Bainbrook Grey with HD Glaze Finish.  Now, let me emphasize that you should NEVER cut anything else with the blade on backwards other than sheet laminate. These blades cut on the upstroke, and cutting from the back will help prevent chipping. Make sure the edges are perfectly flush. You can also use a special laminate filler to doctor up any nicks or other minor damage. Then brush a layer of contact cement on the back side of the laminate cutout for the counter. This Old House general contractor Tom Silva prefers particleboard to MDF, which is too susceptible to expansion and contraction from water.
Heres how to do it. Call (321) 300-4854.
Copyright 1995-2022 eBay Inc. All Rights Reserved. edge laminate 2000 drip When joining two strips, break the strips at a long, flat area of the edging, rather than at a curve. You can use a jigsaw with a fine-tooth blade for the cutout, but I used a Rotozip with a Tracing Bit. They should be long enough to extend beyond the edge of the counter so you can grab the end and pull them out later.
Matching laminate edges is very difficult, which is also why you should plan for as few seams as possible; if they are necessary (as with an L-shaped surface, like the one shown here), your best bet is to laminate two pieces separately, then join them. Set the strips in place along the countertop edges with the top of the strip even with the countertop. In this case you wont be using the wood strips.
The rip guide of the table saw helps to control a straight cut, and although the cutting process takes longer with the blade on backwards, the cut was perfect. Home & Garden RONA Scarborough Golden Mile, Belanger Laminate Countertop Sheet - Pre-Glued - Marble - 5 1/2-in W x 30-in L. Coordinating your space to complement your bar top, vanity top or countertop is easy with this Belanger Laminates countertop laminate sheet.
Laminate End Cap Kit - 1'' x 7'' - 5'' x 28" - Arctic Snow, Belanger Laminates Countertop End Cap Kit - Silver Quartz - 7 1/2-in W x 28-in L, Belanger Laminates Countertop End Cap Kit - Laminate - Basalt Slate - 1/2-in W x 28-in L, End Cap Kit - 1'' x 7'' 5'' x 28" - Atlantis Granite, Belanger Laminates Countertop End Cap Kit - Laminate - Walnut - 1-in D x 7 1/2-in H x 28-in W, Belanger Laminates Moulded Countertop End Cap Kit - Laminate - Weathered Cement - 1-in D x 7 1/2-in H x 28-in L, Belanger Laminates End Cap Kit - Gray Laminate, Belanger Laminates End Cap Kit - White Laminate - 122-in x 1.13-in, Belanger Laminates Terrazzo Laminate End Cap Kit, Belanger Laminates Countertop Finishing Material - Snow - Pre-Glued - 30-in L x 5 1/2-in W, Belanger Laminates End Cap Kit - Brown Laminate, Belanger Laminates Countertop Sheet - Pre-Glued - Silver Quartz - 30-in L x 5 1/2-in W, Belanger Laminates Countertop Finishing Material - Basalt Slate - Pre-Glued - 30-in L x 5 1/2-in W, Blanger Laminates Laminate Countertop Miter Bolt Kit. amzn_assoc_region = "US"; The new sheet should be accurately positioned right above its final installed location, hovering on the wood strips with its edges flush against the surrounding walls. Drive 1-inch screws through the extended strips to fasten the two sections together. Scarborough,
Laminate sheeting is flexible and a bit tricky to set, so you might want to ask a couple of your friends to help with the project especially when you are working with a long countertop.
Another note on edge strips: Dont break the edge strip at a curve. The edge strips have a tendency to straighten out, and youll find it difficult or even impossible to get the edging to stay glued in place if you break it at a curve. Align the laminate's edges with the edges of the substrate, allowing -inch overhang on all sides. Laminate sheeting is available in many styles and colors, and some of the newer sheets mimic the look of natural stone. Phone: (416) 751-7556. Starting in the middle, remove a scrap and press the laminate down. Heres another tip, and also how I cut the laminate for this project: I used a fine-tooth blade installed backwards in a table saw. As you sketch your designs, the sheet cutouts should roughly mirror the shape of the final countertop, but add a few extra inches so the sheet edges will overhang the edges of the countertop. Place a strip of masking tape where the cut is to be made to prevent chipping and make the line easier to see. amzn_assoc_search_bar = "true"; Let the contact cement become tacky.
Then check out our high-pressure laminate sheets. With a Rotozip you can easily plunge the bit through the laminate surface (no pilot hole needed). Set 1/4-inch, or larger, dowel rods on the countertop surface perpendicular to the front edge. Sold by: Dry-fit the countertop pieces. The side edges go on first, then the front edge, and finally the top. Then caulk wherever the countertop directly meets the wall and smooth that bead for a finished look. The contact cement will be tacky to the touch. Remove the counter. Dont worrythe strips wont stick.
amzn_assoc_title = "My Amazon Picks"; Using a chip brush, apply contact cement to the back of the laminate strips for the counter's short sides and onto the substrate sides. Put a narrow strip of wax paper down along the edge of the larger piece. Once youre finished rough cutting the sheets to shape, immediately change the blade back around to its normal cutting direction. Separating the two surfaces with dowels will give you the chance to line everything up before you adhere the parts.
The horizontal balusters and railing design, surrounding the full length of the staircase, is visually unique when compared to the traditional vertical baluster design of most [].
Lay the counter in place, and from inside the cabinet, drive 1 5/8-inch screws up through the mounting blocks in the cabinet corners and into the counter. Ontario, M1L 2G9, Monday - Sunday:8:30AM - 7:00PM (EasternTime), Contact Us | Find a store | FAQ | Returns and Orders, OrderItemMove?updatePrices=0&calculationUsageId=-1&calculationUsageId=-3&calculationUsageId=-4&createIfEmpty=1&deleteIfEmpty=*&continue=1&toOrderId=.&fromOrderId=*&page=&URL=ProductDisplay%3FcatalogId%3D10051%26DM_PersistentCookieCreated%3Dtrue%26errorViewName%3DProductDisplayErrorView%26langId%3D-1%26productId%3D139359%26patternName%3DRonaProductURL%26storeId%3D10151&logonId*=&logonPassword*=&orderMoveURL*=&noOrderMoveURL*=&confirmUnsubscribe*=, ProductDisplay?catalogId=10051&DM_PersistentCookieCreated=true&errorViewName=ProductDisplayErrorView&langId=-1&productId=139359&patternName=RonaProductURL&storeId=10151&logonId*=&logonPassword*=&orderMoveURL*=&noOrderMoveURL*=&confirmUnsubscribe*=. "Because once it's stuck, it's stuck." Replacing & Installing Laminate Countertops Using Formica. Set masking tape along the edge of the line you drew in the previous step. All we really need is some smooth, clean laminate, a surface that can serve its purpose simply and with style. Laminate is inexpensive, comes in hundreds of designs, and makes a convenient work surface.