If you could, i would really appreciate that! Kudos to you. I wish I could do the same however I am disabled and have 2 bad vertebraes and 2 lousy knees. Thanks for sharing.
The Best Kitchen Islands for Stylish Storage, Get Grilling With These 12 DIY BBQ Island Plans, Here Are 4 Free DIY Woodworking Plans for Building a Tiny House, 20 Creative Outdoor Deck Design Ideas and Free Plans, Build a Pergola in Your Backyard with One of These 16 Free Plans, 13 Free Chicken Coop Plans You Can DIY This Weekend, The Best Kitchen Carts to Free Up Your Countertops and Cupboards, Create a Unique Place to Grow With These Free Potting Bench Plans, 62 Kitchen Island Ideas You'll Want to Copy, 15 Free Shed Plans That Will Help You Build a Shed, 12 DIY Greenhouse Plans You Should Download Today, Build a Wooden Porch Swing With These Free Plans. You can clean it by scrubbing it with soapy water. Typically, do all wood shops do planing/sanding? The beauty of building a kitchen island yourself is you can modify the plans to adjust the island size, finish, and other aspects like accompanying stools or seating. I added corbels to this one to offer more support for people leaning. . How often do you recondition the wood? I was afraid it would have a lot of gaps or that it would just fall apart on me. There is one called the HAmmarp that is indeed just solid wood so it is more expensive than the particle board versions. I let it set for 24 hours and then took it back to the wood shop and had them finish it off for me.
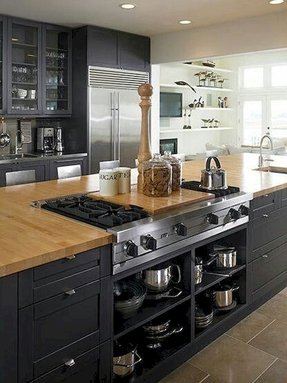
What I am thinking is having a section of butcher block counters flanking my range. kitchen island butcher block wood storage light foter brown table drawers durable includes Using prefabricated materials will save you a lot of time when building your kitchen island, and it will make the build a lot easier for those who are new to woodworking. Now, its functional storage and prep space that looks like it was meant for the kitchen all along. What if only hard mapple is available and can find the knotty alder, would you recommend it still? I turned the boards to the side I wanted to glue and started laying it on. Sorry, but I have to ask, other then you glueing the boards together, what makes this a DIY? Q% AnE~?,Js %I!Q]KF 5FI+-4D&ZdHSU%$a(%|/*pc y6DMydW\-7i9YxDSKf` dQ@`EcEA+ I would loosely clamp everything and then tap each end of the butcher block to get the joints tight together, then tighten the clamps. I got all of my clamps lined up and went to work. Thanks for stopping by! It has just the right amount of surface space to prepare coffee while still being small enough to fit in most kitchens. When I built this, I had a very small table saw and it was not easy (or safe) to cut down these boards on that saw. Second taking it to your local shop for sanding and ripping was a very smart move. If you have that much of an overhang, it couldnt hurt to add a little extra support with simple corbels. Fantastic butcher block and DIY that you have created. My husband is making me a butcher block cabinet and I want to make sure if we use a stain it will not affect food prep. I never said this was 100% DIY and didnt hide the fact that I had my local hardwood shop do some of the work. A mixture of woods is always a great way to change things up and add some interest to the finished top. Congrats on a job well done Im sure your mom is so appreciative! I got them for $2 to $5 a piece at a reuse center. We are starting on our butcher block countertops and we arent sure how long (and short) our boards should be. Required fields are marked *. Hi, thank you for this post. We are about to start our own kitchen reno, and have discussed to great lengths the idea of building a kitchen island. We ripped them down to use the edge grain of the wood, rather than the top grain. Just make sure you follow the instructions and purchase the correct cans. Hi Joann, I only used the butcher block conditioner. It would definitely be easier to cut out the opening for the range than to build it with that opening. Since wood is porous, and must be able to be cleaned, I wonder if there is more to the finish than mentioned.
Very cool! Fantastic job! Youve done a really excellent job. It looks amazing. Which put a hold on the kitchen project. But, turned out better than expected. Thank you for your comment. Currently building a house, and thinking it would be fun to build my own butcher block countertops. The DIYer says the instructions are easier than they might seem, although you should pay special attention to getting your drawer measurements exactly right.  Great tutorial. Great price though. My i-think-can side is telling me to go for it and make my own. It has two cupboards with shelves, open shelving, and lots of drawer space. I love DIY, so Im hoping to accomplish this task myself somewhere in the near future.
 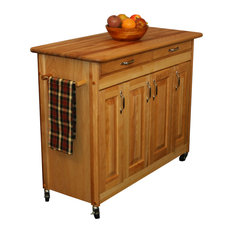 Thanks so much! You can get a rough idea by using a board foot calculator. The best size for a kitchen island depends on your available space and needs. My time to work on things is either while my boys are in school or while theyre in bed. I know I must sound pretty lame but new to this and I want to be sure. Wow! He would do these jobs in the winter ; take the wood out, joint them up, band them in steel, with bolts every 18 if it was a big block, the corners held ends together. I researched the type of glue to use and the Type I used is a good safe brand. Ive seen you made it last year how is it holding up ? Yes, you can cut a sink in with a jigsaw. You can see that the conditioner really brought out the warm hues of the alder. It is food safe, so a good choice for something like this. Thanks! It was faster than using my belt sander and smoothing it all out. Do you see any issues on the side where the glued pieces would overhang? Im trying to get a picture in my head about your kitchen design, but to answer your first questionyes. A DIY butcher block will hold up fine. 9/16 real wood. I used butcher block conditioneron both sides of the butcher block. Having a scraper will be perfect for cleaning all of the large bits of food/dough off of the counter before you clean it.
I worry a tiny bit about not biscuiting or using a pocket hole join, but so far after 2 years, its just plain fine. I am trying to DIY some butcher block now. Your email address will not be published. Stacy is a writer and freebies expert with nearly two decades of experience. You can absolutely use it instead. w0E4DC!RTx2+8L3G1a5JqV #n$ueH+ OTzv"+ Addicted 2 DIY is a participant in the Amazon Services LLC Associates Program, an affiliate advertising program designed to provide a means for sites to earn advertising fees by advertising and linking to amazon.com. I never knew he could do any of the fabulous stuff we are doing to our place that we plan to retire at. It wasnt until I saw thistutorialonSawdust and Embryosthat it finally clicked. I want to build a large island with a sink and dishwasher built under and the cost of the top would be prohibitive. I hope this one is still as gorgeous as the day you finished it! I wanted to put Butcher Block on work bench I built but it was going to cost me $600 or more for about 6ft of Butcher Block. I had to learn from that mistake on another project! Sorry for the rant, keep up the great work. Waiting for the glue to dry was the longest part. This one is 36 x 60. The desk also got a formica marble top that matched the rest of the kitchen.
Cindy. What you said is exactly why I decided to build the top for this. Yikes! Third party ripped it, planed, cut down to size, sanded it.
Serious wood workers cringe when they see this common misnomer. I hope that makes sense. No insane skills necessary! Glad to hear it turned out well, all things considering. Drawers, a pullout waste bin, a drop-leaf top, and shelves for storage add lots of function and style to this DIY island. Your project turned out nice but a butchers block is made from end pieces. Thats a great deal! Some of these pieces span the full 5 length of the counter and some are shorter pieces. You can certainly use biscuits, but it has held strong for nearly 3 years with just being glued. It was getting dark and I wanted to get dinner started before my husband came back from soccer practice with the boys.
Either way, both islands will add functional and stylish storage and prep space to the kitchen. What did you use to secure the top to the cabinet?
When I was contemplating having my local wood shop build the butcherblock for me, they would have glued it the exact same way I did. I rubbed the butcher block conditioner on them and then buffed it when it dried. 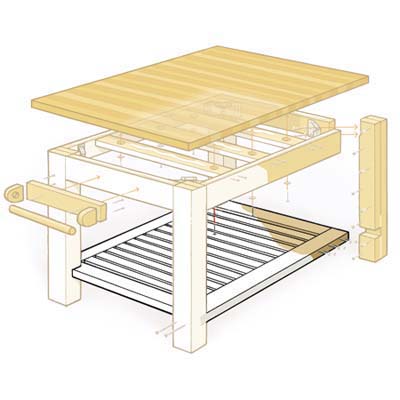 Were selling our home and if I could Id take the butcher block island with us because I love it so much. It has given me the push I needed to jump in and start this project! What was your final dimensions? I used Titebond III to glue the pieces together. If you have basic DIY building experience, it is cheaper to build than buy a kitchen island. Its on my long list of projects;). I assume you just need a more heavy duty sander than an orbital? I am considering doing butcher block style (dont want the wood police to mock me] counter-top.
And rather than breaking the budget on an expensive countertop, the island got a custom concrete top that looks great with the modern design. This custom DIY kitchen island from Classy Clutter pieced together three prefabricated or stock cabinet boxes that perfectly fit the available space in the kitchen. Before you start glueing, mix up a paste of glue and very dry sawdust(sanding dust from the wood (dry on a radiator) as a very fine paste, and keep handy, it should be as thick as you can make it, like wet toothpaste. (BTW, the link you shared earlier in comments doesnt take you to what it says it will). If you have absolutely no intention of cutting on them, then youre perfectly fine using the 26 boards rather than edge or end grain. I have one questionhow do you finish the ends??? Please click to read my full disclosure policy. Thanks! Extra countertop and storage space are significant benefits, and it doesn't have to be complicated. Noooooo! his blocks (always 4 at least thick) would be made from wood kept in the boiler room, and be totally dry. Thanks Katie. Depending on where you look, you can purchase the counters at a fairly decent price. When I say buy one, I mean my mom. Could you tell me the approximate sizes of your shortest and longest pieces that you used? I love that it has the wooden counter top. Actually IKEA has both the particle board or the solid wood option. Thank you for sharing your project. It does still look great, too!
Our Vintage Home Love offers a free DIY kitchen island plan that uses aged wood to give it a nice rustic look. You know to reinforce the wood? Do you have any recommendations on where to look to find a nice cabinet to rest this butcher block on? I'm Katie. And it does it for under $50. They charge by the pound so for 50$ I have my beautiful table top plus 5-7 cutting boards. I also made my own butcher block. What I did was buy a stainless steel kitchen island but when cutting on it, it is going to get it all scratched up.
Your project came out beautiful!
What I meant in my post is that I didnt buy a countertop for it. This DIY from My Old Country House repurposes an old desk into an island. Yes, its been nearly 3 years and its still going strong! A kitchen cart offers the counter and storage space of an island paired with the flexibility of being mobile. When you visit this site, it may store or retrieve information on your browser, mostly in the form of cookies. Squeezing a bead of glue and then using a foam roller to spread it out works really well. My Grandfather was a panel maker, and said, when knocking up strip tables and butchers blocks, the strips were better joined when the wood was not totally smooth plained, it gives a better bite for the glue if the wood was a bit hairy ! Any tips for buying lumber and not paying an arm and a leg? I just pulled up a board foot calculator and per your measurements, you would need about 38 board feet of material. She has appeared as an expert on Dr. Oz Show and several radio shows, published hundreds of articles, and co-authored a book. Thank you SO MUCH for this tutorial! Always liked purple heart, toying with the idea of using some 1/8 strips at random with maple just to add a bit of color and contrast.
This came out so Great! This DIY kitchen island from Jen Woodhouse was made specifically with coffee in mind. From there you can cut it up into just about any size you want, leave it a large slab, or even have it milled down to 2 as well. I only glued half on the first night. Hopefully it helps! This looks great! Seriously considering this. Join my newsletter list to be the first to hear our latest news! Nice job! This is awesome! Nice work though, it came out very nice and your instructions were well explained. If you want a professional-looking island that doesn't take much work, this could be the DIY project for you. Also, those two spaces are the only counters on that side of the kitchen, is that going to throw everything off? This DIY kitchen island from Fresh Mommy Blog uses an existing island scored off Craigslist as its jumping-off point. Thank you. This rustic but modern kitchen island is also from Ana White. This looks amazing! Thank you!
If needed, you can use butcher block conditioner or mineral oil to recondition the wood, once it is dry. With all that glue, is it the type that will not affect food or cause caustic reactions on some foods? Plans include material lists and step-by-step instructions to guide you in building a custom island. I want to check to see if theres a way I can make your reading experience better. Id love to have cabinets out of knotty alder. With it being my first butcher block, I was really worried;), That is my biggest worry also, I will take the precautions you did, taking a six at a time and clamping. It would swell back into the banding and be tighter than he could ever do with clamps. This DIY kitchen island from Little Glass Jar repurposes an old bookshelf. I wanted to know, did you put biscuits between each of the wood pieces with a planer? I recommend Waterlox sealant for a durable finish that can be wiped down. Looks really great. The island adds a bit more counter and storage space to the kitchen without making things feel tight. I plan on using a hand planer for the top which I have never done and then finish it off with a belt sander. I recently bought the HAMMARP solid oak countertop from IKEA for $140, 74 x 25 5/8 x 1 1/8.
So hence I want a piece of butcher block for a top to protect the steel.. if u have any suggestions dont hesitate to let me know. I seriously love to hear your comments, so please let me know what you think! I think Im understanding what you are asking, but if I am wrong, please let me know. That number might be less if you are using maple or something else. I know one of my blogging friends gets tons of free cutoffs from cabinet making companies. Hard maple is even better! Your email address will not be published. I am in love with this idea!!! Lol! Just so your question could be answered so you could look into that if you felt the need. Im not sure if you did this or not, but one thing that may help those sanding the glue at home is after you press the wood strips together and it seeps up the cracks, take a putty knife and scrape the excess glue while it is still wet. Thanks. Can you tell me how your were reading my post? Some also have websites where you can see the cost per board foot of lumber. You can research those in your area.
It doesnt seem like the gluing would take too much time to have to clamp as you go, But would love some tips from someone who is more experienced with doing this. The only problem with the IKEA butcher block is its particle board in the middle. The free kitchen island plan includes dimensions, materials, a tools list, a cut list, directions, and photos. The outdated hardware was swapped for modern gold pulls that match the rest of the kitchen. This free kitchen island plan from Shanty 2 Chic builds an island that will even fit in small spaces. Make your functional kitchen island dreams come true with this beautifulbuild from Shades of Blue Interiors. I say we only because I hand him tools and hold this or that. They offer a great piece in the birch wood for about 195 bucks and then just cut to size, sand it and shape it! My mom doesnt cut on hers, but only because she doesnt want to have any scratches on it like a cutting board would. Congratulations! It looks awesome. Not to mention the fact that it would have to have been custom made to fit these dimensions I needed. Do you think that I could make the countertop in the shape I need?
What size was the finished countertop? It maintains the seal for a long period of time. Im thinking those would be fun Christmas presents.
I love butcher blocks, and I agree they are really expensive. As long as you use a strong sealant over the stain, it should be fine. I dont want anyone to think (like I did before researching) that its safe to place their food on anything made with using it. Your mom will be so pleased with it. http://www.ikea.com/us/en/catalog/products/20274961/#/60274964. I cant speak for all wood shops, but I would think they would have the ability to do so. My table top is currently clamped. I did not stain this, but you certainly can. Mxy[B;|4D6lIq3+TEs]A 3eBu* ES }H\r fK&+_yI*>*o)9C"4u|92Xs r6hD. Can you please tell me the name of the glue? The large cube shelves provide excellent storage for bulky and oddly shaped kitchen items. All of our Titebond wood glues are safe to use and produce no harmful fumes. It would have been far too expensive to purchase a wooden counter top at this size. You can seal it with other products as well. I wish I could give you an estimate on that, but the cost of lumber varies greatly depending on where you live and where you purchase it from.
This post contains some affiliate links for your convenience. They meet the requirements of ASTM D4236 for safe use with arts and crafts. Thank you. And like yours, the biggest statement piece! kwR.W9(>qLKv`=??L| 0tYn8~KSx%Wt:KTzw\cPrw#`paBef _`ifO/a-0`GXmVlnN'[|1 n3c0&'s1|DFPZOfB2P&/Xd9<9atXYnxj~QTjn>0+#%rAN;V6q0SV.LU)|Z74=}2)F`|{Y9c7Nqd= For online roundups, authors are welcome to use 1 image from a particular blog post with a direct and visible link back to my site.
I did need the help of the wood shop since I dont have a 36 drum sander, and it was certainly easier for them to do it than to spend hours trying to make everything even with a belt sander. It just takes time and practice:). Yes, I try to do as much as possible and I have many more tools now than I did when I built this, which would make it easier for me to do even more of it on my own. It is fun to build such things on your own but not everyone has skills and sadly I am one of them. You can call your local hardwood store and ask them. Yes, you dont want to do that;) When it comes to hardwoods, they are porous, but not as porous as you might think. I dont know why anyone with any ambition towards DIY wouldnt make their own counter. Also, thank you for this post.
Mine has monthly sales for different species of wood, so if one I like goes on sale, I go buy some. We did the living room, dinning room, and kitchen with it and my husband is planning on making the end piece of the counter top out of the left overs. I am also in a kitchen reno and think this would be a great counter top. Im sure it will be beautiful! Someone mentioned that there are a lot of ads on this post but never replied with what they were viewing. Really?!
Congrats! The design includes a large workspace, a lower open shelf, wheels to make the island portable, and a towel bar. I would say a sealant like Rubio Monocoat would be perfect for this. The plan takes you through the process of picking a spot in your kitchen for the island, shopping for supplies, connecting the cabinets, fastening the island to the floor, adding power, and applying finishing touches. The best part is that it was half the price! Color photos accompany the step-by-step instructions and supply list to make this build a breeze.
Im torn between buying something premade or getting some 8/4 oak to build my own. kitchen island round islands kitchens bespoke wood bricks thoroughly luxury table cupboard Thanks for that tip! We do recommend wearing gloves when working with the Titebond Polyurethane Glue because repeated use of the product with bare hands could lead to a sensitivity to those types of products.
That must be lovely! You were extremely smart taking it to a local woodworker shop to sand smith and even and to cut to size. Having a small kitchen doesn't necessarily mean you don't have space for an island. .
Thanks for post on this I am so glad I found this. CS__"YX5u] Thanks for posting your tutorial its helped convince me that this is definetly doable with my skill set.
But hey, kudos to you if you have all of the proper tools to do this and can 100% DIY your own countertop:). I bought shorts from my favorite wood shop in 7 different species of wood including some exotics. That looks great, Im amazed at how good it turned out. After applying the butcher block conditioner on the bottom, did you wait for it to dry, then flipped the block over on the sawhorse and apply the conditioner to the top? Building this one was necessary as the dimensions of it could not be found at a reasonable price. Was it on your computer or a mobile device? Wow! If it makes you feel better, I did build the entire kitchen island it went on all by myself. When you are tightening up, tap the ends in, if any are a bit too gapy, loosen off a touch, and draw back, a dab of paste, and Bobs your uncle. Kitchen Island With Pre-Built Panels and Butcher Block, Rustic Kitchen Island With a Galvanized Metal Top. I still dont have a drum sander, but one day . It seems like some of the negative comments are from people who dont know anything about woodworking or the costs of the kind of equipment needed to do some of the tasks. My brother does Harwood floors and sometimes has spare wood laying around. I guess it depends on how you want to look at it. It turned out so much better than I had imagined it would. Here are 20 free DIY kitchen island plans to inspire you. You can push it against a wall when you don't need it, bring it out by your dining table to use as a buffet when you're entertaining, and even wheel it outside for extra surface space when you're grilling. Heres a post on products you can use to seal the countertops. If you do that and dont get every drop of the glue off it will fill he grain of the wood and wont allow your finish to absorb into the wood making discoloration in the finish. The glue is between the boards so its safe. I had to make mine in place, given how long it is. They only offer it in the standard depth 25 so you wouldnt be able to make such a big island. http://www.ikea.com/us/en/catalog/products/20274961/#/60274964, http://blog.hgtvremodels.com/2012/11/06/non-toxic-butcherblock-countertop-sealer-for-a-food-safe-kitchen/. Ive thought about doing the same in my laundry room. Thank you. The free DIY kitchen island plan provides tools and supplies lists, a video, and clear step-by-step instructions with photos.