I like the way the photo illustrates the diagram, even for a layman like me. 21. Tighten the upper nut to 75-80ft-lb, the lower nut to 60ft-lb, and secure with the included cotter pins. Also, verify the axle flange is no larger than 5.9-inches. Youll have to fabricate a few small hard lines and give them double-flare ends, but its nothing you cant accomplish in your home garage. Vehicle make, model, and brand names are trademarks of their respective owners and are used within this site for identification purposes only. 
 Moving to the rear of our hardtop, we start with the removal of the leaf spring plates. Maybe I can help out. Upgrading the suspension and braking on a first-generation Mustang doesnt have to mean high-end weld-on systems with rack-and-pinion steering and so forth. We ordered TCPs 1-inch front antisway bar as well, which bolts directly to the stock points on the frame and lower control arms. 14. 06. Ensure the cross shaft is oriented as shown, and the arrow points towards the front of the car. Tighten the large backup nut to 150ft-lb, and finally, install the button-head screw with a dab of thread locker. Mine had 50 years of grime and all sorts caked around it and was a bit tight. 07. Front UCA Coilover Bolt-In UCA Coil-Over Conversion, Use with OEM or TCP Coil Spring Upper Control Arms, Contains Varishock Double Adjustable Valving Quickset 2 Billet Coil-Overs, Slightly Lowered Ride Height Upper Chassis Front UCA C/O Q1 ML BB M20 Bolt-In 67-73 Mustang UCA Coil-Over Conversion, Use with OEM or TCP Coil Spring Upper Control Arms, Contains Varishock Single Adjustable Valving Quickset 1 Billet Coil-Overs, Maximum Lowered Ride Front UCA C/O Q1 SL BB M20 Bolt-In 67-73 Mustang UCA Coil-Over Conversion, Use with OEM or TCP Coil Spring Upper Control Arms, Contains Varishock Single Adjustable Valving Quickset 1 Billet Coil-Overs, Slightly Lowered Ride Front UCA C/O Q2 SL BB M20 Bolt-In 67-73 Mustang UCA Coil-Over Conversion, Use with OEM or TCP Coil Spring Upper Control Arms, Contains Varishock Double Adjustable Valving Quickset 2 Billet Coil-Overs, maximum Lowered Ride Front UCA Coilover Bolt-In UCA Coil-Over Conversion, Use with OEM or TCP Coil Spring Upper Control Arms, Contains Varishock Double Adjustable Valving Quickset 2 Billet Coil-Overs, Maximum Lowered Ride Height Upper Chassis See What Customers Are Saying About Classic Industries, America's First Choice in Restoration and Performance Parts and Accessories, 1963-77 Ford / Mercury Front Polyurethane Front Upper Coil Spring Isolators - Pair - Mustang/Falcon, 1968-93 Ford/Lincoln/Mercury Front Spindle Nut Hardware Kit, 1967-73 Mustang Urethane Front Strut Rod Bushing Set, 1967-73 Mustang Front Air Spring Conversion Single Adjusatble, 1967-73 Mustang Front Air Spring Conversion Double Adjusatble, 1968-73 Mustang; Front Lower Control Arm Assembly; RH/LH; Black, 1967-73 Mustang Front Coilover Conversion DoubleAdj Big Block Min, 1960-73 Ford/Mercury; Polyurethane; Front Lower Shock Absorber Insulators; Mustang/Cougar/Falcon, END REPAIR KIT-SWAY BAR, 1968-73 Mustang and 1966-70 Falcon, Front, 1967-73 Mustang Front Coilover Conversion Static Valving Big Block Min, 1967-73 Mustang Front Coilover Conversion Double Adj Small Block Min, 1967-73 Mustang Front Coilover Conversion Static Valving Small Block Min, 1967-73 Mustang Front Coilover Conversion Single Adj Big Block Max, 1967-73 Mustang Front Coilover Conversion Single Adj Big Block Min, 1967-73 Mustang Front Coilover Conversion Double Adj Big Block Max, 1967-73 Mustang Front Coilover Conversion Single Adj Small Block Min, 1967-73 Mustang Front Coilover Conversion Single Adj Small Block Max, 1967-73 Mustang Front Coilover Conversion Static Valving Big Block Max. Do you happen to have torque specifications for the front end suspension on the 69? A coil spring compressor is the safest solution to remove the coil springs, but isnt always easy to obtain for home shop use (though, most parts stores will rent you one for cheap). Just a thought. I think the only way to get them is to get a workshop manual of some sort. Often, weve had to cut this bolt free with a reciprocating saw, but we got lucky and our bolts came out with a little elbow grease. Ensure the cross shaft is oriented as shown, and the arrow points towards the front of the car. 02. Remove the upper control arms retaining nuts and pry the upper arm out of the shock tower until the arms studs are clear, and lower the floor jack to release the springs tension in order to remove the spring and upper control arm. As these first-generation classics are being driven more, owners want better driving manners, real brakes that can stop in modern traffic, and more.
  The rear utilizes a 12-inch rotor and a slightly smaller four-piston billet aluminum caliper. Today it is a different story. To put the hardtop back on the ground, we ordered a set of 18-inch Showwheels Streeter polished, five spokes, wrapped them in Falken Azenis FK453 rubber, and bolted them on with a set of Monster Lug spline-drive lug nuts from Mackin Industries. idler Follow the provided instructions for proper shim location. Me I just love all the classic 50s and 60s cars, no matter who make them. Feed the cables through the block and adjust the assembly for proper parking brake application. Make sure it dont drop our on the the seats or carpets etc. willcox The VariShock QuickSet 2 double adjustable shocks bolt into the stock upper mounting location and to the new leaf spring plates using their included hardware. Ensure the springs tail is properly placed in the saddle at the spring stop tab. Seventeen-inch wheels are needed to fit over the kit. After removing the spindle and setting it aside for reinstallation later, the lower control arm and strut rod assembly were unbolted next. The factory bearing retainer plate is not required with the new system so we recommend removing it completely. Up front, TCP offers its Coil-Spring Suspension system, which features tubular upper and lower control arms (optional offset upper arm for improved camber gain), performance coil springs, and bolt-in VariShocks. 09. Remove the front spring eye-retaining bolt next. You want just a bit of light deflection in the bushing body when tightened properly, as seen here. These systems work, but are overkill for some enthusiasts and are difficult to install. The rear rotors must fit in a hub-centric manner. Some of these rear suspension pieces can be had via various staged systems. falcon ford suspension mustang ii kit source ifs kits The Falkens are sized at P215/45ZR18 on an 18x8 wheel up front and P235/40ZR18 on an 18x9 wheel out back. 24. 1967 firebird npdlink Classic Industries offers a wide selection of Front Suspension for your 1970 Ford Mustang. Although the front brake hoses connect directly to the factory hard lines, at the rear the new Master Power calipers use a braided AN hose with banjo fitting at the caliper end. Hey you are doing great work. mustang 1970 ford manual diagram chassis assembly reprint wiring cougar mercury factory shelby supplement brakes sys steering suspension fuel Classic Industries offers 1970 Ford Mustang Ball Joints, 1970 Ford Mustang Bushings, 1970 Ford Mustang Control Arms, 1970 Ford Mustang Conversion Kits, 1970 Ford Mustang Front End Rebuild Kits, 1970 Ford Mustang Spindles - OE, 1970 Ford Mustang Spindles - Performance, 1970 Ford Mustang Torsion Bar, and 1970 Ford Mustang Tubular Control Arms. For this hardtop suspension upgrade, we opted for the optional VariShock QuickSet 2 double adjustable aluminum shocks. Per the included instructions: Chisel out the metal sleeve from the strut rod opening in the frame first, and mount the pivot assembly into the frame, ensuring the grease fitting is pointed down for access. I think a week or two at your shop would be like having a good schooling experience. The new billet disc-brake adapter is slid up from the bottom and seated over the four axle T-bolts. The rear-disc brakes use a billet aluminum adapter bracket that doubles as an axle retainer. Brackets and clamps are included to secure the hoses to the axle tubes. Tighten the upper nut to 75-80ft-lb, the lower nut to 60ft-lb, and secure with the included cotter pins.
I cant think that you are missing anything. TCP does offer a larger diameter heavy-duty U-bolt kit for 3-inch axle tubes under PN LSP-03 if your U-bolts have seen better days. Over-tightening the mounts causes the bushings to deform and split in short order. 06. 16. 10. Best regards. Often, weve had to cut this bolt free with a reciprocating saw, but we got lucky and our bolts came out with a little elbow grease. We ordered TCPs 1-inch front antisway bar as well, which bolts directly to the stock points on the frame and lower control arms. 01. I hope I am wrong on that though.
350 Survives a Life of Drag Racing Unmolested, New Edge Tech: Better Axle Behavior With Maximum Motorsports Sport Lower Control Arms, Bolt On a Fresh Suspension for Your 1965-1970 Mustang. The grommet opening is the same size as the steering shaft. 08. Mustang Books, Technical, Workshop Manual Reviews: Press Releases, original Time, Life, Newsweek articles, sales brochures, 60s Magazine articles & road tests, , each year profiles, Vin decoder, Carplan Tetroseal Underbody Sealant Aerosol, Rustbuster FE123 & Granville Rust Cure Shocking Update 2016, Rust Comparison Test: Granville vs Rustbuster Article, Top Branded Waxes Side by Side Super Showdown, Big Name Brand Wax vs Luxury Hand Blended Wax, Difference Between Waxing, Polishing And Your Paint Job, 13 of the most popular manufacturers Dual Action Pad Comparison Chart, Meguiars Extra Large Detailing Kit Bag (ST025), Meguiars & Mirror Bright Product Reviews, Bilt Hamber Products, EZ Car Products, Valet Pro, Dat Wax, Simoniz, Showroom Shine Product, Fresh Motor Company Scents Reviews, Magnetic Cowl Covers 64 66 all models, Magnetic Cowl Covers 67 68 all models, Magnetic Cowl Covers 69 70 all models, https://mustangmaniac.co.uk/parts/suspension/53, https://onemanandhismustang.com/wp-content/uploads/2018/03/backing-out.mp4, Advertising / Sponsorship / Product Reviews, American Autowire 64 66 Mustang Classic Update kit. 1640 Hoover Avenue 25. It is secured with the original lock nuts, acting as the new axle retainer. What I like is that you have followers who resort to you for advice, which says a great deal about the work youre doing on the blog. Ron, Hi Ron, I dont know where you are based, but I have found a link on the guys I use here. The steering box rod goes up the centre of the column to the steering wheel. Install the rear rotors in the proper direction for airflow and cooling. Tighten the large backup nut to 150ft-lb, and finally, install the button-head screw with a dab of thread locker. Often, these restorations are cosmetic in nature and the drivetrain and suspension are only given a quick once over to ensure safety. Some aftermarket exhaust systems may need to be temporarily loosened to allow access to the bolts nut on the inboard side of the frame rail. The rotors use a hub-centric centering ring. National City, CA 91950 You can update your suspension (and brakes, too, if you like) with basic hand tools in your own garage on a Saturday. All the diagrams I found on forums, articles and a lot mouse cl8cks trying to find what i needed, in a couple of cases tweaked myself. Although were using a lift in our tech center, you can easily handle the removal and installation steps outlined here with jack stands and a floor jack. For the front brakes, we are installing Master Power Brakes Pro Driver Series disc brake conversion for a measureable increase in braking performance. The column slides over the steering shaft and fits onto the steering box. Assemble the rest of the shackle, as shown. Hi, I dont have any torque settings for the cars. Hi, i dont own all the manuals myself unfortunately. I have majority of the parts but have no idea what size or length of bolts I need to button it up. At the bottom there is a rubber grommet that pushes into the end. There are the 6 and v8 versions of the diagrams here. Install the remaining bushings in the rear mid-eye leaf openings and loosely bolt the leaf spring to the shackle. steering rack pinion power hydraulic 2004 2008 ford nissan maxima diagram 2007 taurus honda electric wiring 2002 malibu mustang 2000
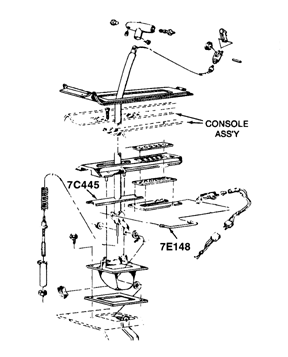
  The diagrams are from the steering wheel, steering column and down to the suspension link up and steering linkages. Im pleased you managed to find something useful from a not so exciting diagram. 1970 ford wiring torino schematic galaxy harness nos ignition galaxie gt source circuit convertible I would like to be able to roll it around to get it out of the weather. Factory Fitted Centre Console Refurbishment, Mustang Each Years Profiles 64 70 & Other Technical Specs, Classic Mustang Vin & Door Decoder, Build Sheets, 64 68 Mustang Door, Window & Handle Diagrams, 66 Mustang Brake and Suspension Schematics, Press, Promotional Items & Owners Manuals Menu, The Original Mustang Articles Time / Life / Newsweek, Mustang On Top Of The Empire State Building, AMF Wen-Mac 1966 Ford Mustang GT Dealer Promo Model, Xyfw 1962 Ford Mustang I Model (Technical), Importing Cars From The USA Part 1 (Tax & Duties), Importing Cars From The USA Part 2 (DVLA Registration), Nigel Mansell Icon Award Classic Car show 2018, American Autowire 1964-66 Mustang Classic Update Wiring Kit, American Autowire Hazard Switch Installation, Inside Autolites Group 24 Replica Battery, Tuff Stuff 100 Amp One Wire Chrome Alternator & Custom Made Bracket, Tuff Stuff Alternator Clocking or Indexing Process, Chemical Guys Ultra Bright Detailing Light, Halfords Advanced Pro 120 piece Socket Set, Sealey Tools VS035 Brake Shoe Spring Pliers, Sealey Vacuum Tester & Brake Bleeding Kit VS402, Stanley MaxSteel Heavy-Duty Bench Vice 6-inch (183068). Definitely like seeing the Stangs on the street, and I want them to be safe! 31-32. USA. 04-05. If so, it must be machined down while the axle is out for proper rotor fit. In addition, per the instructions, the outer axle flange can be no larger than 5.900-inches in diameter. The Master Power Brakes 13-inch rotor features directional cooling with cross-drilled and slotted rotor surfaces. Remember, 17-inch wheels are required for the Pro Driver Series brakes. Today it is a different story. I pulled mine off to replace the rubber mine had disintegrated and besides the rubber grommet that pushes onto the steering box, the rubber surrounding the column at the firewall, and the two bolts holding the column to the dash, I didnt see anything else. Sorry I cant help more than that. Thanks for stopping by. A Classic 1966 Ford Mustang v8 Coupe Restoration Guide. The more years it covers the less specific they can be I found. With the front eyebolt removed, the leaf spring can swing down out of the way. 12. 27. After removing the spindle and setting it aside for reinstallation later, the lower control arm and strut rod assembly were unbolted next. Once the shims are in place, place the caliper over the rotor with the pads installed and tighten all fasteners to the recommended torque specs in the instructions.
  The rotors are zinc-washed for a lifetime of good looks and protection against todays nasty elements. This bolt may be seized to the bushing, depending upon how old your suspension is. Our Kits include Bushings, Sleeves, Washers, Bolts and Nuts (2 required per car) Ford/Mercury Applications: Ford Cars: 1968-73 Mustang 1967-70 Falcon 1962-70 Fairlane 1962-71 Ranchero 1968-71 Torino 1970-77 Maverick Mercury Cars: 1967-73 Cougar 1966-76 Comet 1962-63 Meteor 1968-71 Montego. Do not reinstall the old upper-arm alignment shims. Simply slide the hub into place and seat it onto the spindle per the instructions. 11. To put the hardtop back on the ground, we ordered a set of 18-inch Showwheels Streeter polished, five spokes, wrapped them in Falken Azenis FK453 rubber, and bolted them on with a set of Monster Lug spline-drive lug nuts from Mackin Industries.
  At the rear, clean the frame rail openings of any debris and old bushing and install the new urethane shackle bushings with the included lube. Big help. mustang wiring column diagram steering 1967 67 tilt vacuum diagrams away quotes wheel turn switch signal manual quotesgram 1970 pulling
The rear system features an internal parking brake assembly. Front UCA C/O Q2 SL BB M20 Bolt-In 67-73 Mustang UCA Coil-Over Conversion, Use with OEM or TCP Coil Spring Upper Control Arms, Contains Varishock Double Adjustable Valving Quickset 2 Billet Coil-Overs, Slightly Lowered Ride Front lower shock absorber insulator for various 1960-73 Ford and Mercury models including Mustang, Falcon, Cougar, and Comet. The column is only there to keep the rod centred and protected. Note, weve already separated the tie-rod end from the spindle and loosened the upper and lower ball joint nuts. https://mustangmaniac.co.uk/parts/suspension/53 hope that helps. Stage 1 leaf-spring system with double adjustable VariShocks. While our suspension is broken down for updates, well be updating our Mustang with performance disc brakes from Master Power Brakes. mustang rod tie 65 end steering parts 1965 suspension diagrams steeringwheel essexmustang 12.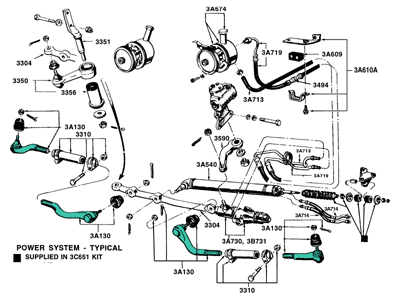 Up front, TCP offers its Coil-Spring Suspension System, which features tubular upper and lower control arms (optional offset upper arm for improved camber gain), performance coil springs, and bolt-in VariShocks. Options include single- and double-adjustable shocks, offset upper control arm, antisway bars, and forged spindles. At the rear, clean the frame rail openings of any debris and old bushing and install the new urethane shackle bushings with the included lube. The Master Power Brakes system features a 13-inch rotor with directional cooling veins and a cross-drilled and slotted surface. Templates are available from Master Power to guarantee fitment before pulling the trigger on an expensive set of wheels. Remove the front spring eye-retaining bolt next. Options are many, including adjustable shocks, antisway bars, torque arm, and Panhard rod systems, and more. Reinstall the stock spindle using the new castle nuts, lower ball joint spacer, and cotter pins. Be sure to install them, otherwise, the rotor will not be centered on the axle shaft. Car Detailing. Thanks, but however many books you read, nothing beats the hands on experience I got with the guys at Mustang Maniac. 1969 disc mustang boss brake brakes suspension assembly steering sway shocks
Over-tightening the mounts causes the bushings to deform and split in short order. Most of them seem to be 64 73 years. 26. Were supporting the rear axle with a jack and fixture, but at home you can simply use two jack stands on the axle tubes. Your first image here 3-25 comet-fairlane with power steering. A high-quality reproduction, this lower control arm also features a two-tone look similar to the originals. The setup uses stock mounting points and allows your car to gain a lower center of gravity, a higher roll center, and precise control of the spindles travel. You dont want stone stock suspension bits, either. 25. I dont see a rag joint. Simply unbolt them from the lower control arm spring perch and from the upper support, shown here.
Moving to the rear of our hardtop, we start with the removal of the leaf spring plates. Maybe I can help out. Upgrading the suspension and braking on a first-generation Mustang doesnt have to mean high-end weld-on systems with rack-and-pinion steering and so forth. We ordered TCPs 1-inch front antisway bar as well, which bolts directly to the stock points on the frame and lower control arms. 14. 06. Ensure the cross shaft is oriented as shown, and the arrow points towards the front of the car. Tighten the large backup nut to 150ft-lb, and finally, install the button-head screw with a dab of thread locker. Mine had 50 years of grime and all sorts caked around it and was a bit tight. 07. Front UCA Coilover Bolt-In UCA Coil-Over Conversion, Use with OEM or TCP Coil Spring Upper Control Arms, Contains Varishock Double Adjustable Valving Quickset 2 Billet Coil-Overs, Slightly Lowered Ride Height Upper Chassis Front UCA C/O Q1 ML BB M20 Bolt-In 67-73 Mustang UCA Coil-Over Conversion, Use with OEM or TCP Coil Spring Upper Control Arms, Contains Varishock Single Adjustable Valving Quickset 1 Billet Coil-Overs, Maximum Lowered Ride Front UCA C/O Q1 SL BB M20 Bolt-In 67-73 Mustang UCA Coil-Over Conversion, Use with OEM or TCP Coil Spring Upper Control Arms, Contains Varishock Single Adjustable Valving Quickset 1 Billet Coil-Overs, Slightly Lowered Ride Front UCA C/O Q2 SL BB M20 Bolt-In 67-73 Mustang UCA Coil-Over Conversion, Use with OEM or TCP Coil Spring Upper Control Arms, Contains Varishock Double Adjustable Valving Quickset 2 Billet Coil-Overs, maximum Lowered Ride Front UCA Coilover Bolt-In UCA Coil-Over Conversion, Use with OEM or TCP Coil Spring Upper Control Arms, Contains Varishock Double Adjustable Valving Quickset 2 Billet Coil-Overs, Maximum Lowered Ride Height Upper Chassis See What Customers Are Saying About Classic Industries, America's First Choice in Restoration and Performance Parts and Accessories, 1963-77 Ford / Mercury Front Polyurethane Front Upper Coil Spring Isolators - Pair - Mustang/Falcon, 1968-93 Ford/Lincoln/Mercury Front Spindle Nut Hardware Kit, 1967-73 Mustang Urethane Front Strut Rod Bushing Set, 1967-73 Mustang Front Air Spring Conversion Single Adjusatble, 1967-73 Mustang Front Air Spring Conversion Double Adjusatble, 1968-73 Mustang; Front Lower Control Arm Assembly; RH/LH; Black, 1967-73 Mustang Front Coilover Conversion DoubleAdj Big Block Min, 1960-73 Ford/Mercury; Polyurethane; Front Lower Shock Absorber Insulators; Mustang/Cougar/Falcon, END REPAIR KIT-SWAY BAR, 1968-73 Mustang and 1966-70 Falcon, Front, 1967-73 Mustang Front Coilover Conversion Static Valving Big Block Min, 1967-73 Mustang Front Coilover Conversion Double Adj Small Block Min, 1967-73 Mustang Front Coilover Conversion Static Valving Small Block Min, 1967-73 Mustang Front Coilover Conversion Single Adj Big Block Max, 1967-73 Mustang Front Coilover Conversion Single Adj Big Block Min, 1967-73 Mustang Front Coilover Conversion Double Adj Big Block Max, 1967-73 Mustang Front Coilover Conversion Single Adj Small Block Min, 1967-73 Mustang Front Coilover Conversion Single Adj Small Block Max, 1967-73 Mustang Front Coilover Conversion Static Valving Big Block Max. Do you happen to have torque specifications for the front end suspension on the 69? A coil spring compressor is the safest solution to remove the coil springs, but isnt always easy to obtain for home shop use (though, most parts stores will rent you one for cheap). Just a thought. I think the only way to get them is to get a workshop manual of some sort. Often, weve had to cut this bolt free with a reciprocating saw, but we got lucky and our bolts came out with a little elbow grease. Ensure the cross shaft is oriented as shown, and the arrow points towards the front of the car. 02. Remove the upper control arms retaining nuts and pry the upper arm out of the shock tower until the arms studs are clear, and lower the floor jack to release the springs tension in order to remove the spring and upper control arm. As these first-generation classics are being driven more, owners want better driving manners, real brakes that can stop in modern traffic, and more. The rear utilizes a 12-inch rotor and a slightly smaller four-piston billet aluminum caliper. Today it is a different story. To put the hardtop back on the ground, we ordered a set of 18-inch Showwheels Streeter polished, five spokes, wrapped them in Falken Azenis FK453 rubber, and bolted them on with a set of Monster Lug spline-drive lug nuts from Mackin Industries. idler Follow the provided instructions for proper shim location. Me I just love all the classic 50s and 60s cars, no matter who make them. Feed the cables through the block and adjust the assembly for proper parking brake application. Make sure it dont drop our on the the seats or carpets etc. willcox The VariShock QuickSet 2 double adjustable shocks bolt into the stock upper mounting location and to the new leaf spring plates using their included hardware. Ensure the springs tail is properly placed in the saddle at the spring stop tab. Seventeen-inch wheels are needed to fit over the kit. After removing the spindle and setting it aside for reinstallation later, the lower control arm and strut rod assembly were unbolted next. The factory bearing retainer plate is not required with the new system so we recommend removing it completely. Up front, TCP offers its Coil-Spring Suspension system, which features tubular upper and lower control arms (optional offset upper arm for improved camber gain), performance coil springs, and bolt-in VariShocks. 09. Remove the front spring eye-retaining bolt next. You want just a bit of light deflection in the bushing body when tightened properly, as seen here. These systems work, but are overkill for some enthusiasts and are difficult to install. The rear rotors must fit in a hub-centric manner. Some of these rear suspension pieces can be had via various staged systems. falcon ford suspension mustang ii kit source ifs kits The Falkens are sized at P215/45ZR18 on an 18x8 wheel up front and P235/40ZR18 on an 18x9 wheel out back. 24. 1967 firebird npdlink Classic Industries offers a wide selection of Front Suspension for your 1970 Ford Mustang. Although the front brake hoses connect directly to the factory hard lines, at the rear the new Master Power calipers use a braided AN hose with banjo fitting at the caliper end. Hey you are doing great work. mustang 1970 ford manual diagram chassis assembly reprint wiring cougar mercury factory shelby supplement brakes sys steering suspension fuel Classic Industries offers 1970 Ford Mustang Ball Joints, 1970 Ford Mustang Bushings, 1970 Ford Mustang Control Arms, 1970 Ford Mustang Conversion Kits, 1970 Ford Mustang Front End Rebuild Kits, 1970 Ford Mustang Spindles - OE, 1970 Ford Mustang Spindles - Performance, 1970 Ford Mustang Torsion Bar, and 1970 Ford Mustang Tubular Control Arms. For this hardtop suspension upgrade, we opted for the optional VariShock QuickSet 2 double adjustable aluminum shocks. Per the included instructions: Chisel out the metal sleeve from the strut rod opening in the frame first, and mount the pivot assembly into the frame, ensuring the grease fitting is pointed down for access. I think a week or two at your shop would be like having a good schooling experience. The new billet disc-brake adapter is slid up from the bottom and seated over the four axle T-bolts. The rear-disc brakes use a billet aluminum adapter bracket that doubles as an axle retainer. Brackets and clamps are included to secure the hoses to the axle tubes. Tighten the upper nut to 75-80ft-lb, the lower nut to 60ft-lb, and secure with the included cotter pins. 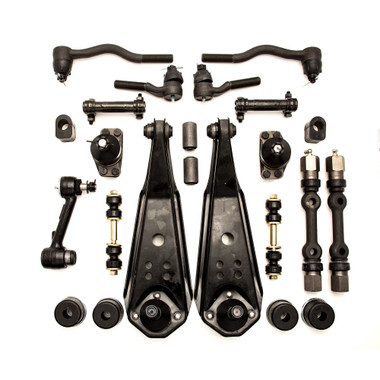
I cant think that you are missing anything. TCP does offer a larger diameter heavy-duty U-bolt kit for 3-inch axle tubes under PN LSP-03 if your U-bolts have seen better days. Over-tightening the mounts causes the bushings to deform and split in short order. 06. 16. 10. Best regards. Often, weve had to cut this bolt free with a reciprocating saw, but we got lucky and our bolts came out with a little elbow grease. We ordered TCPs 1-inch front antisway bar as well, which bolts directly to the stock points on the frame and lower control arms. 01. I hope I am wrong on that though.
350 Survives a Life of Drag Racing Unmolested, New Edge Tech: Better Axle Behavior With Maximum Motorsports Sport Lower Control Arms, Bolt On a Fresh Suspension for Your 1965-1970 Mustang. The grommet opening is the same size as the steering shaft. 08. Mustang Books, Technical, Workshop Manual Reviews: Press Releases, original Time, Life, Newsweek articles, sales brochures, 60s Magazine articles & road tests, , each year profiles, Vin decoder, Carplan Tetroseal Underbody Sealant Aerosol, Rustbuster FE123 & Granville Rust Cure Shocking Update 2016, Rust Comparison Test: Granville vs Rustbuster Article, Top Branded Waxes Side by Side Super Showdown, Big Name Brand Wax vs Luxury Hand Blended Wax, Difference Between Waxing, Polishing And Your Paint Job, 13 of the most popular manufacturers Dual Action Pad Comparison Chart, Meguiars Extra Large Detailing Kit Bag (ST025), Meguiars & Mirror Bright Product Reviews, Bilt Hamber Products, EZ Car Products, Valet Pro, Dat Wax, Simoniz, Showroom Shine Product, Fresh Motor Company Scents Reviews, Magnetic Cowl Covers 64 66 all models, Magnetic Cowl Covers 67 68 all models, Magnetic Cowl Covers 69 70 all models, https://mustangmaniac.co.uk/parts/suspension/53, https://onemanandhismustang.com/wp-content/uploads/2018/03/backing-out.mp4, Advertising / Sponsorship / Product Reviews, American Autowire 64 66 Mustang Classic Update kit. 1640 Hoover Avenue 25. It is secured with the original lock nuts, acting as the new axle retainer. What I like is that you have followers who resort to you for advice, which says a great deal about the work youre doing on the blog. Ron, Hi Ron, I dont know where you are based, but I have found a link on the guys I use here. The steering box rod goes up the centre of the column to the steering wheel. Install the rear rotors in the proper direction for airflow and cooling. Tighten the large backup nut to 150ft-lb, and finally, install the button-head screw with a dab of thread locker. Often, these restorations are cosmetic in nature and the drivetrain and suspension are only given a quick once over to ensure safety. Some aftermarket exhaust systems may need to be temporarily loosened to allow access to the bolts nut on the inboard side of the frame rail. The rotors use a hub-centric centering ring. National City, CA 91950 You can update your suspension (and brakes, too, if you like) with basic hand tools in your own garage on a Saturday. All the diagrams I found on forums, articles and a lot mouse cl8cks trying to find what i needed, in a couple of cases tweaked myself. Although were using a lift in our tech center, you can easily handle the removal and installation steps outlined here with jack stands and a floor jack. For the front brakes, we are installing Master Power Brakes Pro Driver Series disc brake conversion for a measureable increase in braking performance. The column slides over the steering shaft and fits onto the steering box. Assemble the rest of the shackle, as shown.
Hi, I dont have any torque settings for the cars. Hi, i dont own all the manuals myself unfortunately. I have majority of the parts but have no idea what size or length of bolts I need to button it up. At the bottom there is a rubber grommet that pushes into the end. There are the 6 and v8 versions of the diagrams here. Install the remaining bushings in the rear mid-eye leaf openings and loosely bolt the leaf spring to the shackle. steering rack pinion power hydraulic 2004 2008 ford nissan maxima diagram 2007 taurus honda electric wiring 2002 malibu mustang 2000  The diagrams are from the steering wheel, steering column and down to the suspension link up and steering linkages. Im pleased you managed to find something useful from a not so exciting diagram. 1970 ford wiring torino schematic galaxy harness nos ignition galaxie gt source circuit convertible I would like to be able to roll it around to get it out of the weather. Factory Fitted Centre Console Refurbishment, Mustang Each Years Profiles 64 70 & Other Technical Specs, Classic Mustang Vin & Door Decoder, Build Sheets, 64 68 Mustang Door, Window & Handle Diagrams, 66 Mustang Brake and Suspension Schematics, Press, Promotional Items & Owners Manuals Menu, The Original Mustang Articles Time / Life / Newsweek, Mustang On Top Of The Empire State Building, AMF Wen-Mac 1966 Ford Mustang GT Dealer Promo Model, Xyfw 1962 Ford Mustang I Model (Technical), Importing Cars From The USA Part 1 (Tax & Duties), Importing Cars From The USA Part 2 (DVLA Registration), Nigel Mansell Icon Award Classic Car show 2018, American Autowire 1964-66 Mustang Classic Update Wiring Kit, American Autowire Hazard Switch Installation, Inside Autolites Group 24 Replica Battery, Tuff Stuff 100 Amp One Wire Chrome Alternator & Custom Made Bracket, Tuff Stuff Alternator Clocking or Indexing Process, Chemical Guys Ultra Bright Detailing Light, Halfords Advanced Pro 120 piece Socket Set, Sealey Tools VS035 Brake Shoe Spring Pliers, Sealey Vacuum Tester & Brake Bleeding Kit VS402, Stanley MaxSteel Heavy-Duty Bench Vice 6-inch (183068). Definitely like seeing the Stangs on the street, and I want them to be safe! 31-32. USA. 04-05. If so, it must be machined down while the axle is out for proper rotor fit. In addition, per the instructions, the outer axle flange can be no larger than 5.900-inches in diameter. The Master Power Brakes 13-inch rotor features directional cooling with cross-drilled and slotted rotor surfaces. Remember, 17-inch wheels are required for the Pro Driver Series brakes. Today it is a different story. I pulled mine off to replace the rubber mine had disintegrated and besides the rubber grommet that pushes onto the steering box, the rubber surrounding the column at the firewall, and the two bolts holding the column to the dash, I didnt see anything else. Sorry I cant help more than that. Thanks for stopping by. A Classic 1966 Ford Mustang v8 Coupe Restoration Guide. The more years it covers the less specific they can be I found. With the front eyebolt removed, the leaf spring can swing down out of the way. 12. 27. After removing the spindle and setting it aside for reinstallation later, the lower control arm and strut rod assembly were unbolted next. Once the shims are in place, place the caliper over the rotor with the pads installed and tighten all fasteners to the recommended torque specs in the instructions.
  The rotors are zinc-washed for a lifetime of good looks and protection against todays nasty elements. This bolt may be seized to the bushing, depending upon how old your suspension is. Our Kits include Bushings, Sleeves, Washers, Bolts and Nuts (2 required per car) Ford/Mercury Applications: Ford Cars: 1968-73 Mustang 1967-70 Falcon 1962-70 Fairlane 1962-71 Ranchero 1968-71 Torino 1970-77 Maverick Mercury Cars: 1967-73 Cougar 1966-76 Comet 1962-63 Meteor 1968-71 Montego. Do not reinstall the old upper-arm alignment shims. Simply slide the hub into place and seat it onto the spindle per the instructions. 11. To put the hardtop back on the ground, we ordered a set of 18-inch Showwheels Streeter polished, five spokes, wrapped them in Falken Azenis FK453 rubber, and bolted them on with a set of Monster Lug spline-drive lug nuts from Mackin Industries. At the rear, clean the frame rail openings of any debris and old bushing and install the new urethane shackle bushings with the included lube. Big help. mustang wiring column diagram steering 1967 67 tilt vacuum diagrams away quotes wheel turn switch signal manual quotesgram 1970 pulling
 The rear system features an internal parking brake assembly. Front UCA C/O Q2 SL BB M20 Bolt-In 67-73 Mustang UCA Coil-Over Conversion, Use with OEM or TCP Coil Spring Upper Control Arms, Contains Varishock Double Adjustable Valving Quickset 2 Billet Coil-Overs, Slightly Lowered Ride Front lower shock absorber insulator for various 1960-73 Ford and Mercury models including Mustang, Falcon, Cougar, and Comet. The column is only there to keep the rod centred and protected. Note, weve already separated the tie-rod end from the spindle and loosened the upper and lower ball joint nuts. https://mustangmaniac.co.uk/parts/suspension/53 hope that helps. Stage 1 leaf-spring system with double adjustable VariShocks. While our suspension is broken down for updates, well be updating our Mustang with performance disc brakes from Master Power Brakes. mustang rod tie 65 end steering parts 1965 suspension diagrams steeringwheel essexmustang 12.
Up front, TCP offers its Coil-Spring Suspension System, which features tubular upper and lower control arms (optional offset upper arm for improved camber gain), performance coil springs, and bolt-in VariShocks. Options include single- and double-adjustable shocks, offset upper control arm, antisway bars, and forged spindles. At the rear, clean the frame rail openings of any debris and old bushing and install the new urethane shackle bushings with the included lube. The Master Power Brakes system features a 13-inch rotor with directional cooling veins and a cross-drilled and slotted surface. Templates are available from Master Power to guarantee fitment before pulling the trigger on an expensive set of wheels. Remove the front spring eye-retaining bolt next. Options are many, including adjustable shocks, antisway bars, torque arm, and Panhard rod systems, and more. Reinstall the stock spindle using the new castle nuts, lower ball joint spacer, and cotter pins. Be sure to install them, otherwise, the rotor will not be centered on the axle shaft. Car Detailing. Thanks, but however many books you read, nothing beats the hands on experience I got with the guys at Mustang Maniac. 1969 disc mustang boss brake brakes suspension assembly steering sway shocks 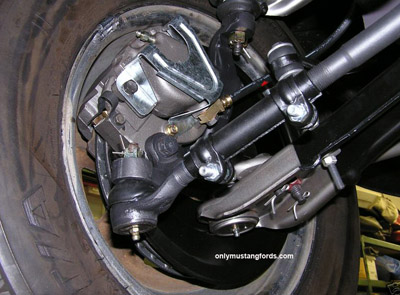
Over-tightening the mounts causes the bushings to deform and split in short order. Most of them seem to be 64 73 years. 26. Were supporting the rear axle with a jack and fixture, but at home you can simply use two jack stands on the axle tubes. Your first image here 3-25 comet-fairlane with power steering. A high-quality reproduction, this lower control arm also features a two-tone look similar to the originals. The setup uses stock mounting points and allows your car to gain a lower center of gravity, a higher roll center, and precise control of the spindles travel. You dont want stone stock suspension bits, either. 25. I dont see a rag joint. Simply unbolt them from the lower control arm spring perch and from the upper support, shown here.