Congrats. OFF ROAD + LIFT KITS + LIGHTING + WHEELS TIRES + BUMPERS, Compustar Remote Car Starters - Info & FAQs, iPod iPad iPhone MP3 - In Car Integration, Head Units Receiver CD / MECHLESS DIN DDIN, VEHICLE SPECIFIC FIBERGLASS SUBWOOFER ENCLOSURE. utv rzr You can also work with carbon fiber with the vacuum bag method. If you mix too much at once, it will dry out before you finish the task. enclosure as well. In the old days we would use speaker grill cloth which was hard to get the resin to soak into or to stick to it. 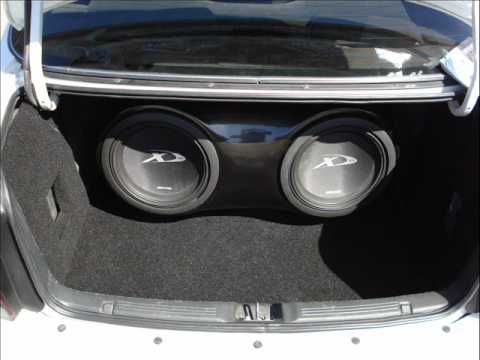
 Thank you for joining our new online store front. If you do not understand the basics of fiber glassing, have a look at Whats also better about that is if something breaks one of the parts you can simply lay up a new one in the mold and itll fit precisely like the original. Electrolytes, Theyre What Dehydrated Hackaday Writers Crave! The implication is that a premium resin is from a production run and not the odds and ends of other production runs. The polyester fleece melts a little with the resin, I assume that acetone is to increase wettability? In the video below, I make a simple speaker pod meant for mounting a speaker to the surface of something like a car door.
Unfortunately those little cans of resin you see at auto parts shops or even marine supply stores are not ideal as it may be old resin, resin of unknown quality, or even outright junk. AVR has updated the project titled Rosie. For a contoured pod I start with speaker rings cut out of Medium Density Fiberboard (MDF). You can even replace your entire door panel with a slick custom shaped one with built in speakers if youre feeling adventuresome. Eric Smith wrote a reply on GoForge - A Renesas FPGA Board. I then cover the entire exposed surface with the good green masking tape. I buy my resin from fiberglasssite.com and then write the date on the can. www.techguys.ca.
Yeah lots of MDF out there which swells when it gets damp. you got me thinking, what about parachute fabric and army surplus? good thing. The idea is that the texture helps hide some minor sins. Once the fiberglass fiberglass enclosure subwoofer larger Once the initial form is free The hardener is Methyl Ethyl Ketone Peroxide (MEKP) and is mixed in the ratios of 1-2% MEKP to resin, so for 400ml of resin I usually ad 1.5% or 6ml. Yes, once the resin sets it will be the resin holding everything in place. jl audio subs sub box fiberglass custom This site uses Akismet to reduce spam.
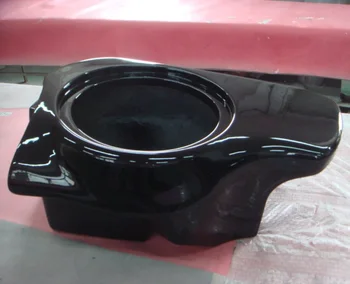
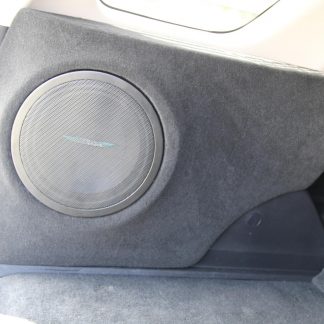
I use it too but since I had a professional laminating guy on my team I am *SUPER* careful with the stuff bisphenols are screwing up a lot of hormonal processes in the human body with effects ranging from allergies, diabetis to cancer. If I had titled it Custom Resin Impregnation I dont think people would have had an intuitive understanding of what I meant. BTW thats the partial answer to the question I ask at the end of the video where I mention why I keep an oven in my garage. enclosure fiberglass subwoofer nrg chevy audio box escalade avalanche ext shipping Your initial form is complete! You do have me thinking about making a streamlined body for my quadracycle. The enclosure is the first thing you should consider after buying a subwoofer. electronics fiberglass roller tool (to remove air bubbles), polyester resin (standard fiberglass resin). See the video for the trials and tribulations on pulling all of the wrinkles out and how to fasten it down. PS: Carpeting something like this requires a great deal of skill Heh, I forgot all about mp3car, used to be I was always planning for the ultimate car computer. After removing the enclosure from the car, clean it of any tape and foil. form. has had a chance to set, you are then ready to remove the mold from its completed, move on to the more complicated portion of the custom I do my own custom fiberglass because I enjoy it, (not the part with pinholes that mess with the finish) and if I do it right I have a custom look that could have otherwise cost some serious cash. Now Im rebuilding the dash for round two???? matter what. I use Rage Gold polyester body filler applied very liberally to the project. How Does The James Webb Telescope Phone Home? This part To begin with, it can be shaped to properly suit the shape of your trunk and mimic its features. {aLE^Iazn.Q+_X~{b5o6,Ek]2BMWBaaNU} Wear a mask or a respirator and goggles and only do it in a well-ventilated location. Yup. All MagicBoxes are built to order. The gel-coat layer is only required if you will be painting the We hope you enjoy shopping at Wicked C.A.S. Excellent article and video. I talk about safety in the video.Not just the glass part but care must be taken when sanding bondo. I cant stand polyester resin. The This article has been viewed 48,059 times. 1WM36xT?iMV:nQi[2^k_a$9;e(;x4M3Wq/REhtm^ew t/q> F"qcWkGO3e~Xr."6onVolGq4[6{OM#F/,Lk0WWsy:o'?P4;CV[v Absolutely! BTW, I usually use my belt sander with a real aggressive belt and make the base a lot thinner and flat, or add a bit of contour if needed. So the title of both the video and article say fibreglass, but in the first (and biggest) example you dont even use fibreglass? Magic boxes can be bought with Subwoofers, When you add a subwoofer to your MagicBox order, Discount is taken out of the enclosure. lycra over your project, you then bathe the lycra in fiberglass resin. AVR has updated the project titled Jenny-XJ9. The center console I thinned with maybe a 5% acetone to resin ratio and it soaked into the fleece quite nicely. Still a good demo for the DIYer who probably doesnt want to go through the learning curve. nolandoktor has updated the log for Vortex Watch. The minimal price for the fiberglass enclosures starts at $200, so even the cheap model will set you back more than the subwoofer. You can alter its thickness, shape, color, and cover, among other things. From our tutorial, youll learn how to make a fiberglass subwoofer box in the trunk of your vehicle. Or does it become part of the final product? Once your volumes match up, mate the two pieces ensuring an extremely If you really like the smell, go with polyester resin, but epoxy has a number of advantages besides being low-odor (you can work indoors). 4runner box subwoofer enclosure 5th gen fiberglass toyota ported tacotunes side The low acute toxicity and the rather pleasant odor fool a lot of people into thinking that epoxy systems are healthier than the old and smelly polyesters alas, this is not the case We have banned most epoxies from our shop, going back to plaster, PU (yuck), polyester and acrylic resins. At least if you do not need aerospace level parts. Most of those custom cars you see at shows with fancy molded interiors are hiding many pounds of MDF, wood and bondo. I will however re-create this project come spring to better illustrate the Utilizing fiberglass for something like a custom speaker pod for a car is not difficult, but it does tend to be tedious when it comes to the finishing stages. (wet spots). wikiHow is a wiki, similar to Wikipedia, which means that many of our articles are co-written by multiple authors. subwoofer enclosure for a 12" MB Quart Subwoofer. Simply install the terminal block for This is a great deal of fun! Chemicals are dangerous - especially ones I think its over 6. The fiberglass box has a number of distinct advantages over other forms of enclosures. Acura - MDX 2007 - 2013 SUB BOX SUBWOOFER ENCLOSURE STEALTH LOOK, Acura - TL 2009 - 2014 Magic Box Subwoofer Enclosure Custom Stealth Sub BOX FIBERGLASS, Acura - TLX 2015+ 2016 2017 2018 Magic Box Subwoofer Enclosure Custom Stealth Sub BOX FIBERGLASS, Cadillac - 2015+ 2015-2020 ESCALADE TAHOE YUKON SUB BOX 3X10" DOWN FIRING SUBWOOFER ENCLOSURE STEALTH STORAGE BIN SUB BOX, FJ CRUISER STAGE1 PACKAGE AUDIO UPGRADE STEREO STAGE 1, FJ CRUISER STAGE2 PACKAGE AUDIO UPGRADE STEREO STAGE 2, Honda - Accord 08-2012 Sedan Magic Box Sub box Subwoofer enclosure, Lexus - IS300 01-05 MAGIC BOX DRIVERS & PASSENGER SIDE Sub box Subwoofer enclosure. Piping of fiberglass increases its life and safe from leaking. You can even use denim. power and sound quality. Then remove the subwoofer and measure the volume Thanks to all authors for creating a page that has been read 48,059 times. flammable liquid on earth). The process of hand-crafting a fiberglass subwoofer box takes more than 24 hours. subwoofer These can be purchased or you can cut them out yourself. To prevent chemicals from seeping into your cars trunk, place masking tape there. But at the end of the day I usually get something similar to what I envisioned and that looks cool and unique. If you think the trunk lid is bothering you, you can even remove it. mdf Its important to note that, while this project isnt tough, it will necessitate a lot of steps and patience. By using our website and services, you expressly agree to the placement of our performance, functionality and advertising cookies. this is the most difficult stage. I did a dash and center console, the dash I didnt thin acetone and ended up with several wet spots and a lot of areas that didnt penetrate the fleece. Before you start the project, read ALL manufacturer's labels for Always wanted to To create a mount for the subwoofer, use a jigsaw or any other equipment that is handy for you to cut out the rings (similar to those on a picture). It will take around 2 hours for each layer to dry, depending on the amount of resin you use. Autoclaves are nice, but only really necessary if you are really concerned with weight and want to get the best possible material properties out of the composite. I know it is more expensive, but it is stronger and easier to mix. Just curious if there is any disadvantage to using epoxy? We'll walk you through casting a fiberglass mold of your trunk and using it to create a DIY speaker box. In the next step, you will stretch the lycra (or similar stretchable Congrats! This ring is then held at an angle by a The preferred way to buy resin is to find a source that talks about the freshness of their resin as resin has a shelf life of 3-4 months typically. Once the (Comment Policy). Commonly a glass strand mat is used for building up thicker structures. I do show my table router in the video but do not turn it on due to the noise and mess it would make in the middle of shooting a video.
I learned to make fiberglass molds from poliester resin its cheaper, Please be kind and respectful to help make the comments section excellent. Yeah the stink is mostly nostalgia for me at this point. a fiberglass mold from with a generous helping of Vaseline or release wax. You can use two layers of an old t-shirt to do this job. Less guesswork in measuring amounts of resin/curative. The result will cause the lycra to loosen up slightly To do this, I recommend you use a disposable paint brush and liberally When I think of making messes with a degree of permanency, I think of fiberglass. Keep it up. I wasnt going to get shirty about this we cant all be like Sir David Attenborough and keep to the same outfit for the sake of consistency. I buy my mixing cups by the box as well as my stir sticks. Toyota - FJ Cruiser Rear PODS. Custom fiberglass is also good for molding structures like sunken subwoofer panels and the like, where a very irregular surface needs to be turned into an airtight container for the sake of audio quality. All tip submissions are carefully reviewed before being published. Then sand it down, add another coat, repeat. I also really like the smell, reminds me of a simpler time in 8th grade shop class. % of people told us that this article helped them. subwoofer box custom audio sub fiberglass enclosures modern wrap speaker interior speakers everything tomorrow then bound cars systems instagram subwoofers remove all the water and note the number of liters (L) you removed - this The fabric is thin and strong, but does it behave with the resins? You can see my CNC mill in some shots. Cut or rip the fiberglass into little squares (dont forget to wear gloves while doing it). Once theyve run one around the show circuit for a year or two it begins to look a little tired so theyre off to do the next car. down a gel-coat for final finish. custom-subwoofer enclosure. It took me 5 weekend to get all of the shots. and droop a little more than when it was stapled taught. walls of your new form. Being polyester, the fleece melds well with the resin and becomes fairly solid. I could do a whole post on using a small table router to do things like recess the speaker or rounding off the speaker ring, however the same things can be accomplished using two different size rings or by hand sanding the ring to round it off. True, epoxy is more expensive, but not prohibitively so ($75 for 1.5 gallon kit at U.S. Composites). MDF also makes a good backboard for the pod. I learned many years ago from watching a video by Robert Garza of Select Products that premium resins are red in color; green is an indication of a mixed batch of leftovers. It was pretty sweet with a VIA C7 mini-itx, but these days the factory head unit is much better than most home-brew solutions. I havent seen the video (payg internet) but the article is great. Yeah I have been guilty of assuming it will just keep. Hackaday Podcast 179: Danger Chess, Corona Motors, An Omni-Walker, And A Fast Talking Telescope, This Week In Security: Symbiote, Smart Locks, And CosmicStrand, Your Own Engineering Workstation, With Mame. No fibreglass. And it gives a descent idea of when the part is ready for another layup, although the container of resin will cure a little faster than a big layup. I mean, if you have bought the best 12-inch subwoofer for your car, you need to place it in the best enclosure possible. scion xb custom subwoofer box fiberglass speaker enclosure stealth 2008 customized jdm dream The idea is to soak the fleece with the resin until there are no light spots which indicate the presence of air bubbles. Hi everyone! 76(5k }Kon/jk&_R4.e+ZB 3g xGF]/|8.dFs If you have ever done bodywork on a car you know what kind of mess and effort I am talking about. air volume for installing a 15" subwoofer without sacrificing trunk space. By signing up you are agreeing to receive emails according to our privacy policy. This allows you to pull the finished mold out of the original spot without It does take a little practice to get things right and getting two pieces to match can require some patience. Trim the edges using a jigsaw or a die grinder (they will be very uneven as you pull the enclosure out). {"smallUrl":"https:\/\/www.wikihow.com\/images\/thumb\/9\/94\/Fiberglass-Speaker-Boxes-Step-1.jpg\/v4-460px-Fiberglass-Speaker-Boxes-Step-1.jpg","bigUrl":"\/images\/thumb\/9\/94\/Fiberglass-Speaker-Boxes-Step-1.jpg\/aid1456177-v4-728px-Fiberglass-Speaker-Boxes-Step-1.jpg","smallWidth":460,"smallHeight":345,"bigWidth":728,"bigHeight":546,"licensing":"
EE9s2uiPV!BRZLnGcR+g~~60_35.JPG)
License: Creative Commons<\/a> License: Creative Commons<\/a> License: Creative Commons<\/a> License: Creative Commons<\/a> License: Creative Commons<\/a> License: Creative Commons<\/a> License: Creative Commons<\/a> License: Creative Commons<\/a> License: Creative Commons<\/a> License: Creative Commons<\/a> License: Creative Commons<\/a> License: Creative Commons<\/a> License: Creative Commons<\/a> License: Creative Commons<\/a> License: Creative Commons<\/a> License: Creative Commons<\/a> License: Creative Commons<\/a> License: Creative Commons<\/a>
\n<\/p>
\n<\/p><\/div>"}, {"smallUrl":"https:\/\/www.wikihow.com\/images\/thumb\/8\/88\/Fiberglass-Speaker-Boxes-Step-2.jpg\/v4-460px-Fiberglass-Speaker-Boxes-Step-2.jpg","bigUrl":"\/images\/thumb\/8\/88\/Fiberglass-Speaker-Boxes-Step-2.jpg\/aid1456177-v4-728px-Fiberglass-Speaker-Boxes-Step-2.jpg","smallWidth":460,"smallHeight":345,"bigWidth":728,"bigHeight":546,"licensing":"
\n<\/p>
\n<\/p><\/div>"}, {"smallUrl":"https:\/\/www.wikihow.com\/images\/thumb\/2\/23\/Fiberglass-Speaker-Boxes-Step-3.jpg\/v4-460px-Fiberglass-Speaker-Boxes-Step-3.jpg","bigUrl":"\/images\/thumb\/2\/23\/Fiberglass-Speaker-Boxes-Step-3.jpg\/aid1456177-v4-728px-Fiberglass-Speaker-Boxes-Step-3.jpg","smallWidth":460,"smallHeight":345,"bigWidth":728,"bigHeight":546,"licensing":"
\n<\/p>
\n<\/p><\/div>"}, {"smallUrl":"https:\/\/www.wikihow.com\/images\/thumb\/9\/9a\/Fiberglass-Speaker-Boxes-Step-4.jpg\/v4-460px-Fiberglass-Speaker-Boxes-Step-4.jpg","bigUrl":"\/images\/thumb\/9\/9a\/Fiberglass-Speaker-Boxes-Step-4.jpg\/aid1456177-v4-728px-Fiberglass-Speaker-Boxes-Step-4.jpg","smallWidth":460,"smallHeight":345,"bigWidth":728,"bigHeight":546,"licensing":"
\n<\/p>
\n<\/p><\/div>"}, {"smallUrl":"https:\/\/www.wikihow.com\/images\/thumb\/e\/e0\/Fiberglass-Speaker-Boxes-Step-5.jpg\/v4-460px-Fiberglass-Speaker-Boxes-Step-5.jpg","bigUrl":"\/images\/thumb\/e\/e0\/Fiberglass-Speaker-Boxes-Step-5.jpg\/aid1456177-v4-728px-Fiberglass-Speaker-Boxes-Step-5.jpg","smallWidth":460,"smallHeight":345,"bigWidth":728,"bigHeight":546,"licensing":"
\n<\/p>
\n<\/p><\/div>"}, {"smallUrl":"https:\/\/www.wikihow.com\/images\/thumb\/4\/45\/Fiberglass-Speaker-Boxes-Step-6.jpg\/v4-460px-Fiberglass-Speaker-Boxes-Step-6.jpg","bigUrl":"\/images\/thumb\/4\/45\/Fiberglass-Speaker-Boxes-Step-6.jpg\/aid1456177-v4-728px-Fiberglass-Speaker-Boxes-Step-6.jpg","smallWidth":460,"smallHeight":345,"bigWidth":728,"bigHeight":546,"licensing":"
\n<\/p>
\n<\/p><\/div>"}, {"smallUrl":"https:\/\/www.wikihow.com\/images\/thumb\/1\/1e\/Fiberglass-Speaker-Boxes-Step-7.jpg\/v4-460px-Fiberglass-Speaker-Boxes-Step-7.jpg","bigUrl":"\/images\/thumb\/1\/1e\/Fiberglass-Speaker-Boxes-Step-7.jpg\/aid1456177-v4-728px-Fiberglass-Speaker-Boxes-Step-7.jpg","smallWidth":460,"smallHeight":345,"bigWidth":728,"bigHeight":546,"licensing":"
\n<\/p>
\n<\/p><\/div>"}, {"smallUrl":"https:\/\/www.wikihow.com\/images\/thumb\/6\/65\/Fiberglass-Speaker-Boxes-Step-8.jpg\/v4-460px-Fiberglass-Speaker-Boxes-Step-8.jpg","bigUrl":"\/images\/thumb\/6\/65\/Fiberglass-Speaker-Boxes-Step-8.jpg\/aid1456177-v4-728px-Fiberglass-Speaker-Boxes-Step-8.jpg","smallWidth":460,"smallHeight":345,"bigWidth":728,"bigHeight":546,"licensing":"
\n<\/p>
\n<\/p><\/div>"}, {"smallUrl":"https:\/\/www.wikihow.com\/images\/thumb\/9\/94\/Fiberglass-Speaker-Boxes-Step-9.jpg\/v4-460px-Fiberglass-Speaker-Boxes-Step-9.jpg","bigUrl":"\/images\/thumb\/9\/94\/Fiberglass-Speaker-Boxes-Step-9.jpg\/aid1456177-v4-728px-Fiberglass-Speaker-Boxes-Step-9.jpg","smallWidth":460,"smallHeight":345,"bigWidth":728,"bigHeight":546,"licensing":"
\n<\/p>
\n<\/p><\/div>"}, {"smallUrl":"https:\/\/www.wikihow.com\/images\/thumb\/1\/1c\/Fiberglass-Speaker-Boxes-Step-10.jpg\/v4-460px-Fiberglass-Speaker-Boxes-Step-10.jpg","bigUrl":"\/images\/thumb\/1\/1c\/Fiberglass-Speaker-Boxes-Step-10.jpg\/aid1456177-v4-728px-Fiberglass-Speaker-Boxes-Step-10.jpg","smallWidth":460,"smallHeight":345,"bigWidth":728,"bigHeight":546,"licensing":"
\n<\/p>
\n<\/p><\/div>"}, {"smallUrl":"https:\/\/www.wikihow.com\/images\/thumb\/7\/72\/Fiberglass-Speaker-Boxes-Step-11.jpg\/v4-460px-Fiberglass-Speaker-Boxes-Step-11.jpg","bigUrl":"\/images\/thumb\/7\/72\/Fiberglass-Speaker-Boxes-Step-11.jpg\/aid1456177-v4-728px-Fiberglass-Speaker-Boxes-Step-11.jpg","smallWidth":460,"smallHeight":345,"bigWidth":728,"bigHeight":546,"licensing":"
\n<\/p>
\n<\/p><\/div>"}, {"smallUrl":"https:\/\/www.wikihow.com\/images\/thumb\/b\/b7\/Fiberglass-Speaker-Boxes-Step-12.jpg\/v4-460px-Fiberglass-Speaker-Boxes-Step-12.jpg","bigUrl":"\/images\/thumb\/b\/b7\/Fiberglass-Speaker-Boxes-Step-12.jpg\/aid1456177-v4-728px-Fiberglass-Speaker-Boxes-Step-12.jpg","smallWidth":460,"smallHeight":345,"bigWidth":728,"bigHeight":546,"licensing":"
\n<\/p>
\n<\/p><\/div>"}, {"smallUrl":"https:\/\/www.wikihow.com\/images\/thumb\/a\/a7\/Fiberglass-Speaker-Boxes-Step-13.jpg\/v4-460px-Fiberglass-Speaker-Boxes-Step-13.jpg","bigUrl":"\/images\/thumb\/a\/a7\/Fiberglass-Speaker-Boxes-Step-13.jpg\/aid1456177-v4-728px-Fiberglass-Speaker-Boxes-Step-13.jpg","smallWidth":460,"smallHeight":345,"bigWidth":728,"bigHeight":546,"licensing":"
\n<\/p>
\n<\/p><\/div>"}, {"smallUrl":"https:\/\/www.wikihow.com\/images\/thumb\/1\/18\/Fiberglass-Speaker-Boxes-Step-14.jpg\/v4-460px-Fiberglass-Speaker-Boxes-Step-14.jpg","bigUrl":"\/images\/thumb\/1\/18\/Fiberglass-Speaker-Boxes-Step-14.jpg\/aid1456177-v4-728px-Fiberglass-Speaker-Boxes-Step-14.jpg","smallWidth":460,"smallHeight":345,"bigWidth":728,"bigHeight":546,"licensing":"
\n<\/p>
\n<\/p><\/div>"}, {"smallUrl":"https:\/\/www.wikihow.com\/images\/thumb\/8\/8c\/Fiberglass-Speaker-Boxes-Step-15.jpg\/v4-460px-Fiberglass-Speaker-Boxes-Step-15.jpg","bigUrl":"\/images\/thumb\/8\/8c\/Fiberglass-Speaker-Boxes-Step-15.jpg\/aid1456177-v4-728px-Fiberglass-Speaker-Boxes-Step-15.jpg","smallWidth":460,"smallHeight":345,"bigWidth":728,"bigHeight":546,"licensing":"
\n<\/p>
\n<\/p><\/div>"}, {"smallUrl":"https:\/\/www.wikihow.com\/images\/thumb\/d\/d2\/Fiberglass-Speaker-Boxes-Step-16.jpg\/v4-460px-Fiberglass-Speaker-Boxes-Step-16.jpg","bigUrl":"\/images\/thumb\/d\/d2\/Fiberglass-Speaker-Boxes-Step-16.jpg\/aid1456177-v4-728px-Fiberglass-Speaker-Boxes-Step-16.jpg","smallWidth":460,"smallHeight":345,"bigWidth":728,"bigHeight":546,"licensing":"
\n<\/p>
\n<\/p><\/div>"}, {"smallUrl":"https:\/\/www.wikihow.com\/images\/thumb\/0\/0b\/Fiberglass-Speaker-Boxes-Step-17.jpg\/v4-460px-Fiberglass-Speaker-Boxes-Step-17.jpg","bigUrl":"\/images\/thumb\/0\/0b\/Fiberglass-Speaker-Boxes-Step-17.jpg\/aid1456177-v4-728px-Fiberglass-Speaker-Boxes-Step-17.jpg","smallWidth":460,"smallHeight":345,"bigWidth":728,"bigHeight":546,"licensing":"
\n<\/p>
\n<\/p><\/div>"}, {"smallUrl":"https:\/\/www.wikihow.com\/images\/thumb\/8\/81\/Fiberglass-Speaker-Boxes-Step-18.jpg\/v4-460px-Fiberglass-Speaker-Boxes-Step-18.jpg","bigUrl":"\/images\/thumb\/8\/81\/Fiberglass-Speaker-Boxes-Step-18.jpg\/aid1456177-v4-728px-Fiberglass-Speaker-Boxes-Step-18.jpg","smallWidth":460,"smallHeight":345,"bigWidth":728,"bigHeight":546,"licensing":"
\n<\/p>
\n<\/p><\/div>"}, http://www.instructables.com/id/How-to-Make-a-Fiberglass-Subwoofer-Box/. is the enclosure's air volume minus the subwoofer's displacement. Nice to see a mix of articles on hackaday. wikiHow is where trusted research and expert knowledge come together. Scion FR-S TOYOTA 86 Subaru BRZ - 2011-2019 Fiberglass subwoofer Enclosure stealth sub box Custom MagicBox Magic Box. from the car, continue to add more layers of fiberglass to the inside to know how the pros make these fiberglass enclosures? Also be sure to throw on some garbage clothing - it will be ruined no Well, I meant the MDF you stretched the fleece over. sure you mask off anything that you don't want ruined by fiberglass resin. If you decide to place your There must be a ton of stuff on the internet about home-made pre-preg carbon parts, but the one that springs to mind for me is this one http://www.danstuff.info/furybuild2.htm on the interior panels section http://www.danstuff.info/panels.htm He describes how he made his oven out of MDF and bits of an electric hob. fiberglass audio fibra If youre intending to do custom stuff like this for a daily driver into which youll be stuffing things that bump and bang, go the extra mile and do the mold and production part. http://imgur.com/a/09CDu, were you on mp3car? When youre done, your trunk should resemble this: Then, on top of the masking tape, apply a thick layer of foil.