Your craft piece is only ready to use after 3-4 weeks. To apply the mod podge on wood, you should use a paintbrush or a foam brush. Then go back over it and take the excess off to have a thin, even layer. You should wait half an hour before applying the next coat.  modge The more humid the air, the longer it takes both paint and decoupage medium to cure. Keep smoothing until all of the bubbles are removed. Make your own mouse pad with mod podge.. 2.
  Depending on the project at hand, its feasible to use mod podge before and after painting. thrive place How Long Does Mod Podge take to Dry? (How to Dry it Quickly!) How to Seal Cardboard With Mod Podge. Next, apply a thick layer of Mod Podge Photo Transfer Medium to image side of copy. When mixing water in Mod Podge dont use any electronic means to do so. Dont use white glue/regular glue! IL. podge modge Outdoor Mod Podge: This formula protects your decoupage project from moisture and the elements. Is Mod Podge a liquid or a solid? Apply another layer of Mod Podge to seal everything. or to seal the foam before spray-painting. You can see what each of the Mod Podge finishes look like when they are dry below! Mod Podge Gloss Shiny, glossy finish. This was one of the first Mod Podge formulas. Mod Podge Hard Coat Satin finish: somewhere in between a Gloss and a Matte (slightly shiny). Final Conclusion ; You can adhere fabric, plastic, paper, or any porous material. Using Mod Podge on vinyl Decals - Bling Your Band
 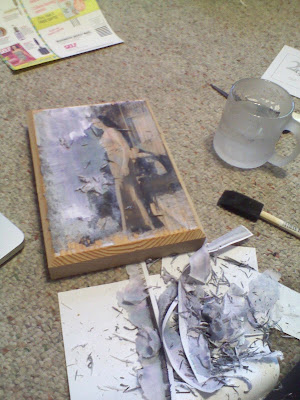 valspar 4. Package Dimensions 13.2 x 10.5 x 4.6 inches Customer Reviews 4.6 out of 5 stars 98 ratings 4.6 out of 5 stars Does Mod Podge. Is Mod Podge Waterproof? (Explained and Solved!) - Crafting Pal
 Here is the step-by-step process: Using a one-inch silicon brush, apply a first coat of Mod Podge on the tumbler heavily.
  Paint it on your surface evenly. podge mod decoupage crafts steps basics templates wood podging before use painted baby perfect bubbles step mobile promo painting diy How to Decoupage: 7 Steps to Perfect Mod Podging - Mod Is there a Mod Podge Alternative? - Best Answer From Experts You should apply another thin layer of mod podge on the picture to make it stick sturdily. Napkins are thin, and when you add moisture, they will fall apart. If its a hard coat, let it dry for 72 hours. Generally, it is vital to give the sealer adequate time to finish curing before making any use of the finished craft. podge modge
  Ideally, since mod podge is a water-based medium, it wont blend well with oil-based paints or latex paint. Next, apply a thick layer of Mod Podge Photo Transfer Medium to image side of copy. It adds an epoxy-like finish to jewelry and paper crafts and dries clear. Yes, PVA glue can be used to seal off objects onto a surface instead of Mod Podge. You really want to start this process only after the spray paint is dry.
  Here are the 5 items that I experimented with: Plain Water; Vinegar and Water; Glass Cleaner; Water and Dish Detergent; Nail Polish Remover; Plain Water. 3. Prepare Items to be Mod Podged. Cut out the paper or whatever it is that you are planning to decoupage. Experiment with design elements to deter If its ink-jet printed paper, spray clear acrylic sealer on both sides of the paper. No, Mod Podge Ultra isnt waterproof. modge podge tray diy Next, cut the photo down with a paper slicer or a metal ruler Once it is dry, wipe the surface once more to get rid of any dust or dirt. Modge Podge
  The fabric dried to the top with no bubbles. First, you can try soaking the fabric/clothing in really hot water. To do this, apply the Mod Podge and let it dry an hour.
  Mod Podge takes up to 24 hours to dry clear on a porous surface. PVA glue is the best alternative to Mod Podge in my opinion. After allowing it to dry for about ten minutes or Back to the Mod Podge removal. For example, if you are Mod Podging an image from a thin napkin onto a dresser, use a Dust gets stuck in the gaps if you leave the painting unfinished. Either substance will cause the glitter to stick. It goes on white, self-levels (somewhat) and dries clear in about 15-20 minutes - cleans up with a wet rag if you need to start over. Mod Podge might dry clear in 24 hours but Paint the Mod Podge on the container with a silicone brush. 2. Pick your Mod Podge formula. Take 1 part of water and 4 parts of Mod Podge in a mixing bowl and stir well to make a fine mixture. After the final coat, sand and then spray a clear acrylic sealer to finish. Mod Podge Using Mod Podge With Your Cricut When mixing water in Mod Podge dont use any electronic means to do so. How To Use Mod Podge On Fabric Tutorial - Petticoat Junktion Apply the first layer of Mod Podge that will preserve the project. Depending on the humidity where you live, this could take several days, especially if you used a lot of Mod Podge.
  podge modge sallie How to Remove Mod Podge Using Common Household Items I attended a workshop on finish work where the instructor did the mod-podge after painting. Let this dry completely overnight. You should not be able to see the image (it should be completely obscured by medium) when you place it down. It feels dry to touch within an hour but let it dry for a day. Press hard to make sure it sticks. Gloves, Mod Podge, 20 Epoxy Mixing Cups, 20 Resin Mixing Sticks. podge modge upcycle removed Tape off top, 1 -2 mm above paint line (and bottom if you did before).. It acts in three forms: Glue: Using it, you could glue up materials such as fabric, paper, plastic, and so on with ease. To minimize the warping, spray the front and back of these papers with an acrylic sealer such as Mod Podge Acrylic Sealer, and let dry. Can You Use Mod Podge On Paper? (Read This First!) Top 7 How to Mod Podge with Napkins Tips | Plaid Online 4. Cut items to fit the surface. Measure as necessary, with a ruler and a pencil, and trim items to fit. Stencils for Wood Signs: How To Prevent Bleeding Under Stencil Make a DIY Confetti vase.. 6. I ran a little kitchen experiment to see what might be the best way to remove the paper and glue. before basics furniture podge modge Slide the wax paper and puzzle onto one sheet of cardboard, lay the other sheet on top, and flip the entire "sandwich" over. After getting the perfect wood piece, apply a mod podge of a thin texture on it. Take 1 part of water and 4 parts of Mod Podge in a mixing bowl and stir well to make a fine mixture. After the Mod Podge dried thoroughly I applied three coats of Hard Coat Mod Podge over the fabric to seal and protect it from damage.
modge The more humid the air, the longer it takes both paint and decoupage medium to cure. Keep smoothing until all of the bubbles are removed. Make your own mouse pad with mod podge.. 2. Depending on the project at hand, its feasible to use mod podge before and after painting. thrive place How Long Does Mod Podge take to Dry? (How to Dry it Quickly!) How to Seal Cardboard With Mod Podge. Next, apply a thick layer of Mod Podge Photo Transfer Medium to image side of copy. When mixing water in Mod Podge dont use any electronic means to do so. Dont use white glue/regular glue! IL. podge modge Outdoor Mod Podge: This formula protects your decoupage project from moisture and the elements. Is Mod Podge a liquid or a solid? Apply another layer of Mod Podge to seal everything. or to seal the foam before spray-painting. You can see what each of the Mod Podge finishes look like when they are dry below! Mod Podge Gloss Shiny, glossy finish. This was one of the first Mod Podge formulas. Mod Podge Hard Coat Satin finish: somewhere in between a Gloss and a Matte (slightly shiny). Final Conclusion ; You can adhere fabric, plastic, paper, or any porous material. Using Mod Podge on vinyl Decals - Bling Your Band 
 valspar 4. Package Dimensions 13.2 x 10.5 x 4.6 inches Customer Reviews 4.6 out of 5 stars 98 ratings 4.6 out of 5 stars Does Mod Podge. Is Mod Podge Waterproof? (Explained and Solved!) - Crafting Pal
  Here is the step-by-step process: Using a one-inch silicon brush, apply a first coat of Mod Podge on the tumbler heavily. Paint it on your surface evenly. podge mod decoupage crafts steps basics templates wood podging before use painted baby perfect bubbles step mobile promo painting diy How to Decoupage: 7 Steps to Perfect Mod Podging - Mod Is there a Mod Podge Alternative? - Best Answer From Experts You should apply another thin layer of mod podge on the picture to make it stick sturdily. Napkins are thin, and when you add moisture, they will fall apart. If its a hard coat, let it dry for 72 hours. Generally, it is vital to give the sealer adequate time to finish curing before making any use of the finished craft. podge modge
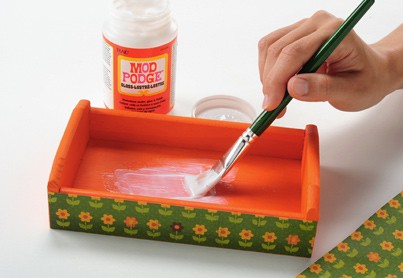
 Ideally, since mod podge is a water-based medium, it wont blend well with oil-based paints or latex paint. Next, apply a thick layer of Mod Podge Photo Transfer Medium to image side of copy. It adds an epoxy-like finish to jewelry and paper crafts and dries clear. Yes, PVA glue can be used to seal off objects onto a surface instead of Mod Podge. You really want to start this process only after the spray paint is dry. Here are the 5 items that I experimented with: Plain Water; Vinegar and Water; Glass Cleaner; Water and Dish Detergent; Nail Polish Remover; Plain Water. 3. Prepare Items to be Mod Podged. Cut out the paper or whatever it is that you are planning to decoupage. Experiment with design elements to deter If its ink-jet printed paper, spray clear acrylic sealer on both sides of the paper. No, Mod Podge Ultra isnt waterproof. modge podge tray diy Next, cut the photo down with a paper slicer or a metal ruler Once it is dry, wipe the surface once more to get rid of any dust or dirt. Modge Podge
  The fabric dried to the top with no bubbles. First, you can try soaking the fabric/clothing in really hot water. To do this, apply the Mod Podge and let it dry an hour.
  Mod Podge takes up to 24 hours to dry clear on a porous surface. PVA glue is the best alternative to Mod Podge in my opinion. After allowing it to dry for about ten minutes or Back to the Mod Podge removal. For example, if you are Mod Podging an image from a thin napkin onto a dresser, use a Dust gets stuck in the gaps if you leave the painting unfinished. Either substance will cause the glitter to stick. It goes on white, self-levels (somewhat) and dries clear in about 15-20 minutes - cleans up with a wet rag if you need to start over. Mod Podge might dry clear in 24 hours but Paint the Mod Podge on the container with a silicone brush. 2. Pick your Mod Podge formula. Take 1 part of water and 4 parts of Mod Podge in a mixing bowl and stir well to make a fine mixture. After the final coat, sand and then spray a clear acrylic sealer to finish. Mod Podge Using Mod Podge With Your Cricut When mixing water in Mod Podge dont use any electronic means to do so. How To Use Mod Podge On Fabric Tutorial - Petticoat Junktion Apply the first layer of Mod Podge that will preserve the project. Depending on the humidity where you live, this could take several days, especially if you used a lot of Mod Podge. podge modge sallie How to Remove Mod Podge Using Common Household Items I attended a workshop on finish work where the instructor did the mod-podge after painting. Let this dry completely overnight. You should not be able to see the image (it should be completely obscured by medium) when you place it down. It feels dry to touch within an hour but let it dry for a day. Press hard to make sure it sticks. Gloves, Mod Podge, 20 Epoxy Mixing Cups, 20 Resin Mixing Sticks. podge modge upcycle removed Tape off top, 1 -2 mm above paint line (and bottom if you did before).. It acts in three forms: Glue: Using it, you could glue up materials such as fabric, paper, plastic, and so on with ease. To minimize the warping, spray the front and back of these papers with an acrylic sealer such as Mod Podge Acrylic Sealer, and let dry. Can You Use Mod Podge On Paper? (Read This First!) Top 7 How to Mod Podge with Napkins Tips | Plaid Online 4. Cut items to fit the surface. Measure as necessary, with a ruler and a pencil, and trim items to fit. Stencils for Wood Signs: How To Prevent Bleeding Under Stencil Make a DIY Confetti vase.. 6. I ran a little kitchen experiment to see what might be the best way to remove the paper and glue. before basics furniture podge modge Slide the wax paper and puzzle onto one sheet of cardboard, lay the other sheet on top, and flip the entire "sandwich" over. After getting the perfect wood piece, apply a mod podge of a thin texture on it. Take 1 part of water and 4 parts of Mod Podge in a mixing bowl and stir well to make a fine mixture. After the Mod Podge dried thoroughly I applied three coats of Hard Coat Mod Podge over the fabric to seal and protect it from damage.