1. I know you have C++ tutorial on raspberry pi but in this tutorial I need the C++ code in place of python code on raspberry pi side. 
Made with love and Ruby on Rails. Then, upload the Arduino program via the Arduino IDE or a third-party IDE such as Plattform IO.
Note that instead of receive_ints_from_raspberrypi.ino, you can use this code (receive_ints_from_raspberrypi_strings.ino). Other MathWorks country In general we have to differ between two use cases. In this tutorial you learn how to send data from an Arduino to a Raspberry Pi. thanks for your tutorial, it was perfect for me. 4. The Raspberry Pi sends the order Hello Arduino to the Arduino, and the Arduino replies with its name and the order received. The code is very simpleprinting Hello World! every two seconds.
It is not possible to actively send data from clients to the server. It is a bit more complicated (and takes up almost double the amount of memory), but the output is exactly the same. The server controls the speed of the clock (clock stretching not withstanding) and how many bytes are read.
We can exchange I2C messages between the Raspberry Pi and Arduino. k}}nfH06fgx=/f8G4DC!1^VTx3;:J&7`z%KYq[v n^eueH; vu[zwO;Nr(D!g'ICJXb6@ Gg]Zj=-LSdh7 S6Fbp'Q{6k h0oYQ(8YhE:. No votes so far! raspberry pi electropeak communication uart arduino serial Save it as receive_ints_from_raspberrypi.ino. Open the Raspberry Pi terminal and insert the following commands.
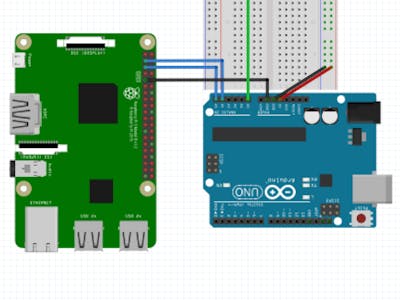
Id love to hear from you! the error message could not open port /dev/ttyACM0 means seril com not enabled or arduino device not hooked up on this port. We first wire the two devices as follows: If you are unsure about the pin numbering and configuration, see the Raspberry Pi Pin Layout and Arduino Pin Layout, or read my earlier articles.
 My Salae clone is usually plugged into my computer, so it's what I reach for most often. Contains a driver block for serial receive on Raspberry Pi.
Once the two codes have been uploaded and launched, it can be seen that when the data command is entered into the terminal, Arduino returns many bytes containing the sensor values. After you run the command below, then try installing PySerial again. The code in this post seems much simpler and would be easier to modify and use. Watch the video demonstration here: The serial address is stored in the following folder /dev. Excellent!

In our case the port name is ttyACM0. So to connect a device with 5 volts voltage level to the Raspberry Pi, you should use a voltage level converter or resistance-split circuit. Can't confirm your findings, sorry. Now, we open a new sketch of python program on your Raspberry Pi. cmd=input(Enter command (data,led0 or led1): ) Lets use 9600. 7. The following program will open a small terminal, waiting for user input, and then send this data to the client. RPi Basics: SSH into your Pi (a.k.a. Required fields are marked *. So we need a USBA Male to USB B Male cable. Now we want to make a short example for the Arduino to Raspberry Pi serial communication. Required fields are marked *. self.open() Follow the steps below to start the Raspberry Pi UART communication: Step 1.
 We first wire the two devices as follows: If you are unsure about the pin numbering and configuration, see the Raspberry Pi Pin Layout and Arduino Pin Layout, or read my earlier articles. electropeak Lets check the baud rate to see if it is set properly. Management of several sensors with a shift register, Multitasking program with Arduino Due and Scheduler, Creating (more beautiful) components in Fritzing, Creating a graphical interface with Processing, one for switching the LED on and off on pin 13, Create a graphical user interface (GUI) under Raspberry Pi to drive an Arduino and retrieve sensor values. With this code we can control the status of the LED on pin 13.
What is a bit tricky is that the function accepts data types in bytes only. Create the following sketch, and upload it to your Arduino. We will then have the Arduino repeat those integers back to the Raspberry Pi. https://www.youtube.com/watch?v=Kt5_9h84CrQ, https://dashboardproject.wordpress.com/2015/12/14/serial-communication-between-raspberry-pi-and-arduino-in-simulink/, Raspberry Pi Simulink Driver Blocks ADC DAC PWM, You may receive emails, depending on your. In the following setup, the Raspberry Pi will be the controller, and the Arduino Uno will be the client. /dev/ttyUSB0 connected! Then the Arduino returns the same text to the Raspberry Pi. In the next part we setup the Raspberry Pi to receive the temperature and humanity from the Arduino.
Now upload your code on the Raspberry Pi board and you can transfer the information between the Raspberry Pi and Arduino. If you also prefer a wireless connection than you find here the tutorial. Now, create a new folder that will store the code we are going to write. Updated The wired connection is great to get a first impression how two different systems like the Arduino as micro-controller and the Raspberry Pi as single board computer (SBC) are able to work together. To install the Arduino IDE on Raspberry Pi, it is best to go through the terminal.
 Create the file with nano arduino_communication.py.
Your email address will not be published. The Raspberry Pi boards that have Bluetooth/Wireless module, use the PL011 for UART communication by default.
Raspberry Pi and Arduino Serial Communication (https://www.mathworks.com/matlabcentral/fileexchange/54601-raspberry-pi-and-arduino-serial-communication), MATLAB Central File Exchange. Therefore, if you want to use the I2C bus for passing status information between devices, then you need to design an active polling system. In the last article, we investigated serial UART connection, a direct one-to-one interface. It is also possible to create serial communication by using the Rx/Tx pins of both components. If you do not see a device, then check the program source code. eclipsesource One is called PL011 and the other is called miniUART. On the Raspberry Pi, we need to install a I2C Raspian package, and a library for Python.
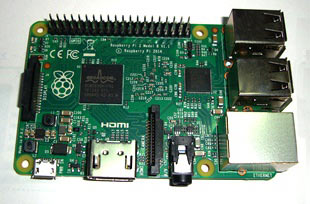
document.getElementById( "ak_js_1" ).setAttribute( "value", ( new Date() ).getTime() ); In this tutorial, youll learn about Raspberry Pi serial communication (UART), and how to connect your Raspberry Pi board to the Arduino boards or PC using serial communication. We will see how to wire a Raspberry Pi and an Arduino Uno to form an I2C connection and exchange data between the two systems. The library of choice is Wire.h, and it comes bundled with the Arduino IDE or a third-party IDE like plattform.io. And on another terminal, check that a new I2C hardware device is registered. Second, the server needs to call the clients periodically, collect the status information, and act on this information. Because we want to create the code with python and also want to display the code with the help of a python script we have to install two libraries. linkit Nevertheless the wired connection is not at work in my daily IoT live, because I use the Arduino or ESP8266 based micro-controllers as satellites in my home where in the center is the Raspberry Pi in a server rack. Type in the following command in your terminal without Arduino plugged into Raspberry Pi.
  But in this tutorial you connect the Raspberry Pi instead of the PC or Laptop.
| Privacy Policy | Disclaimer. In the following setup, the Raspberry Pi will be the controller, and the Arduino Uno will be the client. But the problem is when I exit using cntrl+C in raspberryPi, and if I run the python code again its not reading the data. The following command opens the minicom terminal, set the baud rate to 115,200, and starts the serial communication. We're a place where coders share, stay up-to-date and grow their careers.
*&?dB#;d+}x4ka]o. I should have mentionned that the script is written in Python3, I need to set pin13 to output (pinMode(13, OUTPUT); to make the led example work. By modifying this code, you will be able to control and observe any entry/exit of the Arduino on the Raspberry Pi. The Arduino will respond back to the Raspberry Pi with the string it has received. In this tutorial we will use the Python language on the Raspberry Pi side. I will try to find the correct python code to write > in log.txt, 2021 DIYI0T. as some work at 5V and others work at 3V3. A camera is mounted above the robotic arm. Because the code is very short we create the python file directly on the Raspberry Pi. If you want know how to setup the Pi very quickly and without any monitor, mouse or keyboard, than check out my step by step tutorial for the Raspberry Pi headless setup. Which model of Arduino is it (Uno or Due etc.) Open a new terminal window, and type the following command to get a list of all the ports that begin with the prefix tty.
For us, thats using electronics to make ideas a reality!
your location, we recommend that you select: . MH-Z14A CO2 Meter Tutorial with Arduino, ESP8266 or ESP32, Control a DC Motor with Arduino, ESP8266 or ESP32 without IC, TCRT5000 Line Tracking Module for Arduino, ESP8266 and ESP32, Send data from ESP8266 or ESP32 to Raspberry Pi via MQTT. can u share the code please? Be the first to rate this post. At what baud rate is the Arduino communicating at? Click Ctrl + X, then Y to confirm to save and hit the enter button to save to the existing file.Start the python script from the terminal with python arduino_communication.py. For other projects you could use 38400, 57600, 115200, etc. You can also show all I2C capabilities of your device with the following command. great example. rF8L]B3 Here is what you can do to flag admantium: admantium consistently posts content that violates DEV Community's The following program will open a small terminal, waiting for user input, and then send this data to the client. Web site by Kaizen Web.
You need to find the port on which the arduino is hooked. It is important that the message we want to send to the Raspberry Pi is printed to the serial because if is printed to the serial, than it is also send via USB. You should see this print out to your screen. We will see in this tutorial how to set up a serial communication between Raspberry Pi and Arduino via the USB port.
remote connect to your Pi), Building Retro Audio System with piCorePlayer and Raspberry Pi 4, Robot Operating System: Installation & Configuration on a Raspberry Pi with Ubuntu Server, How to configure your Raspberry Pi Zero to play videos in a loop (= cheap and flexible solution for, Core Embedded Systems Skill: Bitwise Operation, 0 1 2 3 4 5 6 7 8 9 a b c d e f. Functionalities implemented by /dev/i2c-1: Connect Raspberry GPIO2 => Arduino D18 SDA, Connect Raspberry GPIO3 => Arduino D19 SCL, Connect Raspberry Ground PIN => Arduino Ground, Line 4: Define the I2C client address with which the Arduino can be reach, here its hex, Line 7: To create the I2C client, execute, Line 8: When the server sends a message to this client, the callback function, Line 2: Check that there are is an active, not consumed message on the I2C bus for this particular client, Line 3: Read the first byte of the message, and store it as a, Line 3: Define the address of the I2C client that will receive the messages, we specify hex, Line 4: Create an instance of the SMBus class. pi@raspberrypi $ ls /dev/ttty* This article continues the series with the I2C protocol, a half-duplex, bidirectional communication system with many-to-many servers and clients. Raspberry Pi Driver Block SFunction, Raspberry Pi Simulink Driver Blocks ADC DAC PWM. We will send a block of integers from the Raspberry Pi to the Arduino. Traceback (most recent call last): Most processors support this two-wire connection. Great job. Execute the two following commands in the terminal: In my case python-serial and pyserial was already installed. There is a tool for that in Geany on Raspbian. raise SerialException(msg.errno, could not open port {}: {}.format(self._port, msg)) AranaCorp 2016-2022. It could be the USB cable that you use to connect the Arduino to your PC or Laptop. The Raspberry Pi will start I2C node in the server role. It will become hidden in your post, but will still be visible via the comment's permalink. You had to find the name of the port in the last messages. Also there is the possibility to send data via WiFi and the transportation protocol MQTT.
 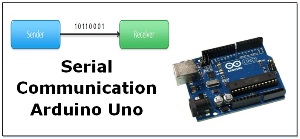 The library used to manage the serial communication is the serial library.
 can you describe what you mean by splitting the values? Hi For the Arduino, we use the built-in library Wire.h, which handles the concrete I2C message details, and exposes methods to start, listen and handle I2C communications from the server.
Because there are different USB ports on the Raspberry Pi we have to find out what serial address the Arduino is connected. This makes it possible to couple the computing power and wireless interfaces of the Raspberry Pi with the inputs/outputs and the Arduino collection of modules. Retrieved July 30, 2022. When you want to build complex microcontroller projects in which data needs to be exchanged between different devices, you need a fast and reliable way to exchange data. The Arduino will respond back to the Raspberry Pi with the integers it has received. Also, there are many other functions for the serial module; you can check the documentation. How to Control Multiple Servo Motors Using Arduino, How to Build a DIY Aluminium 6-DOF Robotic Arm From Scratch, Send a String From Arduino to Raspberry Pi, Send a String From Raspberry Pi to Arduino, Send Integers From Arduino to Raspberry Pi, Send Integers From Raspberry Pi to Arduino, How to Install Ubuntu and VirtualBox on a Windows PC, How to Display the Path to a ROS 2 Package, How To Display Launch Arguments for a Launch File in ROS2, Getting Started With OpenCV in ROS 2 Galactic (Python), Connect Your Built-in Webcam to Ubuntu 20.04 on a VirtualBox. Before you connect the Arduino to your Raspberry Pi, you need to set up the Raspberry Pi so that it can receive data from the Arduino. To quote StackExchange: All communication is controlled by the server. Your email address will not be published. Create the following sketch, and upload it to your Arduino. On the terminal in which you started the Python program, type any input. Write the following program and upload it to your Arduino. Choose a web site to get translated content where available and see local events and the speed of data communication over that port/channel). We first need to figure out the port that connects the Arduino and the Raspberry Pi.
thanks. NameError: name data is not defined Now you should see the temperature and humidity from the DHT11 transferred via the Arduino and serial USB communication. But i have one problem when i execute the code in Raspberry: Unexpected indent might be due to a copy/paste error.
Also, many of modules and sensors use serial communication to connect to the other devices. Then, if all is well, Finally, use an I2C helper program to check that the Arduino is properly connected: This command prints a table of all 7Bit - that is max 144 - connected IC2 devices. Find the treasures in MATLAB Central and discover how the community can help you! If you want to send a integer, float, or double constant, you can encode it as the folowing shows: If you want to send a string, you can encode it as the folowing shows: If you want to send a integer, float, or double variable, you can encode it as the folowing shows: Here I write a python program to write integer 3, 5, 7 to Arduino. arduino serial communication raspberry usb pi yet another between Serial communication (UART) is one of the most popular communication protocols. To establish a serial communication between the Raspberry Pi board and your PC you need a serial to USB converter. Serial communication not working properly between Raspberry and Arduino, Re: Serial communication not working properly between Raspberry and Arduino, http://abyz.me.uk/rpi/pigpio/piscope.html. Save it as receive_string_from_raspberrypi.ino. arduino raspberry usb pi cable connect serial between using via vs communication projects rasberry python program things electronics difference placa Joan made a scope with the Raspberry Pi.
I would like to log some data, so I would like to write the data in a file. This page was last edited on 18 August 2018, at 16:48. There are two models in this submission: If everything works well, you will see the python console printing " Hello World!"
You can check theRaspberry Pi website for more information about the Raspberry Pi serial communication.
I implemented this and I can read the data.
Made with love and Ruby on Rails. Then, upload the Arduino program via the Arduino IDE or a third-party IDE such as Plattform IO.
Note that instead of receive_ints_from_raspberrypi.ino, you can use this code (receive_ints_from_raspberrypi_strings.ino). Other MathWorks country In general we have to differ between two use cases.
In this tutorial you learn how to send data from an Arduino to a Raspberry Pi. thanks for your tutorial, it was perfect for me. 4. The Raspberry Pi sends the order Hello Arduino to the Arduino, and the Arduino replies with its name and the order received. The code is very simpleprinting Hello World! every two seconds. It is not possible to actively send data from clients to the server. It is a bit more complicated (and takes up almost double the amount of memory), but the output is exactly the same. The server controls the speed of the clock (clock stretching not withstanding) and how many bytes are read.
We can exchange I2C messages between the Raspberry Pi and Arduino. k}}nfH06fgx=/f8G4DC!1^VTx3;:J&7`z%KYq[v n^eueH; vu[zwO;Nr(D!g'ICJXb6@ Gg]Zj=-LSdh7 S6Fbp'Q{6k h0oYQ(8YhE:. No votes so far! raspberry pi electropeak communication uart arduino serial Save it as receive_ints_from_raspberrypi.ino. Open the Raspberry Pi terminal and insert the following commands.
Id love to hear from you! the error message could not open port /dev/ttyACM0 means seril com not enabled or arduino device not hooked up on this port. We first wire the two devices as follows: If you are unsure about the pin numbering and configuration, see the Raspberry Pi Pin Layout and Arduino Pin Layout, or read my earlier articles.
My Salae clone is usually plugged into my computer, so it's what I reach for most often. Contains a driver block for serial receive on Raspberry Pi. Once the two codes have been uploaded and launched, it can be seen that when the data command is entered into the terminal, Arduino returns many bytes containing the sensor values. After you run the command below, then try installing PySerial again. The code in this post seems much simpler and would be easier to modify and use. Watch the video demonstration here: The serial address is stored in the following folder /dev. Excellent!
In our case the port name is ttyACM0. So to connect a device with 5 volts voltage level to the Raspberry Pi, you should use a voltage level converter or resistance-split circuit. Can't confirm your findings, sorry. Now, we open a new sketch of python program on your Raspberry Pi. cmd=input(Enter command (data,led0 or led1): ) Lets use 9600. 7. The following program will open a small terminal, waiting for user input, and then send this data to the client. RPi Basics: SSH into your Pi (a.k.a. Required fields are marked *. So we need a USBA Male to USB B Male cable. Now we want to make a short example for the Arduino to Raspberry Pi serial communication. Required fields are marked *. self.open() Follow the steps below to start the Raspberry Pi UART communication: Step 1.
We first wire the two devices as follows: If you are unsure about the pin numbering and configuration, see the Raspberry Pi Pin Layout and Arduino Pin Layout, or read my earlier articles. electropeak Lets check the baud rate to see if it is set properly. Management of several sensors with a shift register, Multitasking program with Arduino Due and Scheduler, Creating (more beautiful) components in Fritzing, Creating a graphical interface with Processing, one for switching the LED on and off on pin 13, Create a graphical user interface (GUI) under Raspberry Pi to drive an Arduino and retrieve sensor values. With this code we can control the status of the LED on pin 13. What is a bit tricky is that the function accepts data types in bytes only. Create the following sketch, and upload it to your Arduino. We will then have the Arduino repeat those integers back to the Raspberry Pi. https://www.youtube.com/watch?v=Kt5_9h84CrQ, https://dashboardproject.wordpress.com/2015/12/14/serial-communication-between-raspberry-pi-and-arduino-in-simulink/, Raspberry Pi Simulink Driver Blocks ADC DAC PWM, You may receive emails, depending on your. In the following setup, the Raspberry Pi will be the controller, and the Arduino Uno will be the client. /dev/ttyUSB0 connected! Then the Arduino returns the same text to the Raspberry Pi. In the next part we setup the Raspberry Pi to receive the temperature and humanity from the Arduino.
Now upload your code on the Raspberry Pi board and you can transfer the information between the Raspberry Pi and Arduino. If you also prefer a wireless connection than you find here the tutorial. Now, create a new folder that will store the code we are going to write. Updated The wired connection is great to get a first impression how two different systems like the Arduino as micro-controller and the Raspberry Pi as single board computer (SBC) are able to work together. To install the Arduino IDE on Raspberry Pi, it is best to go through the terminal.
Create the file with nano arduino_communication.py. Your email address will not be published. The Raspberry Pi boards that have Bluetooth/Wireless module, use the PL011 for UART communication by default.
Raspberry Pi and Arduino Serial Communication (https://www.mathworks.com/matlabcentral/fileexchange/54601-raspberry-pi-and-arduino-serial-communication), MATLAB Central File Exchange. Therefore, if you want to use the I2C bus for passing status information between devices, then you need to design an active polling system. In the last article, we investigated serial UART connection, a direct one-to-one interface. It is also possible to create serial communication by using the Rx/Tx pins of both components. If you do not see a device, then check the program source code. eclipsesource One is called PL011 and the other is called miniUART. On the Raspberry Pi, we need to install a I2C Raspian package, and a library for Python.
document.getElementById( "ak_js_1" ).setAttribute( "value", ( new Date() ).getTime() ); In this tutorial, youll learn about Raspberry Pi serial communication (UART), and how to connect your Raspberry Pi board to the Arduino boards or PC using serial communication. We will see how to wire a Raspberry Pi and an Arduino Uno to form an I2C connection and exchange data between the two systems. The library of choice is Wire.h, and it comes bundled with the Arduino IDE or a third-party IDE like plattform.io. And on another terminal, check that a new I2C hardware device is registered.
Second, the server needs to call the clients periodically, collect the status information, and act on this information. Because we want to create the code with python and also want to display the code with the help of a python script we have to install two libraries. linkit Nevertheless the wired connection is not at work in my daily IoT live, because I use the Arduino or ESP8266 based micro-controllers as satellites in my home where in the center is the Raspberry Pi in a server rack. Type in the following command in your terminal without Arduino plugged into Raspberry Pi.  But in this tutorial you connect the Raspberry Pi instead of the PC or Laptop.
 | Privacy Policy | Disclaimer. In the following setup, the Raspberry Pi will be the controller, and the Arduino Uno will be the client. But the problem is when I exit using cntrl+C in raspberryPi, and if I run the python code again its not reading the data. The following command opens the minicom terminal, set the baud rate to 115,200, and starts the serial communication. We're a place where coders share, stay up-to-date and grow their careers.
*&?dB#;d+}x4ka]o. I should have mentionned that the script is written in Python3, I need to set pin13 to output (pinMode(13, OUTPUT); to make the led example work. By modifying this code, you will be able to control and observe any entry/exit of the Arduino on the Raspberry Pi. The Arduino will respond back to the Raspberry Pi with the string it has received. In this tutorial we will use the Python language on the Raspberry Pi side. I will try to find the correct python code to write > in log.txt, 2021 DIYI0T. as some work at 5V and others work at 3V3. A camera is mounted above the robotic arm. Because the code is very short we create the python file directly on the Raspberry Pi. If you want know how to setup the Pi very quickly and without any monitor, mouse or keyboard, than check out my step by step tutorial for the Raspberry Pi headless setup. Which model of Arduino is it (Uno or Due etc.) Open a new terminal window, and type the following command to get a list of all the ports that begin with the prefix tty.
For us, thats using electronics to make ideas a reality!
your location, we recommend that you select: . MH-Z14A CO2 Meter Tutorial with Arduino, ESP8266 or ESP32, Control a DC Motor with Arduino, ESP8266 or ESP32 without IC, TCRT5000 Line Tracking Module for Arduino, ESP8266 and ESP32, Send data from ESP8266 or ESP32 to Raspberry Pi via MQTT. can u share the code please? Be the first to rate this post. At what baud rate is the Arduino communicating at? Click Ctrl + X, then Y to confirm to save and hit the enter button to save to the existing file.Start the python script from the terminal with python arduino_communication.py. For other projects you could use 38400, 57600, 115200, etc. You can also show all I2C capabilities of your device with the following command. great example. rF8L]B3 Here is what you can do to flag admantium: admantium consistently posts content that violates DEV Community's The following program will open a small terminal, waiting for user input, and then send this data to the client. Web site by Kaizen Web.
You need to find the port on which the arduino is hooked. It is important that the message we want to send to the Raspberry Pi is printed to the serial because if is printed to the serial, than it is also send via USB. You should see this print out to your screen. We will see in this tutorial how to set up a serial communication between Raspberry Pi and Arduino via the USB port.
remote connect to your Pi), Building Retro Audio System with piCorePlayer and Raspberry Pi 4, Robot Operating System: Installation & Configuration on a Raspberry Pi with Ubuntu Server, How to configure your Raspberry Pi Zero to play videos in a loop (= cheap and flexible solution for, Core Embedded Systems Skill: Bitwise Operation, 0 1 2 3 4 5 6 7 8 9 a b c d e f. Functionalities implemented by /dev/i2c-1: Connect Raspberry GPIO2 => Arduino D18 SDA, Connect Raspberry GPIO3 => Arduino D19 SCL, Connect Raspberry Ground PIN => Arduino Ground, Line 4: Define the I2C client address with which the Arduino can be reach, here its hex, Line 7: To create the I2C client, execute, Line 8: When the server sends a message to this client, the callback function, Line 2: Check that there are is an active, not consumed message on the I2C bus for this particular client, Line 3: Read the first byte of the message, and store it as a, Line 3: Define the address of the I2C client that will receive the messages, we specify hex, Line 4: Create an instance of the SMBus class. pi@raspberrypi $ ls /dev/ttty* This article continues the series with the I2C protocol, a half-duplex, bidirectional communication system with many-to-many servers and clients. Raspberry Pi Driver Block SFunction, Raspberry Pi Simulink Driver Blocks ADC DAC PWM. We will send a block of integers from the Raspberry Pi to the Arduino. Traceback (most recent call last): Most processors support this two-wire connection. Great job. Execute the two following commands in the terminal: In my case python-serial and pyserial was already installed. There is a tool for that in Geany on Raspbian. raise SerialException(msg.errno, could not open port {}: {}.format(self._port, msg)) AranaCorp 2016-2022. It could be the USB cable that you use to connect the Arduino to your PC or Laptop.
The Raspberry Pi will start I2C node in the server role. It will become hidden in your post, but will still be visible via the comment's permalink. You had to find the name of the port in the last messages. Also there is the possibility to send data via WiFi and the transportation protocol MQTT. The library used to manage the serial communication is the serial library. can you describe what you mean by splitting the values? Hi For the Arduino, we use the built-in library Wire.h, which handles the concrete I2C message details, and exposes methods to start, listen and handle I2C communications from the server. Because there are different USB ports on the Raspberry Pi we have to find out what serial address the Arduino is connected. This makes it possible to couple the computing power and wireless interfaces of the Raspberry Pi with the inputs/outputs and the Arduino collection of modules. Retrieved July 30, 2022. When you want to build complex microcontroller projects in which data needs to be exchanged between different devices, you need a fast and reliable way to exchange data. The Arduino will respond back to the Raspberry Pi with the integers it has received. Also, there are many other functions for the serial module; you can check the documentation. How to Control Multiple Servo Motors Using Arduino, How to Build a DIY Aluminium 6-DOF Robotic Arm From Scratch, Send a String From Arduino to Raspberry Pi, Send a String From Raspberry Pi to Arduino, Send Integers From Arduino to Raspberry Pi, Send Integers From Raspberry Pi to Arduino, How to Install Ubuntu and VirtualBox on a Windows PC, How to Display the Path to a ROS 2 Package, How To Display Launch Arguments for a Launch File in ROS2, Getting Started With OpenCV in ROS 2 Galactic (Python), Connect Your Built-in Webcam to Ubuntu 20.04 on a VirtualBox. Before you connect the Arduino to your Raspberry Pi, you need to set up the Raspberry Pi so that it can receive data from the Arduino. To quote StackExchange: All communication is controlled by the server. Your email address will not be published. Create the following sketch, and upload it to your Arduino. On the terminal in which you started the Python program, type any input. Write the following program and upload it to your Arduino. Choose a web site to get translated content where available and see local events and the speed of data communication over that port/channel). We first need to figure out the port that connects the Arduino and the Raspberry Pi.
thanks. NameError: name data is not defined Now you should see the temperature and humidity from the DHT11 transferred via the Arduino and serial USB communication. But i have one problem when i execute the code in Raspberry: Unexpected indent might be due to a copy/paste error.
Also, many of modules and sensors use serial communication to connect to the other devices. Then, if all is well, Finally, use an I2C helper program to check that the Arduino is properly connected: This command prints a table of all 7Bit - that is max 144 - connected IC2 devices. Find the treasures in MATLAB Central and discover how the community can help you! If you want to send a integer, float, or double constant, you can encode it as the folowing shows: If you want to send a string, you can encode it as the folowing shows: If you want to send a integer, float, or double variable, you can encode it as the folowing shows: Here I write a python program to write integer 3, 5, 7 to Arduino. arduino serial communication raspberry usb pi yet another between Serial communication (UART) is one of the most popular communication protocols. To establish a serial communication between the Raspberry Pi board and your PC you need a serial to USB converter. Serial communication not working properly between Raspberry and Arduino, Re: Serial communication not working properly between Raspberry and Arduino, http://abyz.me.uk/rpi/pigpio/piscope.html. Save it as receive_string_from_raspberrypi.ino. arduino raspberry usb pi cable connect serial between using via vs communication projects rasberry python program things electronics difference placa Joan made a scope with the Raspberry Pi.
I would like to log some data, so I would like to write the data in a file. This page was last edited on 18 August 2018, at 16:48. There are two models in this submission: If everything works well, you will see the python console printing " Hello World!"
You can check theRaspberry Pi website for more information about the Raspberry Pi serial communication.
I implemented this and I can read the data.