The use of spline allows you to start wherever you choose.
Why You Shouldnt Nail Nailing laminate planks down will cause damage that will not only make the floor useless, but also void your warranty.  We let them sit in the room for about two weeks to acclimate to the house.
  You can normally trace the extinction of cut nail use to the introduction of a local train depot in your communities past.
  Each one by hand. I have read mixed reviews on which polyurethane is tough enough to stand the test of time. When taping sheets together, tape them to each other and not to the floor. Look them up on this site under the suppliers. my wife was giving me doubts last night as to the facenailing issue since she heard my bro in law.
So because of this issue, our workflow for each board was setting the nails, cleaning up the plastic shards, hammering the nail heads flush with the board, and then using a nail set to recess the nails slightly below the wood surface. Your email address will not be published. was it acceptable? Continue the installation in the other direction until there is insufficient space to use the floor nailer. We were able to source the new #3 grade Ponderosa pine boards through a local wood supply company for $1 per square foot, and had them delivered. The information provided above is for informational purposes only.
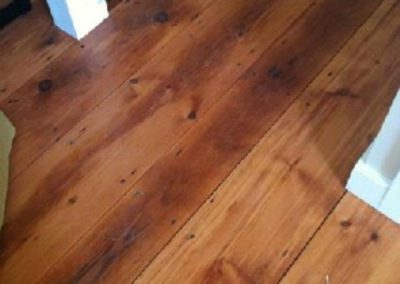
The entire floor should be covered, since some species are light-sensitive and uncovered areas may change color. Here you'll find a wide range of discussions on old-house topics. And we will be doing it again in other rooms as soon as we can. floorboards This gave a nice v-groove accent between the boards. Nail down installation of wide plank solid and wide plank engineered flooring requires additional bonding to the subfloor to prevent movement and squeaks. So my husband cut a piece to fit. This installation methodcan also involve more equipment and creative carpentry to set and keep the boards in place while they set up in the glue. by James Wed Apr 26, 2006 10:08 pm, Post By midway through the install the boards were all starting to look the same and we wasted a lot of time looking for the defects again to decide if a board was usable. The floor of the kitchen in our house is original to the build. , Sabizabulin: Covid-19, 17,5 . This way the nails didn't blow through into the basement ceiling below. ', .
Log siding was my first choice but way too expensive.
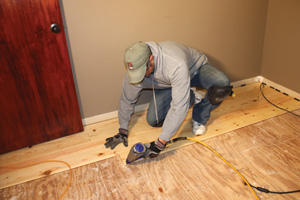
Fasteners shall be installed between 3/4 in. Aglue down installation will be more time consuming. They include a traditional plywood subfloor, some kind of radiant heat system either in concrete or in plywood, or a concrete slab with or without sleepers. Can you please email me at hoodcreeklogcabin@gmail.com and I will get right back to you. Dettol: 2 1 ! Inspire. Here's the breakdown of the cost of this floor: The wood was $1 per square foot and we ordered about 20% extra, so $719 with delivery fees. After growing up in construction and with more than 30 years in the field, she believes a girl can swing a hammer with the best of them. in fact my wife looked at me as i was face nailing the first board and said" i did not realize this will be a slow process". By the way, when we renovate the kitchen, this original floor will be refinished. I think it looks nice. Can't quite tell from the pictures. longleaf hardwood We adjusted the nailer to set the nails about an 1/8" above the wood because the plastic collated nails we used made shards of plastic that shot into the wood and blew out the hole. #23 - Refresh Living, http://lehmanlane.net/laundry-room-renovation/, https://lehmanlane.net/powder-room-reveal-diy-wood-counter-tops/, How to Build a DIY Chicken Coop & Run that your Chickens & Husband will LOVE. When we had a butt joint of two boards, only one board actually was nailed into the floor joist. anyway, we recently ripped out the carpet in the sunroom since the PO had 4 cats and a dog and the smell remained even after 2 doses of carpet shampooing. If you are installing your floor to a standard plywood subfloor then the blind nail and glue method is the best installation for you. pine yellow flooring reclaimed face studio by therapist Tue Apr 25, 2006 7:13 pm, Post Daraka, you have no idea how timely these instructions are! Stone, after all, would shatter, as would ceramic tiles. DIY Unfinished Wide Pine Floors & if Pine Flooring is a Good Idea, How to Install Pine Flooring or Wide Pine Floors, Taking out Carpet to Install Wide Pine Flooring, Prepping Floors for the Unfinished Wide Pine Flooring, Acclimating the Wide Pine Floors & Adding a Underlayment, Installing the Wide Pine Boards with a Floor Stapler, Adding Wood Putty to the Knots in the Pine Floors, Adding Polyurethane to the Installed Pine Floors. Do you have one near you? How to Build a Horseshoe Pit that Rocks in 6 Easy DIY Steps! We used a jigsaw to cut out the holes for the floor vents. face nailing pine floors with cut masonry nails. See how those nails line up with the nails in the other boards? We measured from the walls to the seam in the plywood subfloor to see if that line was square, and it was. If that didn't answer your question, just let me know again. Face nailing does add more labor and cost to the installation so if your installer has recommended this for your new Carlisle floor speak with your specialist to make sure it is necessary before you proceed. If you want to face-nail the entire floor, drill pilot holes and use two nails side-by-side every 8 to 16 inches across the length, sinking into the floor joists wherever present. we used for the next floor and it worked so much better than the one shown in the picture above.
The technique requires a pair of nails, driven at opposing 45-degree angles. It is commonly assumed that if you use a board over 5 wide that you must face nail the boards, or install plugs, to keep the boards flat. You'll have to send me pictures when you're done. A full glue down installation is quite different from blind nail and glue. Some popular glue down adhesives includes Bostiks Best, Mapei, Loba-Wakol, and Sika. The decision to face nail a floor all depends on the overall look you want to create, your personal preference and the type/thickness of your subfloor. Face nailing is the common practice used to nail the first few rows of boards in place because it is difficult to maneuver hardwood floor nail guns close to the wall. pine pumpkin flooring reclaimed sample the only thing I would reccommend is that you order some nailss from Tremont Nail Company. concrete stained pine southern yellow flooring arguably burn distressing face most floors by lrkrgrrl Wed Apr 26, 2006 9:09 am, Post For future projects we will definitely use different collated nails.
Very labor intensive, even with the introduction of mechanincal stamping. Karie Fay earned a Bachelor of Science in psychology with a minor in law from the University of Arkansas at Monticello. by therapist Wed Apr 26, 2006 4:37 pm, Post Avoid taping to the finished flooring, as it may react and weaken the finish. Linoleum and vinyl are glued, while carpet is stretched and attached to tack strips as anchors. pine flooring floors floor wood plywood furniture Talk to a specialist about finish options. Then we cut about an inch off of some nails to use in the board on the left. Your email address will not be published. Thanks for joining us on this crazy renovation ride! To install a face-nailed floor, lay out the floor as you normally would. To finish the last rows, treat them as in a floating floor installation by gluing the boards together at the tongue and groove; as well as brad nailing or hand nailing the boards in place. If you prefer to stay with regular nails, you'll want to cover them so they don't show.
This post is getting so long, I figured I would break it up into two posts. pine heart flooring reclaimed floors hermitage floor wood antique smooth wide colors mountainlumber plank lynnfield ma visit grade lumber Undercut drywall and use tmould between the tile and hardwood when running widthwise. Any covering should be taped, using a low-adhesion tape (Blue 3M), to the base or shoe mouldings. To have the most aesthetically pleasing look have no joints closer than 3 times the width of the pieces; avoid H Joints and stair stepping from not completing rows. The installation method recommended is not a full glue down installation, but only a bead of glue across the width of the board.
Face-nailing attaches the wood in the simplest, most straightforward manner possible. My husband made this template to keep each set of nails evenly spaced and consistent. This field is for validation purposes and should be left unchanged. Please see these other posts for further information on how we installed 12" wide plank pine tongue and groove floors next.
Starting the installation in the center of large rooms can reduce these potential problems by forcing the expansion to go in two directions. Please note, comments must be approved before they are published. The Ontario Building Code requires cleats be used in all floors with a width of 4 or greater. Have you considered renting a flooring nailer? A Nail Punch, also known as a Nailset or Nail Set, is used with a hammer to drive nails into wood. The resin that prevents the tape from drying out can chemically react with the finish, causing it to come off when the tape is removed. its a just sunroom but i have no idea how a whole floor secured with cut nails will look since ive never seen one. Any flooring installation involving wood or woodlike products, such as bamboo or cork, requires nailing.
They look amazing! The builder and original owner of our home was a wood reclaimer way back in the 1980s, before it was cool. So I see no reason not to do it. Disclosure Statement & Privacy Policy. Face nail only the last row if it will be hidden by baseboard or quarter round (gluing the last rows together at the tongue and groove will keep them connected, enabling them to move with the rest of the floor through seasonal changes). TOE-NAILING In contrast, toe-nailing produces a strong joint. It is very uncommon to install antique cut nails in hardwood flooring or antique wood flooring. SANGI, : , , 62,4% Covid-19, , EMA: , : Summer school on natural drug products. Show off your sense of style by using a little different nail when you face-nail: cut nails. i should be done before the wednesday. We found an even better source since this post. We are moving full steam ahead on the renovation of our attached mother-in-law apartment in preparation for my in-lawsto move into it. Hi Christina! I haven't had time to write the follow up post but I will be happy to email you everything we did. We used a square to mark the location of the floor joists on the paper, using the nail line of the subfloor as a guide. i only saw cut nails used to secure the 1st boards of our 2nd floor pine floors. With each board we used a flooring nailer to nail the edge down and help keep the joints tight. I'll be laying the floor boards when I'm done with the walls, meanwhile they are acclimating in the center of the floor with spacers for air circulation. Beads of glue are applied to the back of the boards with a caulking gun. Sometimes face-nailing is the best choice -- or perhaps the only choice depending on the situation. Use a covering material with a vapor permeance (perm rating) of 1 perm or more (tested in accordance with ASTM E-96) to avoid trapping moisture/vapor on or within the floor. , 210 2829552. The next time I see him I've got to remember to ask him where these boards came from because everything in this house has a story. Remove your backer board. To run parallel to the floor joists, you must add a layer of 1/2 plywood underlayment or brace every 16 between the joists with a nominal 2 x 6 spf nailed in place. Well that's exactly what my place has, 230plus year old pine planks, face nailed. The type of subfloor you use will determine the method you use to secure the flooring. If many of your nails look like the photo then the siding installation was not the best job. Because fasteners penetrate the tongue of the flooring at an angle, they act like tent pegs and resist a great deal of force in the direction the fastener enters the subfloor. The most popular floor to face nail is our historic Eastern White Pineflooring,especially if you are trying to create a vintage or restoration style floor. substrate securing wideplankflooring nailing carlisle With Carlisles higher quality standards, SlowCraft manufacturing process and proper installation methods, we have installed boards up to 20 wide, with no face nails, that are still flat and stable today. Mostly they look straight, I only got 3 extra You and your husband gave me so many good ideas and tips I will be using (bevel edges, use a template for nails (I'll be using screws), glue butt joints, use floor jack, you guys really have some great ideas! : nailing in which the nailheads are exposed to view and which is used in the fastening of facing wood to a base. I was planning on every 2 feet but am open to suggestion. And. It is typically used for finishing work like installing skirting and trim, and other applications where the appearance of the finished piece is important. Update: Please see these other posts for further information on how we installed 12" wide plank pine tongue and groove floors next. This photo is from toward the end, I forgot to take a photo earlier. One of the goals in our renovation of this house has been to make choices of materials that fit the house well and honor its uniqueness. southendreclaimed In some cases, your installer may use a full spread glue, which we will go over in the next section. For this reason, wood flooring has a tendency to expand mainly in the direction the tongue is facing. Wow. Once the boards are installed, they are considered to have been accepted by the installer and homeowner. Wood flooring and wood flooring products, on the other hand, use screws, staples or nails. Use 2 cleats, 1-2 from the board ends, and 4-6 apart with a minimum 4 cleats per piece. This is the most popular, and the most efficient installation method for Carlisle floors and can be used on solid wood flooring and engineered wood flooring.
You may even prefer the look of a face-nailed floor, but not be able to identify it as face-nailed. After installation, use an approved protective cover to protect the floor. After each board was cut to size, wesanded a small bevel on the top two long edges. Solid hardwood must be installed perpendicular to the joists or on a diagonal for any single layer subfloor. by James Tue Apr 25, 2006 8:38 pm, Post How do you install nail face on hardwood floors? We used Liquid Nails for subfloors to basically glue the ends of the two boards together, so they will move together with expansion and prevent cupping on the ends. Starting along the longest wall or the wall to which you want your flooring to run parallel, push 1/4-inch spacers against the wall edge every few feet. i initially thought of putting just plywood but Lowes had a deal on fir floor planks. She enjoys "green" or innovative solutions and unusual construction. FAQ: What documents do I need for my permit? I'm showing my husband now, we are really looking into new flooring and especially on a budget! This reduces the likelihood that there will be enough movement to cause cupping and cracking. This post is getting so long, I figured I would break it up into two posts. If you want to face-nail the entire floor, drill pilot holes and use two nails side-by-side every 8 to 16 inches across the length, sinking into the floor joists wherever present. Did you set your nails every foot or every two feet? We used Liquid Nails for subfloors to basically glue the ends of the two boards together, so they will move together with expansion and prevent cupping on the ends. Required fields are marked *, Copyright .
Here is how we installed a DIY wide plank pine floor in our home, using 12" pine boards. Face nailing is applicable where dictated by building code, in high wind areas, and when fastening is to OSB or equivalent sheathing without penetrating into studs. about the pneumatic flooring nailer, my bro in law has one but ive never seen it used. If you decide to face nail your installer will determine the size of the nail you need and the nailing pattern they will use. The simplest way to visualize this process is to picture a paint being applied to a wall, as the glue is applied to the subfloor before the boards are set in place. On boards 7 & wider cut vapor retarder in half (18) which doubles the number of glue lines. pine floor face floors nailed flooring wood installation
Using empty flooring boxes is not acceptable. flooring wood floor plank hardwood floors tongue groove face nails nailing boards planks creaking rotting wooden reclaimed wide dremel This past week we tackled one of the biggest projects, replacing all of the flooring in the great room and kitchen. A few times we ended up with a board that wasn't lining up well with the previous board, leaving a wider gap than we wanted at one end. Right now I am using "yard wood", scraps from a douglas fir lumber yard to cover the metal beams and insulation in the walls, attaching them to wood studs my husband attached to the steel beams for me.
now that i'm halfway done i am finding this to be easier than face nailing. the pneumatic nailer is a charm!! Everything was in pretty bad condition and really needed to be replaced.
See how we sanded, stained, and finished the floor at, DIY Wide Plank Pine Floors [Part 2- Finishing]. Although we have much more sophisticated installation methods available today, face nailing is still used on some flooring styles.
In answer to how far apart the nails are, we were nailing into the wood floor joists so every 18". Greece Race for the Cure ! Face nailing means that you shoot your nail at a 90 degree angle to the board through the flat (or face) of the board. Each board is different and beautiful, some thicker than others, some wider, pretty rustic but looks great. Attaching steps to stair stringers necessitates face-nailing as well. If glue gets on floor clean it off as soon as possible. i finally decided to hide the nails and nail the wood floor with a pneumatic nailer. They are a pretty close match to the originals. Product can be installed above-grade or on-grade level on a wood-based subfloor. Hi, the whiteboard is lighter weight and will be very soft.
*. Looks fabulous. Your installer will determine which type of nail gun and nail/staple, and their size as part of the installation process. to nail the edge down and help keep the joints tight. It's all up to what looks good to you. , : site . Since the tongues on either side of the room face different ways, the floor will still expand the same amount, but instead of all the growth focusing on one side, half will go to the opposite side. The starting point will often be the longest unbroken line in the room. On 5 & 6 widths use full width (36) approved vapor retarder. You guys are so handy. and the floors' beginning to look neat. This is due to the fact that the glue is applied in a thick layer and it will take time for the glue to cure and set up with the flooring boards in place. It's 12" wide pine planks that were top nailed into the joists. plank harlesden One of the most difficult things about any building or remodeling project isn't so much the work itself but the terminology. groove familyhandyman by HB Tue Apr 25, 2006 8:54 pm, Post unfinished lehmanlane refinish sanding We laid down a layer of this vapor barrierpaper. No, it was not easy, but it was totally do-able if you have some experience. Some popular glues for this method include PL-premium and Loba-Wakol. Browse through all the blog posts over the years, Here is how we installed a DIY wide plank pine floor in our home, using 12" pine boards, This post may contain affiliate links, which means if you make a purchase through them I receive a small percentage at no extra cost to you (. But not cut nails, blacksmith made T head finishing nails. Glue the groove; insert the spline and fasten the piece with the floor nailer. My Simple & Cheap Trick for How to Keep Deer Out of the Garden Naturally, Incredible Church Pew Makeover for our Farmhouse (easy DIY Church Pew Restoration), Fabulous DIY Wooden Arbor for the Garden Patio, How to Spray Paint Patio Furniture like a Pro for less than $50, Moving a Hot Tub with just 2 People (Easy Step by Step Tips for How to Rock Moving a Hot Tub by Yourself), #1 Best Tool for How to Get Rid of Dandelions Naturally in 3 Easy Steps, Fabulous DIY Easy Chandelier Makeover with Spray Paint in 1 Hour, How to Install & Refinish Unfinished Wide Pine Floors (Is DIY Pine Flooring a Good Idea Review 4 Yrs Later), The Best DIY Pallet Sliding Barn Door out of 2 Pallets (Ultimate Easy DIY Pallet Door that Lasts), How to Make Homemade Strawberry Freezer Jam. Once you understand the basics of the technique, you'll find many things surrounding you, other than your floor, are face-nailed too. The most common type of nails to countersink include casing, brad and other types of finish nails. Using random lengths to eliminate any pattern where the boards end, turn each board so that the groove side of the board -- if any -- is against the wall. I love this Dara!! I'm sharing how we installed the floors, the mistakes we made, and the problems we had to overcome. The kitchen and dining areas still had the original linoleum and the rest of the great room had the original carpet. we found our boards at a local lumber yard, not Lowes or HD. Is the fir flooring tongue and groove? The application methods for each of these adhesives will vary depending on the manufacturer, type of wood, subfloor, and installation conditions. the subfloor is plywood over rough pine planks. If you have questions or need guidance on the installation of your new Carlisle floor, speak to your Wide Plank Specialist at 800.595.9663. flooring pine wide nails wagner cg woodworking unfinished building cut hand installed At no additional cost to you, I will earn a small commission if you purchase through them. Get in touch witha Wide Plank Specialist todiscuss the finish options available for the floor you have selected and provide recommendations based on the look you are trying to create. You can use this method for pine, hardwood or reclaimed flooring if your floor was made with a tongue and groove edge, as seen below: This allows you to blind nail the boards through the tongue and apply beads of glue to the back of the boards. t all came together beautifully, and thankfully square to the last board!