{ In this architecture, the first thing is the connectivity of the smart meters with the cloud. Topic format is yourusername/feeds/feedname and click on create. The content of this field is kept private and will not be shown publicly. "); 5. } else { if (mqtt.connected()) { At this stage, AWS Sagemaker is using a trusted data lake for the model training.
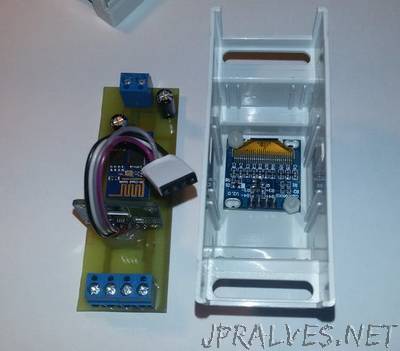
Step 2: Select Electricity Meter and select Subscribe. { delay(10000); unsigned long current_time =0; power meter solar jpralves So, Arduino will read the current sensor value through analog pin and send it to the Wi-Fi module ESP12 using Serial communication. } Adafruit_MQTT_Client mqtt(&client, AIO_SERVER, AIO_SERVERPORT, AIO_USERNAME, AIO_KEY); delay(1000); Be advised that working with mains requires practice and hence do not build this circuit if you are not sure how to do it. endobj Also, change in the IFTTT AdaFruit IO setup. it shows 0. please help, With 15 different sizes, aluform enclosures provide customers a wide range of potential uses. First, we included all the libraries for ESP12Wi-Fi Module and AdaFruit MQTT. Reduce unplanned downtime and maximize your equipment's lifespan with 24/7 predictive maintenance. Submitted by Satish on Sun, 07/29/2018 - 22:28, Thanks for the great content, can you please tell the value of resistor, Submitted by aditya on Mon, 08/06/2018 - 21:50. do we need a voltage regulator for the circuit? AWS IoT core is sending results to the AWS Kinesis Firehose. last_time = current_time; Then we return to the main function. See the MQTT_connect In loop function, we will call sensor.getCurrentAC(); function to get the current value and store in the float variable I. } Today technology has become a necessity How to Building Secure Big Data Platform? Our bill amount may change fast but IFTTT takes time to trigger the applet so these lines will give time for triggering so that we can receive threshold email. }
So, its basically in that 1 second that we are going to store what is the minimum value of the voltage and what is the maximum value of the voltage and the result is difference between the maximum value of the voltage and minimum value of the voltage and multiplied by 5 and divided by 1024 all is used for converting to current and it is related to calibration factor. } bill.publish(bill_amount); Under the VOID SETUP, we are just connecting to the wifi. }. We have tested it on different load conditions like with a 100-watt bulb, with 200-watt Blub, and with 500 watts halogen, etc. This field is not required, but you can write a description ofyour data. if(Serial.available() > 0 ){ ESP has an onboard voltage divider circuit internally, so we are giving direct input from ACS712 output to the A0 input pin. the others version seem me complicated. <>/Border[0 0 0]/P 3 0 R>> } As shown in the picture we have three pins on the module which are Vcc, Vout and Ground respectively. Feed stores the data sent by IFTTT. Along with the graph, the value is also printed on MQTT and it is compared with the serial monitor as shown below. A typically ACS712 Current sensor is shown below. When an electron flows through a wire or path, it creates a magnetic field in its surroundings. After this, a window will pop up where you need to fill your details. This section defines the AdaFruit server and server port which is fixed as io.adafruit.com and 1883 respectively.
if (! char watt[5]; After this, the architecture is divided into four parts: Alerting and Notification, Real-time Results, Analytical dashboard, Predictive results on the dashboard. Step 5: Click onKeybutton and note down the AIO Keys, we will use this key in our code. hey man, I have the same problem. endobj Under the loop, you can see we are going to convert peak voltage to RMS value using the formulae explained above. Serial.write(watt); If you have any questions, feel free to leave them in the comment section below. Serial.print(Irms); Measuring current especially AC current is always a tough task due to the noise coupled with it improper isolation problem etc.
In this project we make a Smart Electricity Energy meter using Arduino and ESP8266 Wi-Fi module which can not only sends you a SMS/Email of your electricity Bill but also you can monitor the energy uses anytime and from anywhere in the world. Serial.println(F("Failed")); delay(2000); SS&|G6{Qyxd2C2qAF&'nhJ{w]M3 K^r2\^lo!~3 9eeg^>YGGpynw)E :vm{1r8+I`@ljzaXKaqz` 0RD-B\1 5w`XbRp40X?3TM_%xTVpl#}iZk Before we start building the project it is very important for us to understand the working of the ACS712 Current sensor as it is the key component of the project. My preocupation is to the level of the MQTT Dashboard android app. Then click on save settings and your account is created. // function definition further below. Setting up an AdaFruit account for storing Electricity meter readings. #include "Adafruit_MQTT_Client.h"
");
The major advantage of using ACS712 Current Sensor is that is can measure both AC and DC current and it also provides isolation between the Load (AC/DC load) and Measuring Unit (Microcontroller part). Let us proceed to the circuit diagram. Wh = Wh+ P *(( current_time -last_time) /3600000.0) ; retries--; Required android app mqtt dashboard link.. above mention link not recognize my playstore. watt1 = atof(watt); 12 0 obj Serial.begin(115200); I have used 4 as my threshold trigger value. What if we can monitor the electricity bill from anywhere on our smartphones?
#define AIO_USERNAME "rjrishabh" I hope you understood the tutorial and built something useful. We have previously done other IoT based Remote Monitoring projects likeTemperature and Humidity Monitoring, Battery Monitoring, Food Monitoring, Air Quality Monitoring, etc. Serial.println("MQTT Connected! // Should be called in the loop function and it will take care if connecting. Thank you in advance, Submitted by Gaurav Singh on Mon, 02/18/2019 - 03:40. We will take help of IFTTT platform to link our Wi-Fi to SMS/E-mail notifications. } // Serial.println(I); You can download it through the library manager or can download it from the below link and add using the import library option on Arduino IDE. Here is the screenshot with zero to 100-watt load conditions on the MQTT IoT platform. } LittelfuseSC1103C-01UTG Bidirectional TVS Diode is fabricated in a proprietary silicon avalanche technology. when you have doubts use the calculators, https://circuitdigest.com/calculators/voltage-divider-calculator, Submitted by adi on Thu, 08/23/2018 - 12:37. i have a 2.2k resistor instead of 2k.when i kept the value of r1=1k and r2=2.2k it gave me a vout of 3.4375 as the input voltage was 5v.and in the above circuit description the node mcu takes upto 3.3v.so is it safe if i use the resistor combination i have for creating voltage divider? 8. void MQTT_connect() { Open the dashboard you just created. { Antennas are designed to offer precise and reliable location information through the use of multi-band GNSS. Step 6: Click on + button to create a new block and click on Gauge to display Energy uses level. } #define AIO_USERNAME "sanu7210" Irms = ((Vrms * 1000) / mVperAmp) ; Serial.println("Retrying MQTT connection in 5 seconds"); Now, we have to link AdaFruit IO to SMS/E-mail using IFTTT. , )) - , , ) , - , , ! delay(500);
<>/Border[0 0 0]/P 3 0 R>> Copyright IoTDesignPro 2021. At last of every month, many of us get worried about the high electricity bill and we have to look at the energy meter once in a while. #define WLAN_PASS "*******************" Serial.println("Retrying MQTT connection in 5 seconds"); We will edit this code according to our AIO keys and Wi-Fi credentials and incoming serial data from the Arduino. Replace these fields with your username and AIO keys which you have copied from AdaFruit site while making the Feed. return result; We will also use MQTT Dashboard Android App to monitor our Energy uses. Search for G-mail and click on it and Login with your g-mail credentials. In loop function, we will check for incoming data from the Arduino and publish this data to AdaFruit IO. for Arduino Uno: Complete Arduino code is given at the end of this tutorial. { dtostrf(Wh, 4, 2, watt); Submitted by jammu on Thu, 05/09/2019 - 18:44, In reply to regarding the above project by adi. First, include library for current sensor as: Make an array to store power for sending it to NodeMCU. Inside this function, we are taking value for 1 second, in that 1 second, we are going to read the value from the sensor, then we are going to calculate the maximum value and the minimum value. <> First, we will include all the library for ESP8266 and Adafruit MQTT. Step 7: Now, Enter Name of Feed and click on Create. monitoring iot health based project diagram block patient system arduino internet things Step 7: Click on +that. For this download the MQTT Dashboard android app from the Play store or from this Link.
photocell.publish(Irms)) After some research, I decided to build a simple one by using a current sensor with NodeMCU and send the measured current valuesto theIoT Cloud Platform. while ((millis() - start_time) < 1000) //sample for 1 Sec if (retries == 0) { 7 0 obj Serial.println(F("Failed")); ACS712 sensor has 4 variants (185mV=5A module,100mV=10A & 66mV for 20A & 30A module) and each variant is rated is for a different current value. 11 0 obj Step 8:In block settings, fill the min. !
Please note that the ASC712 output offset voltage is dependable on its operating voltage (generally half of the operating voltage). This real-time transformed stream is sent to AWS Kinesis Stream. //WiFiClientSecure client; <>/Border[0 0 0]/P 3 0 R>> Hammond's rugged enclosures available in twenty sizes, three colors, and with accessory inner panels. please contact me olej_1118@yahoo.com. By measuring the voltage induced in this coil, we can calculate the current that passed through the wire. Web page addresses and email addresses turn into links automatically. This can be integrated directly with the dashboard. "));
int mVperAmp = 66; //185mV for 5Amp module , 100mV for 10A , 66mv for 20 & 30 Amp module
} We will discuss more on ACS712 working later in this article. The current sensing is done in two ways, namely the Direct sensing method and the indirect sensing method. Previously we have built a Energy Meter circuit which sends you SMS about the bill using GSM module. Setup a feed called 'Power' and bill for publishing to changes. { With a perfectly blended team of Engineers and Journalists, we demystify electronics and its related technologies by providing high value content to our readers. 


