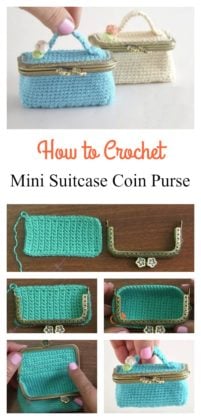
Make a hole, insert the snap. Heres how to make a DIY card and coin purse!
Repeat the same to the other side of the edge. The Pellon 911FF is the perfect weight for sewing zipper pouches, handbags and similar sewing projects. Pin and clip all the sides in place. Using your sewing machine and zipper foot, stitch the zipper to the fabric. Flip the fabric inside out through the gap, then poke the corners nicely, and press the whole fabric. By the way, you need a Leather Chisel tool to punch the stitching holes for sewing. Cut inside the lines so that the pen marks are not on the edge of the pouch. To create this article, 28 people, some anonymous, worked to edit and improve it over time.  wikiHow is a wiki, similar to Wikipedia, which means that many of our articles are co-written by multiple authors. Sew the first crease outline together, then open the front flap, fold the fabric upwards, make sure that the corners are joined together, pin it in place, then sew downwards with a quarter-inch seam allowance. Go gather up those coins!
  I found that using fingers to apply the gum works too. mypatchwork hexy artculo
Punch holes on the Leather Key Pouch as indicated on the template. Press. Once you have your pattern sketched, you can add a 1 box at the bottom corners of your pattern. Time to add the zipper.
Pin in place. This leather purse is approximate 3 x 4, 1/2 bigger than the no-sew leather pouch.  Attach any embellishment to the pouch if it requires some sewing or riveting or clamping. Using an embroidery tread and needle, simply sew the frame onto the purse body on each side. Using a round jar lid, place it on top of the upper corner of the flap and make a side curve. Fold each fabric piece down so the wrong sides are facing each other and straight stitch along the top. Check her other content and follow for more! Whether you want to make a nice gift for your boyfriend or you want a fun weekend project for yourself, wikiHow has a design for whatever you have in mind. Would you like to get in touch? Download and print separately SEWING PATTERN for drawing the leather. Then, use your thumbs to turn it inside out. Coin purses are a nice functional gift or hobby project.
This article has been viewed 44,234 times. It's very simple to sew up too, and makes an ideal sewing project for a beginner. Sew each of the curved edges closed, leaving one side open for turning. }, {
Then try this DIY multipurpose pouch that could work as a coin purse and a cardholder! Sew the opposite inner flap downwards as well. Make sure you do it on the cutting mat or equivalent surface. Place the other outer piece of fabric on top of the zipper right sides of outer fabric facing together. We use cookies to make wikiHow great. Insert the needle to the next hole, as shown in the picture. It is optional and you may do the normal way of threading.1. I used CMC (Sodium Carboxymethyl Cellulose) clear leather burnishing agent. Use a snap tool installer kit and a mallet to secure the top of the snap button in place. You may put a little glue to the end of of the nylon thread if it splits and frays badly.2. This leather coin purse is approximate 3 x 4, 1/2 bigger than the no-sew leather pouch. "id": "7678846",
Open up the purse. Just in case you fell in love with the leather crafts, here are morefree leather patterns for you to make.  Attach a piece of fusible fleece on the wrong side and then fold it in half. The thread is now locked at the eye of the needle. Make sure the top edges of the front panel, zipper tape, and exterior piece are aligned. Flip the exterior fabric to the other side. Position the chisel at 1/8 from the edge of the pouch, with 1 prong at the single-layer area. 2008 - 2022 Craft Passion. It is similar to the stitches created by sewing machine, the tension has to be right to keep the thread crossed inside the leather so that no lumps will show on either side of the leather. Straight stitch to close the opening. Leather the edges with burnishing gum as well. Then on the lower left side of the fabric, make a 10cm (3.9 inches) line across and 8cm (3.1 inches) line down. Press the opening. Craft Passion is a website that offers a multitude of free craft patterns & tutorials. Next, place it on top of the lining fabric with their right sides facing each other. Sew to the piece using a straight stitch. Pull the needle until the thread is about half way the length. }, Inserting the snap closure on the coin purse, 2 Super-Cute DIY Halter Tops to Make For the Perfect Summer Vibes, 8 Summer Looks To Wear With a Wide Brim Hat, Notebook Paper Inspired Teacher Book Bag Tote, How to Make a Quick & Easy DIY Summer Dress From Scratch, How to Make Jeans Tighter Without a Belt - DIY Shoelace Hack, How to Make Fake Nails With Toilet Paper & Baby Powder, How to Bleach Jeans and Update Your Look With a Trendy Floral Design, Make This DIY Ruffle Shirt From An Old TShirt, TAMBOUR EMBROIDERY AND SEWING WITH SILICONE SHEETS, DIY: How to Make Your Own Embroidered Rainbow Baseball Cap, How to Get Big, Supermodel-Esque, '90s Blowout Hair in 5 Easy Steps.
***You can find the ad-free, printable PDF version of this sewing tutorial available for purchase HERE. Make the hole, insert the snap pin, and use the installer kit. coin creativas cremallera purses purl portamonete less purlbee monedero weddbook dekohouse boquilla thetraintocrazy The fruits look like an orange cherry tomato but the taste is quite different, it's almost like a pineapple taste, it's one of those fruits you either love or hate. Include your email address to get a message when this question is answered. purse coin tutorial easy diy purses sewing padded pattern sew patterns zip project bag wallet projects tutorials handbag really jellie
Attach the size of fusible fleece to the flap piece.
Trace the paper template on the flesh side of the leather with ball pen. Once the Physalis peruviana lanterns turn from lime green to a papery cream colour they are ripe and can be picked, or snipped.
interweave The prong goes through both layers of the leather. Growing and caring for Physalis peruviana - aka Cape Gooseberries. Each fruit has a husk which looks like a little paper lantern casing, they're really quite magical, you may have heard them called Chinese Lanterns. Turn right side out. I have an abundance of jean fabric that I can use to make these.
I was able to cut out all 4 layers at once, using my Ginger Scissors. Apply both side edges with fine PVA glueline. Thank you for the idea! wallet snappy sewtimeless homemade rashida nudge iheartlinen typepad Lay one piece with of the lining with the fusible fleece directly on top of this, right sides together. Then, lay the other piece of fabric, also right sides together, sandwiching the sewn coin purse inside. Line up the top edges together including the zip tape, and pin in place. We cover various contents such as sewing, crochet, knitting, kid crafts, upcycling crafts, and more. Scroll through the pics - the mini coin purse tutorial is at the end.
Carefully cut out the leather piece with a pair of strong scissors. coolcreativity Take the other piece of fabric and lay it on the front of the coin purse right sides together. These are so cute! 8mm tall; 7mm base diameter; 6mm stud head diameter, Leather Chisel tool (I used Diamond chisel with 4 prongs of 4mm pitch), CMC (Sodium Carboxymethyl Cellulose) clear leather burnishing agent. Zigzag stitch all around to prevent the fabric from fraying. Push the lining inside the pouch.
2022 The Seasoned Homemaker All Rights Reserved Terms of Use | Privacy Policy | Disclosure, Step 13: Attach the purse body to the metal frame, Qty (1) Fat Quarter Exterior Fabric (I got some crushed velvet from my local fabric store), Qty (1)Fat Quarter Interior Fabric (I used Kona Pink Fabric), Embroidery Thread (8 wt thread works well), Large Eye needle (for attaching the purse to the frame). The completed leather coin pouch that is nicely stitched up and closed with a button stud. handbags Fold the outer fabric and lining fabric down, wrong sides together and straight stitch. My go to brand is Pellon for all my interfacing. If you do not have these tools, you can make a template measuring 5 1/2 inches wide X 4 inches H, pin to your fabric and use sewing scissors to cut out the pieces. Cut a piece for the small tab that is 2 inches by 1 inches. and it can be made to any size.
Pull the fabric sideways then adjust until it is on its right form, just follow the curved flap and make sure its at the top. "alt": "DIY coin purse video", Don't forget to tag @craftpassion so that we can see it.
purse pattern crochet coin wallet easy ravelry patterns dragos kristin pouch purses bag stitches quick change afkomstig bags van beginner It is fully lined using co-ordinating cotton and lightly padded with 2oz wadding. snappy makezine rashida Snip the seam allowance.
Rule of thumb your fabric pieces are 1 1/2 inches wider that the length of your zipper. The purse pattern is simple and easy to sew up (zips are really easy I promise!) On the exterior fabric of the body, measure 1 inches down from the top. Center the purse body inside of the frame. Hammer the chisel to cut the stitching holes. Measure your interfacing fabric with 30cm (11.8 inches) wide and 26cm (10.2 inches) long. Mark the center in the flap where you want to place the snap button. Let me know in the comments if you made it for yourself or as a gift for a special someone! dishtowel By using our site, you agree to our. If you were to use a 7 inch zipper, for example, your fabric should measure 8 1/2 inches wide. Sew the bottom edge together with a 1/4 seam allowance and press open. Topstitch the zipper in place for extra security. snappy rashida monedero This method will help to prevent the short tail from coming off from the eye of the needle. These little purses are so cute and it turns out they are pretty simple to make! "title": "DIY coin purse video", Stitch within of an inch right at the top. Mark. It is perfect to be used as a coin purse and a card pouch. Use the small piece of fabric and fold it into quarters and those quarters into a half. *These amazing images are all credited to Thuy craft via YouTube. Fold the flap sideways to find the center and mark where you want the button to be, puncture a hole in that mark, then do this on the front-most fabric as well, and insert the button snap. If you disable this cookie, we will not be able to save your preferences. Place the lining inside of the exterior of the purse, right sides together. Iron fusible fleece onto the exterior pieces. Unlike the first 2 no-sew leather pouches, this leather coin purse requires some sewing to seam up the sides. "width": 634, Apply a small amount of the burnishing gum to the flesh side or edge of your leather spread evenly then firmly work into the leather with a smooth wooden dowel or piece of scrapper. You will cut out (2) of the exterior and (2) of the interior pieces. Pull the thread through. Purchase the exact same material and tool used in this pattern from Craft Passion Shop. How to Crochet a Blanket (20+ Free & Easy Patterns), Leather scrap (pigment coated finished leather), 7 1/2 x 4. Have you ever wanted to put your sewing skills to practice? You will also need a zipper foot for your sewing machine. Assemble the button stud onto the leather piece.2. Fold the flap piece in half. Change is inevitable, especially in your purse! Lay the flap directly in the center on this mark. This purse is made using a cotton/linen mix fabric, lightly stiffened using lightweight interfacing.
Fold the paper pattern on a folded piece of lining fabric and cut. Email - haptree@gmail.com to get in touch with Hilary You can also find me on Twitter @CraftBlogGrow. Trim away the top curved seam allowance to 1/8 and turn purse right side out.
Hold the end tail side of the thread and align it with the stitch holes. Press with an iron, then do the same to the other flap, open the fabric and fold it in half sideways, make sure that the corners are joined, clip them in place. By signing up you are agreeing to receive emails according to our privacy policy. "youtube_video_id": "Ij2PtStgP7I" Open or unzip the zipper about half way you will need this opening for turning. Face mask sewing pattern & tutorial & video. Taught by the ever-amazing Thuy craft via YouTube, this sewing project was very quick and easy to make, with no sweat. Do you have enough leather projects to do? Otherwise, you can do it later.
This means that every time you visit this website you will need to enable or disable cookies again. Here are the instructions. Place the main fabric with its wrong side up, then place the pattern on top of it, and press the fabrics together with an iron. Leaving a tail of 3 4. This article has been viewed 44,234 times. Here is the third leather project, Leather Coin Purse, I shared in Craft Passion. It doesnt matter if youre a beginner or an expert in sewing because youll end up with an adorable purse either way. However, you can always replace the leather with thick felt, faux leather, PVC leather, and something equivalent you can think of. The plant is of the nightshade family Solanaceae. coin uloen document.getElementById( "ak_js_1" ).setAttribute( "value", ( new Date() ).getTime() ); Can I sell what I make from this pattern? Position the first prong to the last prong of the previous cut, repeat the knock to cut more stitching holes.
This zipper is 4 inches and is measured from the top metal stop to the bottom metal stop as shown above. Place it directly beneath the flap. This cute little padded purse has a useful little tab for clipping inside a larger bag or attaching to a keyring. All rights reserved. I have some nice charms that you might want to consider, Scissors that are able to cut thick fabric, and/or, roller cutter and mat, Tragacanth Leather Burnishing gum and tools (optional), Edge Coat Paint and applicator (optional). You may coat the raw edge with the leather edge coat paint. Open the double lining piece. This is where a good pair of scissors comes in handy. I hope you try making some of these. By using this service, some information may be shared with YouTube. crochet purse coin lining commotion seashell minki This is how I thread the nylon sewing thread. Some extra steps are needed for the coating, you may watch this video from Youtube which I find it very useful. This will give a nice and smooth leather edge that looks professionally done. Pinch the top corner of the flap and make a notch, do this two more times, then repeat on the other side. We are using cookies to give you the best experience on our website. You may do it earlier before gluing the leather or after stitching up.
Fold the tab in half.
The fruits of the plant I had in the first few years were prolific and the plant would grow vigorously almost all year, needing regular chopping back to stop it bursting out through broken panes in the greenhouse. Pinch the zipper so the teeth are facing towards the lining of the pouch and pin in place. wikiHow is where trusted research and expert knowledge come together. As a bonus, Craft Passion also offers an array of delicious recipes that you can cook for your family.
Perfect for yourself or perfect for a gift! Cut around the outer fabrics and leave only about a half-inch seam allowance from the interfacing fabric. Cookie information is stored in your browser and performs functions such as recognising you when you return to our website and helping our team to understand which sections of the website you find most interesting and useful.
Lay the zipper right at the top of the front panel so that the teeth and zipper pull are right sides touching by the flap. Hope that you will have fun making up all these simple leather pouches soon. I love them, they are so beautiful. If you are looking for a more challenging pouch to make and to advance from the no-sew technique, this could be the one you are looking for. Pin in place the zipper should be sandwiched in between the outer fabric piece and the lining fabric piece, right sides together. Screw the round stud head tightly to the screwback to complete.4.
Simple and fun!
Embellishment (optional). This post may contain affiliate links which wont change your price but will share a commission. How To Make A Whimsical DIY Owl Dreamcatcher, 100 DIY Bedroom Decor Ideas | Creative Room Projects, 34 DIY Home Decor Ideas Made With Repurposed Crates, 43 Simple Snacks To Make in Less Than 5 Minutes, 34 DIY Photo Albums To Showcase All Those Pics, 31 Free Printables and Templates for Mason Jars, Visit our friends at DIY Projects for Teens. "showRelated": true % of people told us that this article helped them.
All tip submissions are carefully reviewed before being published. Gather all the materials and tools needed to make this leather coin pouch.Download the Leather Coin Pouch Template and print it out on a card. Fold the zipper pouch coin purse so the outer fabric pieces are right sides together and lining pieces are right sides together. Youre done with an adorable coin purse that is so cute and makes for an excellent gift for someone as well. Lay the tab on the left side of the front panel of the coin purse with the open ends right at the edge. Subscribe and Get the Latest Quilting & Sewing Tutorials! Please leave a comment below or share a photo on Instagram. {"smallUrl":"https:\/\/www.wikihow.com\/images\/thumb\/3\/3d\/Make-a-Coin-Purse-Step-1-Version-2.jpg\/v4-460px-Make-a-Coin-Purse-Step-1-Version-2.jpg","bigUrl":"\/images\/thumb\/3\/3d\/Make-a-Coin-Purse-Step-1-Version-2.jpg\/aid103078-v4-728px-Make-a-Coin-Purse-Step-1-Version-2.jpg","smallWidth":460,"smallHeight":306,"bigWidth":728,"bigHeight":485,"licensing":"
License: Fair Use<\/a> (screenshot) License: Fair Use<\/a> (screenshot) License: Fair Use<\/a> (screenshot) License: Fair Use<\/a> (screenshot) License: Fair Use<\/a> (screenshot) License: Fair Use<\/a> (screenshot) License: Fair Use<\/a> (screenshot) License: Fair Use<\/a> (screenshot) License: Fair Use<\/a> (screenshot) License: Fair Use<\/a> (screenshot) License: Fair Use<\/a> (screenshot) License: Fair Use<\/a> (screenshot) License: Fair Use<\/a> (screenshot) License: Fair Use<\/a> (screenshot) License: Fair Use<\/a> (screenshot) License: Fair Use<\/a> (screenshot) License: Fair Use<\/a> (screenshot) License: Fair Use<\/a> (screenshot) License: Fair Use<\/a> (screenshot) License: Fair Use<\/a> (screenshot) License: Fair Use<\/a> (screenshot) License: Fair Use<\/a> (screenshot) License: Fair Use<\/a> (screenshot) License: Fair Use<\/a> (screenshot)
\n<\/p><\/div>"}, {"smallUrl":"https:\/\/www.wikihow.com\/images\/thumb\/e\/e5\/Make-a-Coin-Purse-Step-2-Version-2.jpg\/v4-460px-Make-a-Coin-Purse-Step-2-Version-2.jpg","bigUrl":"\/images\/thumb\/e\/e5\/Make-a-Coin-Purse-Step-2-Version-2.jpg\/aid103078-v4-728px-Make-a-Coin-Purse-Step-2-Version-2.jpg","smallWidth":460,"smallHeight":306,"bigWidth":728,"bigHeight":485,"licensing":"
\n<\/p><\/div>"}, {"smallUrl":"https:\/\/www.wikihow.com\/images\/thumb\/b\/b1\/Make-a-Coin-Purse-Step-3-Version-2.jpg\/v4-460px-Make-a-Coin-Purse-Step-3-Version-2.jpg","bigUrl":"\/images\/thumb\/b\/b1\/Make-a-Coin-Purse-Step-3-Version-2.jpg\/aid103078-v4-728px-Make-a-Coin-Purse-Step-3-Version-2.jpg","smallWidth":460,"smallHeight":306,"bigWidth":728,"bigHeight":485,"licensing":"
\n<\/p><\/div>"}, {"smallUrl":"https:\/\/www.wikihow.com\/images\/thumb\/d\/d0\/Make-a-Coin-Purse-Step-4-Version-2.jpg\/v4-460px-Make-a-Coin-Purse-Step-4-Version-2.jpg","bigUrl":"\/images\/thumb\/d\/d0\/Make-a-Coin-Purse-Step-4-Version-2.jpg\/aid103078-v4-728px-Make-a-Coin-Purse-Step-4-Version-2.jpg","smallWidth":460,"smallHeight":306,"bigWidth":728,"bigHeight":485,"licensing":"
\n<\/p><\/div>"}, {"smallUrl":"https:\/\/www.wikihow.com\/images\/thumb\/1\/1e\/Make-a-Coin-Purse-Step-5-Version-2.jpg\/v4-460px-Make-a-Coin-Purse-Step-5-Version-2.jpg","bigUrl":"\/images\/thumb\/1\/1e\/Make-a-Coin-Purse-Step-5-Version-2.jpg\/aid103078-v4-728px-Make-a-Coin-Purse-Step-5-Version-2.jpg","smallWidth":460,"smallHeight":303,"bigWidth":728,"bigHeight":480,"licensing":"
\n<\/p><\/div>"}, {"smallUrl":"https:\/\/www.wikihow.com\/images\/thumb\/b\/b2\/Make-a-Coin-Purse-Step-6-Version-2.jpg\/v4-460px-Make-a-Coin-Purse-Step-6-Version-2.jpg","bigUrl":"\/images\/thumb\/b\/b2\/Make-a-Coin-Purse-Step-6-Version-2.jpg\/aid103078-v4-728px-Make-a-Coin-Purse-Step-6-Version-2.jpg","smallWidth":460,"smallHeight":306,"bigWidth":728,"bigHeight":485,"licensing":"
\n<\/p><\/div>"}, {"smallUrl":"https:\/\/www.wikihow.com\/images\/thumb\/c\/c6\/Make-a-Coin-Purse-Step-7-Version-2.jpg\/v4-460px-Make-a-Coin-Purse-Step-7-Version-2.jpg","bigUrl":"\/images\/thumb\/c\/c6\/Make-a-Coin-Purse-Step-7-Version-2.jpg\/aid103078-v4-728px-Make-a-Coin-Purse-Step-7-Version-2.jpg","smallWidth":460,"smallHeight":317,"bigWidth":728,"bigHeight":501,"licensing":"
\n<\/p><\/div>"}, {"smallUrl":"https:\/\/www.wikihow.com\/images\/thumb\/b\/b2\/Make-a-Coin-Purse-Step-8-Version-2.jpg\/v4-460px-Make-a-Coin-Purse-Step-8-Version-2.jpg","bigUrl":"\/images\/thumb\/b\/b2\/Make-a-Coin-Purse-Step-8-Version-2.jpg\/aid103078-v4-728px-Make-a-Coin-Purse-Step-8-Version-2.jpg","smallWidth":460,"smallHeight":310,"bigWidth":728,"bigHeight":490,"licensing":"
\n<\/p><\/div>"}, {"smallUrl":"https:\/\/www.wikihow.com\/images\/thumb\/3\/30\/Make-a-Coin-Purse-Step-9.jpg\/v4-460px-Make-a-Coin-Purse-Step-9.jpg","bigUrl":"\/images\/thumb\/3\/30\/Make-a-Coin-Purse-Step-9.jpg\/aid103078-v4-728px-Make-a-Coin-Purse-Step-9.jpg","smallWidth":460,"smallHeight":306,"bigWidth":728,"bigHeight":485,"licensing":"
\n<\/p><\/div>"}, {"smallUrl":"https:\/\/www.wikihow.com\/images\/thumb\/1\/18\/Make-a-Coin-Purse-Step-10.jpg\/v4-460px-Make-a-Coin-Purse-Step-10.jpg","bigUrl":"\/images\/thumb\/1\/18\/Make-a-Coin-Purse-Step-10.jpg\/aid103078-v4-728px-Make-a-Coin-Purse-Step-10.jpg","smallWidth":460,"smallHeight":310,"bigWidth":728,"bigHeight":491,"licensing":"
\n<\/p><\/div>"}, {"smallUrl":"https:\/\/www.wikihow.com\/images\/thumb\/c\/cd\/Make-a-Coin-Purse-Step-11.jpg\/v4-460px-Make-a-Coin-Purse-Step-11.jpg","bigUrl":"\/images\/thumb\/c\/cd\/Make-a-Coin-Purse-Step-11.jpg\/aid103078-v4-728px-Make-a-Coin-Purse-Step-11.jpg","smallWidth":460,"smallHeight":320,"bigWidth":728,"bigHeight":506,"licensing":"
\n<\/p><\/div>"}, {"smallUrl":"https:\/\/www.wikihow.com\/images\/thumb\/c\/c1\/Make-a-Coin-Purse-Step-12.jpg\/v4-460px-Make-a-Coin-Purse-Step-12.jpg","bigUrl":"\/images\/thumb\/c\/c1\/Make-a-Coin-Purse-Step-12.jpg\/aid103078-v4-728px-Make-a-Coin-Purse-Step-12.jpg","smallWidth":460,"smallHeight":317,"bigWidth":728,"bigHeight":502,"licensing":"
\n<\/p><\/div>"}, {"smallUrl":"https:\/\/www.wikihow.com\/images\/thumb\/3\/3b\/Make-a-Coin-Purse-Step-13.jpg\/v4-460px-Make-a-Coin-Purse-Step-13.jpg","bigUrl":"\/images\/thumb\/3\/3b\/Make-a-Coin-Purse-Step-13.jpg\/aid103078-v4-728px-Make-a-Coin-Purse-Step-13.jpg","smallWidth":460,"smallHeight":306,"bigWidth":728,"bigHeight":485,"licensing":"
\n<\/p><\/div>"}, {"smallUrl":"https:\/\/www.wikihow.com\/images\/thumb\/e\/ea\/Make-a-Coin-Purse-Step-14.jpg\/v4-460px-Make-a-Coin-Purse-Step-14.jpg","bigUrl":"\/images\/thumb\/e\/ea\/Make-a-Coin-Purse-Step-14.jpg\/aid103078-v4-728px-Make-a-Coin-Purse-Step-14.jpg","smallWidth":460,"smallHeight":324,"bigWidth":728,"bigHeight":513,"licensing":"
\n<\/p><\/div>"}, {"smallUrl":"https:\/\/www.wikihow.com\/images\/thumb\/1\/17\/Make-a-Coin-Purse-Step-15.jpg\/v4-460px-Make-a-Coin-Purse-Step-15.jpg","bigUrl":"\/images\/thumb\/1\/17\/Make-a-Coin-Purse-Step-15.jpg\/aid103078-v4-728px-Make-a-Coin-Purse-Step-15.jpg","smallWidth":460,"smallHeight":306,"bigWidth":728,"bigHeight":485,"licensing":"
\n<\/p><\/div>"}, {"smallUrl":"https:\/\/www.wikihow.com\/images\/thumb\/6\/6e\/Make-a-Coin-Purse-Step-16.jpg\/v4-460px-Make-a-Coin-Purse-Step-16.jpg","bigUrl":"\/images\/thumb\/6\/6e\/Make-a-Coin-Purse-Step-16.jpg\/aid103078-v4-728px-Make-a-Coin-Purse-Step-16.jpg","smallWidth":460,"smallHeight":306,"bigWidth":728,"bigHeight":485,"licensing":"
\n<\/p><\/div>"}, {"smallUrl":"https:\/\/www.wikihow.com\/images\/thumb\/7\/70\/Make-a-Coin-Purse-Step-17.jpg\/v4-460px-Make-a-Coin-Purse-Step-17.jpg","bigUrl":"\/images\/thumb\/7\/70\/Make-a-Coin-Purse-Step-17.jpg\/aid103078-v4-728px-Make-a-Coin-Purse-Step-17.jpg","smallWidth":460,"smallHeight":306,"bigWidth":728,"bigHeight":485,"licensing":"
\n<\/p><\/div>"}, {"smallUrl":"https:\/\/www.wikihow.com\/images\/thumb\/e\/ef\/Make-a-Coin-Purse-Step-18.jpg\/v4-460px-Make-a-Coin-Purse-Step-18.jpg","bigUrl":"\/images\/thumb\/e\/ef\/Make-a-Coin-Purse-Step-18.jpg\/aid103078-v4-728px-Make-a-Coin-Purse-Step-18.jpg","smallWidth":460,"smallHeight":306,"bigWidth":728,"bigHeight":485,"licensing":"
\n<\/p><\/div>"}, {"smallUrl":"https:\/\/www.wikihow.com\/images\/thumb\/f\/f9\/Make-a-Coin-Purse-Step-19.jpg\/v4-460px-Make-a-Coin-Purse-Step-19.jpg","bigUrl":"\/images\/thumb\/f\/f9\/Make-a-Coin-Purse-Step-19.jpg\/aid103078-v4-728px-Make-a-Coin-Purse-Step-19.jpg","smallWidth":460,"smallHeight":306,"bigWidth":728,"bigHeight":485,"licensing":"
\n<\/p><\/div>"}, {"smallUrl":"https:\/\/www.wikihow.com\/images\/thumb\/a\/a7\/Make-a-Coin-Purse-Step-20.jpg\/v4-460px-Make-a-Coin-Purse-Step-20.jpg","bigUrl":"\/images\/thumb\/a\/a7\/Make-a-Coin-Purse-Step-20.jpg\/aid103078-v4-728px-Make-a-Coin-Purse-Step-20.jpg","smallWidth":460,"smallHeight":306,"bigWidth":728,"bigHeight":485,"licensing":"
\n<\/p><\/div>"}, {"smallUrl":"https:\/\/www.wikihow.com\/images\/thumb\/3\/34\/Make-a-Coin-Purse-Step-21.jpg\/v4-460px-Make-a-Coin-Purse-Step-21.jpg","bigUrl":"\/images\/thumb\/3\/34\/Make-a-Coin-Purse-Step-21.jpg\/aid103078-v4-728px-Make-a-Coin-Purse-Step-21.jpg","smallWidth":460,"smallHeight":302,"bigWidth":728,"bigHeight":478,"licensing":"
\n<\/p><\/div>"}, {"smallUrl":"https:\/\/www.wikihow.com\/images\/thumb\/0\/06\/Make-a-Coin-Purse-Step-22.jpg\/v4-460px-Make-a-Coin-Purse-Step-22.jpg","bigUrl":"\/images\/thumb\/0\/06\/Make-a-Coin-Purse-Step-22.jpg\/aid103078-v4-728px-Make-a-Coin-Purse-Step-22.jpg","smallWidth":460,"smallHeight":306,"bigWidth":728,"bigHeight":485,"licensing":"
\n<\/p><\/div>"}, {"smallUrl":"https:\/\/www.wikihow.com\/images\/thumb\/2\/27\/Make-a-Coin-Purse-Step-23.jpg\/v4-460px-Make-a-Coin-Purse-Step-23.jpg","bigUrl":"\/images\/thumb\/2\/27\/Make-a-Coin-Purse-Step-23.jpg\/aid103078-v4-728px-Make-a-Coin-Purse-Step-23.jpg","smallWidth":460,"smallHeight":306,"bigWidth":728,"bigHeight":485,"licensing":"
\n<\/p><\/div>"}, {"smallUrl":"https:\/\/www.wikihow.com\/images\/thumb\/0\/0e\/Make-a-Coin-Purse-Step-24.jpg\/v4-460px-Make-a-Coin-Purse-Step-24.jpg","bigUrl":"\/images\/thumb\/0\/0e\/Make-a-Coin-Purse-Step-24.jpg\/aid103078-v4-728px-Make-a-Coin-Purse-Step-24.jpg","smallWidth":460,"smallHeight":326,"bigWidth":728,"bigHeight":516,"licensing":"
\n<\/p><\/div>"}, {"smallUrl":"https:\/\/www.wikihow.com\/images\/thumb\/b\/b8\/Make-a-Coin-Purse-Step-25.jpg\/v4-460px-Make-a-Coin-Purse-Step-25.jpg","bigUrl":"\/images\/thumb\/b\/b8\/Make-a-Coin-Purse-Step-25.jpg\/aid103078-v4-728px-Make-a-Coin-Purse-Step-25.jpg","smallWidth":460,"smallHeight":306,"bigWidth":728,"bigHeight":485,"licensing":"