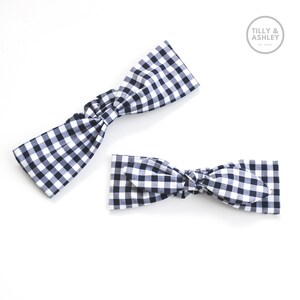
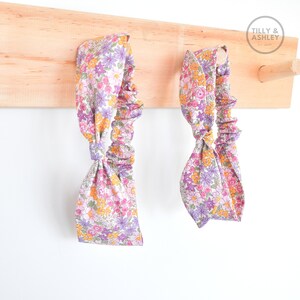
This twisted headband pattern is fun to sew. Sew the elastic tube: Fold the fabric strip for the tube in half, right sides together and sew along the edge using a 1/4" seam allowance (-- yellow line--). Love this pattern, but the only way I could get it to work was to turn the first strip the right way out after step 7. The one most commonly use for headbands is 3/8", but some like a thin 1/8" headband, especially for babies.  So its fun to add a cute accessory to make a messy topknot or ponytail look more intentional and a great way to show off your cute fabric! We use cookies to make wikiHow great. Sometimes you just need a simple, no frills headband to use on your run or to pull back your hair to wash your face! When Im not chasing kids you can find me at my sewing table or daydreaming up new designs. 9. You sure you want to checkout without a gift? Hello You Designs. By using this service, some information may be shared with YouTube. Finally, bring the ends together and connect them using hot glue or by sewing them together. I used a medium weight cotton, but any cotton will do.
This website uses cookies to ensure you get the best experience on our website. wikiHow, Inc. is the copyright holder of this image under U.S. and international copyright laws. Share your makes in our Facebook group or on instagram with the #madamsew hashtag and inspire others! This image is not<\/b> licensed under the Creative Commons license applied to text content and some other images posted to the wikiHow website. ravelry headband Making an elastic headband yourself will ensure you get the perfect fit for your head and your style. Now you have a hairband which can hold any decoration you have on a clip by sliding it through the loop and clipping it in place. 4 long, if very stretchy elastic, you can make it shorter. Baste the pleats in place. Came out perfect.
Debbie Colgrove is an award-winning seamstress and tailor who shares her knowledge with beginner sewers on how to work with patterns and fabrics. Wear it as you want: twist to the side, over the forehead, or to pull your hair back. Mark both large fabric strips as shown in the picture: Place a mark: To view the free version, go to: https://www.caabcrochet.com/easy-elastic-crochet-headband/, 32 Yards Size 4 Yarn (I used Lion Brand Pima Cotton) 32 Yards of 1 mm Elastic Bracelet String (I used Paxcoo) US H/ 5.0 mm Crochet Hook Yarn Needle Scissors, 18 circumference (teen/adult small) Instructions for modifying size included, (ch) chain (sl st) slip stitch (fsc) foundation single crochet (sc) single crochet (dc) double crochet, https://www.caabcrochet.com/easy-elastic-crochet-headband/. Clip a safety pin to the end of the tube and turn it right sides out. This image may not be used by other entities without the express written consent of wikiHow, Inc.
\n<\/p>
\n<\/p><\/div>"}, {"smallUrl":"https:\/\/www.wikihow.com\/images\/thumb\/8\/8d\/Make-an-Elastic-Headband-Step-11.jpeg\/v4-460px-Make-an-Elastic-Headband-Step-11.jpeg","bigUrl":"\/images\/thumb\/8\/8d\/Make-an-Elastic-Headband-Step-11.jpeg\/aid263094-v4-728px-Make-an-Elastic-Headband-Step-11.jpeg","smallWidth":460,"smallHeight":345,"bigWidth":728,"bigHeight":546,"licensing":"
\u00a9 2022 wikiHow, Inc. All rights reserved.
My name is Kate, a twenty something fashion lover and mother of two. This image is not<\/b> licensed under the Creative Commons license applied to text content and some other images posted to the wikiHow website. She has over 40 years experience and has been writing and authoring books for two decades. Flip main fabric piece around and repeat the steps to attach the other end of the elastic. This image is not<\/b> licensed under the Creative Commons license applied to text content and some other images posted to the wikiHow website. See our privacy policy here. To learn how to add adornments to your elastic headband, scroll down! Choices to make Your email address will not be published. You may share 1 photo and up to 3 lines of text, under the condition that proper credit is given to, Scattered Thoughts of a Crafty Mom is a participant in the Amazon Services LLC Associates Program, an affiliate advertising program designed to provide a means forsites to, earn advertising fees by advertising and linking to Amazon.com. lastrafashion Its fun to play with fabric this way and youll love making these! Learn more about our. By signing up you are agreeing to receive emails according to our privacy policy. This category only includes cookies that ensures basic functionalities and security features of the website. 7. Using a safety pin, thread the elastic that is connected to the headband through the elastic cover tube. Sew across the edges to finish the headband. https://www.byregion.net/cgibin/users/articles_viewer.pl?id=4668, https://www.youtube.com/watch?v=RM7Fb75WLs4&feature=youtu.be&t=63, https://www.youtube.com/watch?v=IyLC4pIg_-o&feature=youtu.be&t=151, https://www.youtube.com/watch?v=RM7Fb75WLs4&feature=youtu.be&t=102. We take your privacy seriously. Constricting an infant's head could have a problematic effect on its growth and development. Your email address will not be published. This image is not<\/b> licensed under the Creative Commons license applied to text content and some other images posted to the wikiHow website. Dont forget to add inch for the seam allowance. Match up the raw edges of the second loop. How to Make Your Own Wrist and Ankle Weights, Sew Your Own Duvet Covers with These Directions, How to Sew a Gathered Dress With Elastic Thread, Sew Fleece Christmas Stockings for Easy Holiday Decor, How to Sew a Simple Towel Robe or Beach Cover-Up, Sewing a Mitered Quilt Binding Is Easy With This Tutorial, Learn How to Sew a Pillowcase With This Free Tutorial. An expandable headband is a versatile hair accessory that can be worn in multiple ways. It has nicely finished edges and no opening between the 2 straps. I hope that helps! Now try it on! Turn under 1/8 inch again to enclose the raw edge, and press it in place. My hair is pretty straight so this happens to me too! wikiHow, Inc. is the copyright holder of this image under U.S. and international copyright laws. Get peace of mind with Delivery Guarantee in the event of your delivery is damaged, stolen or lost during transit. The best part is you can customize the fabric to your style and coordinate it with certain outfits. Hand Sewing Basics: Single or Double Thread, 5 FREE - Beginner Friendly Sewing Project Patterns, 1/3 yard of fabric or a piece of 28 inch x 12 inch, Sewing machine, needle, matching threads, ruler, scissors or mat+rotary cutter, pins, For an adult head (23): cut 2 strips of 18, For a child (21): cut 2 strips of 16.
crochet headband diy lace elastic hairband bit Trim the edges and tape together. Is that correct? So I decided to make her one. Truly amazing! This image is not<\/b> licensed under the Creative Commons license applied to text content and some other images posted to the wikiHow website. Be sure to line up the pin so that it is not lopsided on the headband. . Then cut your elastic as well. These headbands make great personalized gifts, too. I still find it so cool that you can choose your own material and personalise what you make #ilovesewing . All tip submissions are carefully reviewed before being published. This image may not be used by other entities without the express written consent of wikiHow, Inc.
\n<\/p>
\n<\/p><\/div>"}, {"smallUrl":"https:\/\/www.wikihow.com\/images\/thumb\/3\/35\/Make-an-Elastic-Headband-Step-9.jpeg\/v4-460px-Make-an-Elastic-Headband-Step-9.jpeg","bigUrl":"\/images\/thumb\/3\/35\/Make-an-Elastic-Headband-Step-9.jpeg\/aid263094-v4-728px-Make-an-Elastic-Headband-Step-9.jpeg","smallWidth":460,"smallHeight":345,"bigWidth":728,"bigHeight":546,"licensing":"
\u00a9 2022 wikiHow, Inc. All rights reserved. Sew the elastic to the pleated ends of the expandable section, keeping the seam on the wrong side of the expandable section. Calculation for your head: circumference - 5 inches = length of 1 strip Align the turned-under edges of the fabric tube, so they are even. If you dont have a model at hand, you can use these measurements: 2. Next, pleat the 12-inchedge by making small fan folds until the edge is 1 inch wide. Why do I always end with the seams showing on the last panel of the headband.
How to Sew a Mug Cozy with Free Pattern to Keep Your Drink Warm! Then pull the elastic cover over the stitching with the edge of the tube still folded over and sew in place. Place the elastic on top of the raw edges overlapping about 3/8. It took me a while to figure out how I had to sew the pieces together. This image may not be used by other entities without the express written consent of wikiHow, Inc.
\n<\/p>
\n<\/p><\/div>"}, {"smallUrl":"https:\/\/www.wikihow.com\/images\/thumb\/e\/e5\/Make-an-Elastic-Headband-Step-5.jpeg\/v4-460px-Make-an-Elastic-Headband-Step-5.jpeg","bigUrl":"\/images\/thumb\/e\/e5\/Make-an-Elastic-Headband-Step-5.jpeg\/aid263094-v4-728px-Make-an-Elastic-Headband-Step-5.jpeg","smallWidth":460,"smallHeight":345,"bigWidth":728,"bigHeight":546,"licensing":"
\u00a9 2022 wikiHow, Inc. All rights reserved. 3: From the middle 1 to the right on the raw edge This image may not be used by other entities without the express written consent of wikiHow, Inc.
\n<\/p>
\n<\/p><\/div>"}. Its a great scrapbuster sewing pattern and only requires a little bit of elastic. Turn under about 1/2 of the elastic cover tubes ends. 3. If you are making the high volume headband, fold the pieces over the elastic and clip in place. This image may not be used by other entities without the express written consent of wikiHow, Inc.
\n<\/p>
\n<\/p><\/div>"}, {"smallUrl":"https:\/\/www.wikihow.com\/images\/thumb\/1\/1d\/Make-an-Elastic-Headband-Step-7.jpeg\/v4-460px-Make-an-Elastic-Headband-Step-7.jpeg","bigUrl":"\/images\/thumb\/1\/1d\/Make-an-Elastic-Headband-Step-7.jpeg\/aid263094-v4-728px-Make-an-Elastic-Headband-Step-7.jpeg","smallWidth":460,"smallHeight":345,"bigWidth":728,"bigHeight":546,"licensing":"
\u00a9 2022 wikiHow, Inc. All rights reserved. Out of these cookies, the cookies that are categorized as necessary are stored on your browser as they are as essential for the working of basic functionalities of the website. Unsubscribe at any time. Keep the first strip inside this one. 10. flyaway comfortably californianas This image may not be used by other entities without the express written consent of wikiHow, Inc.
\n<\/p>
\n<\/p><\/div>"}, {"smallUrl":"https:\/\/www.wikihow.com\/images\/thumb\/e\/e4\/Make-an-Elastic-Headband-Step-6.jpeg\/v4-460px-Make-an-Elastic-Headband-Step-6.jpeg","bigUrl":"\/images\/thumb\/e\/e4\/Make-an-Elastic-Headband-Step-6.jpeg\/aid263094-v4-728px-Make-an-Elastic-Headband-Step-6.jpeg","smallWidth":460,"smallHeight":345,"bigWidth":728,"bigHeight":546,"licensing":"
\u00a9 2022 wikiHow, Inc. All rights reserved. If you want a wide headband with a finished width of 5, make the strips 5 1/2 wide. ravelry headband This image may not be used by other entities without the express written consent of wikiHow, Inc.
\n<\/p>
\n<\/p><\/div>"}, {"smallUrl":"https:\/\/www.wikihow.com\/images\/thumb\/c\/c8\/Make-an-Elastic-Headband-Step-2.jpeg\/v4-460px-Make-an-Elastic-Headband-Step-2.jpeg","bigUrl":"\/images\/thumb\/c\/c8\/Make-an-Elastic-Headband-Step-2.jpeg\/aid263094-v4-728px-Make-an-Elastic-Headband-Step-2.jpeg","smallWidth":460,"smallHeight":345,"bigWidth":728,"bigHeight":546,"licensing":"
\u00a9 2022 wikiHow, Inc. All rights reserved. You can also sew the ends together. To make an elastic headband, start by measuring your head with a flexible tape measure, starting at the nape of your neck and wrapping the tape measure around where you want your headband to rest. wikiHow is where trusted research and expert knowledge come together. And then I made one for myself and one for a friend and now Im sharing the pattern and this tutorial with you and hope you will have fun making and wearing your headband. Press tubes flat with the seam allowances on the back. {"smallUrl":"https:\/\/www.wikihow.com\/images\/thumb\/5\/55\/Make-an-Elastic-Headband-Step-1.jpeg\/v4-460px-Make-an-Elastic-Headband-Step-1.jpeg","bigUrl":"\/images\/thumb\/5\/55\/Make-an-Elastic-Headband-Step-1.jpeg\/aid263094-v4-728px-Make-an-Elastic-Headband-Step-1.jpeg","smallWidth":460,"smallHeight":345,"bigWidth":728,"bigHeight":546,"licensing":"
\u00a9 2022 wikiHow, Inc. All rights reserved. To learn how to add adornments to your elastic headband, scroll down! Just attach the pin to 1 edge, 1 layer of fabric, put it through the tube and pull. headbands Sew Your Own Reversible Two-Piece Swimsuit! Chat with a real person to answer your questions. I made these headbands with my new fabric line, SPOTTED!
Thanks to all authors for creating a page that has been read 126,720 times.
Some elastic is made with silicone strips in the back. headband elastic leopard animal You can find them here. How to Sew a Collar and Cuffs for a Clown Costume, How to Sew a Tote Bag With a Recessed Zipper, Sew a Foldover Backpack With This Free Pattern. This image may not be used by other entities without the express written consent of wikiHow, Inc.
\n<\/p>
\n<\/p><\/div>"}, {"smallUrl":"https:\/\/www.wikihow.com\/images\/thumb\/8\/88\/Make-an-Elastic-Headband-Step-4-Version-2.jpeg\/v4-460px-Make-an-Elastic-Headband-Step-4-Version-2.jpeg","bigUrl":"\/images\/thumb\/8\/88\/Make-an-Elastic-Headband-Step-4-Version-2.jpeg\/aid263094-v4-728px-Make-an-Elastic-Headband-Step-4-Version-2.jpeg","smallWidth":460,"smallHeight":345,"bigWidth":728,"bigHeight":546,"licensing":"
\u00a9 2022 wikiHow, Inc. All rights reserved. I used it as a pattern to create a one that fits better. Now take the other strip and pull it through the opening you just created stitching strip 1. You can find an anti fray solution at a sewing store or in the glue section of a craft store. Turn the fabric tube right side out, and press with the seam centered on one side of the tube. Questions or suggestions? You know, the headbands that give you a headache. Wonderful instructions too. Adjust the sizes by using more or less elastic. Include your email address to get a message when this question is answered. But opting out of some of these cookies may have an effect on your browsing experience. Look for a fray-stop spray at your local fabric store and spray both ends of your elastic. Pin and sew side A to B and C to D, right sides facing. Fold the edge of the larger fabric piece over as shown in the picture, pin in place. Press to the inside of the tube. Beginner sewers can easily make their own expandable headband, and the project should only take around an hour. We Pay Shipping on All Orders Over $40.00, Safe and Secure Delivery in 2-5 Business Days. Customers using ShopPay may see the Shipping Insurance being processed as a separate order! Apply a seam finish, and press. wikiHow, Inc. is the copyright holder of this image under U.S. and international copyright laws. This image may not be used by other entities without the express written consent of wikiHow, Inc.
\n<\/p>
\n<\/p><\/div>"}, {"smallUrl":"https:\/\/www.wikihow.com\/images\/thumb\/5\/5c\/Make-an-Elastic-Headband-Step-3-Version-2.jpeg\/v4-460px-Make-an-Elastic-Headband-Step-3-Version-2.jpeg","bigUrl":"\/images\/thumb\/5\/5c\/Make-an-Elastic-Headband-Step-3-Version-2.jpeg\/aid263094-v4-728px-Make-an-Elastic-Headband-Step-3-Version-2.jpeg","smallWidth":460,"smallHeight":345,"bigWidth":728,"bigHeight":546,"licensing":"
\u00a9 2022 wikiHow, Inc. All rights reserved. Your twisted headband is done! Tie a knot to secure the stitches. See our privacy policy here. Learn more Elastic based headbands are flexible and useful for keeping hair in place and off your face. A portion of the headband has encased elastic while the rest is pleated fabric. The twist headband is made with two pieces of fabric that loop in the middle, creating a little knot. turban 6. The fabric featured in this tutorial is Spotted Leopard in Tan. The headband can be worn opened out to create a wider style or you can smush it narrower. Interested? elvira headbands craftgossip Wow! Yes, you may curl your hair while wearing an elastic headband. This pattern has an stretchy back, it will not slide off your head. You can also use knits, jersey or a viscose blend. What am I doing wrong? To seal the ends with heat, quickly pass the ends through a flame to singe them. Leave the elastic exposed on each end and the fabric bunched in the center of the elastic. Trim excess fabric and flip around the fabric, hiding the raw edge inside. wikiHow, Inc. is the copyright holder of this image under U.S. and international copyright laws. Copyright 2022 See Kate Sew All Rights Reserved Privacy Policy Site Design by Emily White Designs, Mountain Town and More Mountain Quilt Patterns, 8a918f8da8e0e69102dc0f33a718de85a99c31a57283e0e3e2, View the Spotted Storyboard from Riley Blake, easy baby dress pattern for the summertime, modern ombre + b/w triangle quilt tutorial + pattern, Woven cotton fabric, such as quilting cotton, Pattern pieces, sign up to get the printable below. Thread the other main headband piece through the loop you made with the first one, keeping the seam allowance side to the inside of the fabric. This image is not<\/b> licensed under the Creative Commons license applied to text content and some other images posted to the wikiHow website. Turn the ends of the fabric tube in approximately 1/4 inch to enclose the raw edges. wikiHow, Inc. is the copyright holder of this image under U.S. and international copyright laws. You read and agreed to our Privacy Policy, This website uses cookies to improve your experience while you navigate through the website. Experiment with different sizes of elastic to see which you like most, or just to vary the styles you wear. We also use third-party cookies that help us analyze and understand how you use this website. Once you secure the ends, you can put the headband on and slide the decoration into the proper place. This image is not<\/b> licensed under the Creative Commons license applied to text content and some other images posted to the wikiHow website. 2: From the middle: 1 inch to the left on the raw edge I cut them 6 wide, but you can choose the width you like. Cut out 1 headband back and 2 main fabric pieces. And Im still curious about what you are making! Wait 30 minutes for the glue to dry completely before. This easy elastic crochet headband pattern is the perfect solution! wikiHow, Inc. is the copyright holder of this image under U.S. and international copyright laws. Take the 11 inch-by-3 inch piece of fabric, and fold it lengthwise to align the 11-inch edges with the wrong sides together. The small will fit kids and the large will fit adults. I took apart the store bought headband. Have you tried these threaders yet? Followed your instructions for the turban headband. An Pull the end of the tube up over the elastic that is sewn to the headband piece. For more info, read full, Girls A-line Knit Play Shorts Pattern (size 2 to 12), Fabric piece 1: 16 inches by 6 1/4 inches, Fabric piece 2: 10 1/2 inches by 2 3/4 inches. By using our site, you agree to our. Sage themebyRestored 316. Since I have this fantastic elastic, I dont have to worry anymore about having a stock of different widths. Stitch the 1/8-inch hem in place, sewing as close to the inner edge fold as possible. elastic % of people told us that this article helped them. Fold all three fabric pieces in half lengthwise and sew the long edge with a 1/4 seam allowance. Please note, comments must be approved before they are published, Order by phone Monday through Friday 9-5 est time. Welcome to See Kate Sew! You can also glue flowers or other decorations to a clip if they are not already fixed to one. This image is not<\/b> licensed under the Creative Commons license applied to text content and some other images posted to the wikiHow website. Thread the elastic through the tube with a threader or a safety pin.
Flip the tube right side out. Then, cut a piece of fold-over elastic to fit around your head, and seal the cut ends of the elastic using the flame from a lighter. Plus, because the headband doesn't require much fabric, you might be able to use fabric scraps or pick up something from the clearance rack for a cost-effective approach. Now, take your 12 inch-by-15 inch piece of fabric. wikiHow, Inc. is the copyright holder of this image under U.S. and international copyright laws. My headbands always slip around on the back of my head or dont stay in place. 1. Fold one of the headband main tubes in half and match the short edges together with the seam allowance facing the inside.
Thread a needle with a thread that matches your elastic and put a few stitches through the overlapped ends. Make a loop and sew side A to side B and side C to side D. It difficult to stitch all the way to the corners (finished edge) near the stitching you did in the previous step, Its ok to have a very small opening. You also have the option to opt-out of these cookies. It wont be seen once the headband is worn. Secure each end with a pin and sew a quick basting stitch to hold the elastic in place. This website uses cookies to improve your experience. Your instructions are too good. Choose either low or high volume for a different style. This image may not be used by other entities without the express written consent of wikiHow, Inc.
\n<\/p>
\n<\/p><\/div>"}, {"smallUrl":"https:\/\/www.wikihow.com\/images\/thumb\/9\/9a\/Make-an-Elastic-Headband-Step-8.jpeg\/v4-460px-Make-an-Elastic-Headband-Step-8.jpeg","bigUrl":"\/images\/thumb\/9\/9a\/Make-an-Elastic-Headband-Step-8.jpeg\/aid263094-v4-728px-Make-an-Elastic-Headband-Step-8.jpeg","smallWidth":460,"smallHeight":345,"bigWidth":728,"bigHeight":546,"licensing":"
\u00a9 2022 wikiHow, Inc. All rights reserved. Cut the strip that will cover the elastic & cut the elastic. Pin in place.
This image is not<\/b> licensed under the Creative Commons license applied to text content and some other images posted to the wikiHow website. They are really practical because the elastic wont twist or snag, especially if youre inserting elastic into a long casing. The glue will be very hot. We've updated our Privacy Policy, which will go in to effect on September 1, 2022. 8. If youre new here, sign up formy email newsletterfor access to free patterns, tutorials and all the latest sewing news! These cookies will be stored in your browser only with your consent. 3 w by 10 1/5 long (tapered into a V at the ends). You can use clear nail polish if you can't get an anti fray solution. You can open the fabric to wear as a wide hair wrap, scrunch it to be a thin headband, or position it somewhere in between.